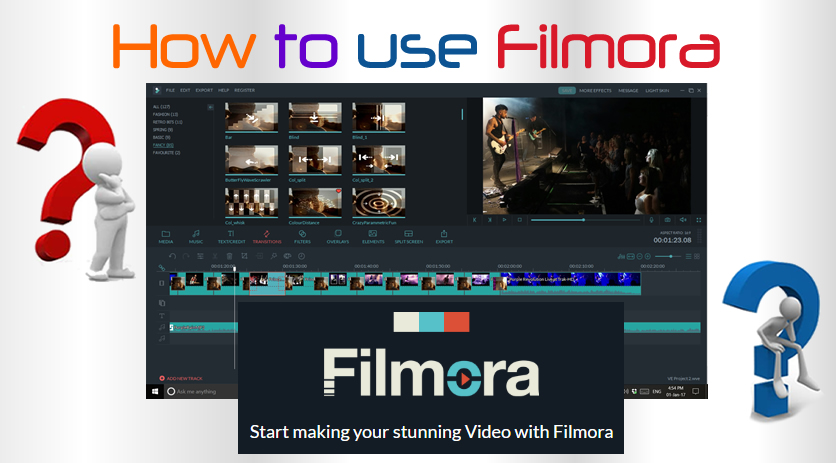
Filmora is an easy to use but very powerful video editor made by Wondershare.
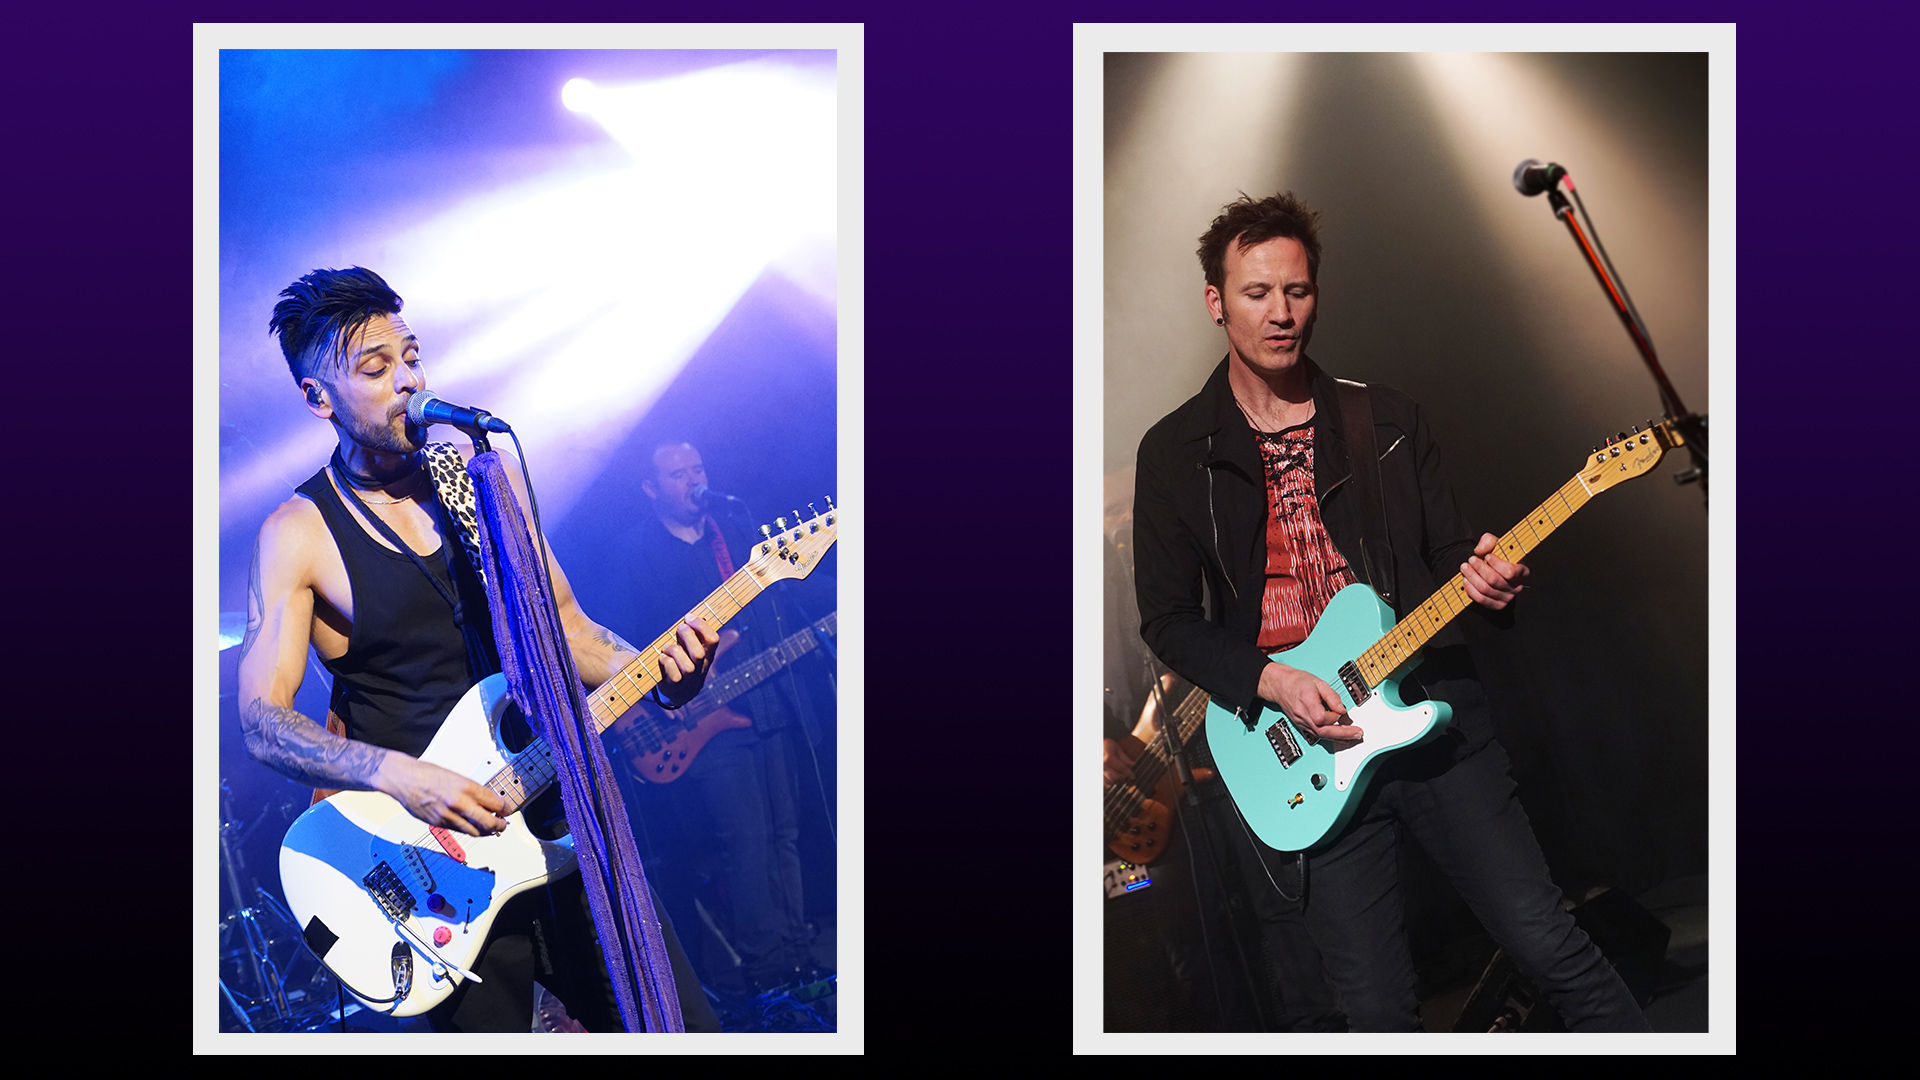
Recently we purchased and tried out the “Wondershare Filmora” Video editor for a combination Music Video / Photo Slideshow project.
It was so much easier than editing in Adobe Premiere and has some great built in effects. These effects would be extremely time consuming to make in Adobe After Effects, but in Filmora they are incorporated into your video with just a couple of simple clicks.
The output H.264 MP4 HD 1920×1080 Quality was sufficiently crisp and clear. The only issue we had was that our sountrack got slightly out of sync with some singing in the video, even though it was perfectly matched when played in the editor. Perhaps some of the effects we added cause some frames to be altered or removed during the rendering process. Our frame rate of the video footage was 25fps, and we set our project also at 25fps but still had the slight syncing issue in the output.
Here is our final Filmora Video Slideshow (click on Settings and watch at 1080p HD for best results).
In this lesson we fully cover Filmora and how it can be used to make videos and slide shows.
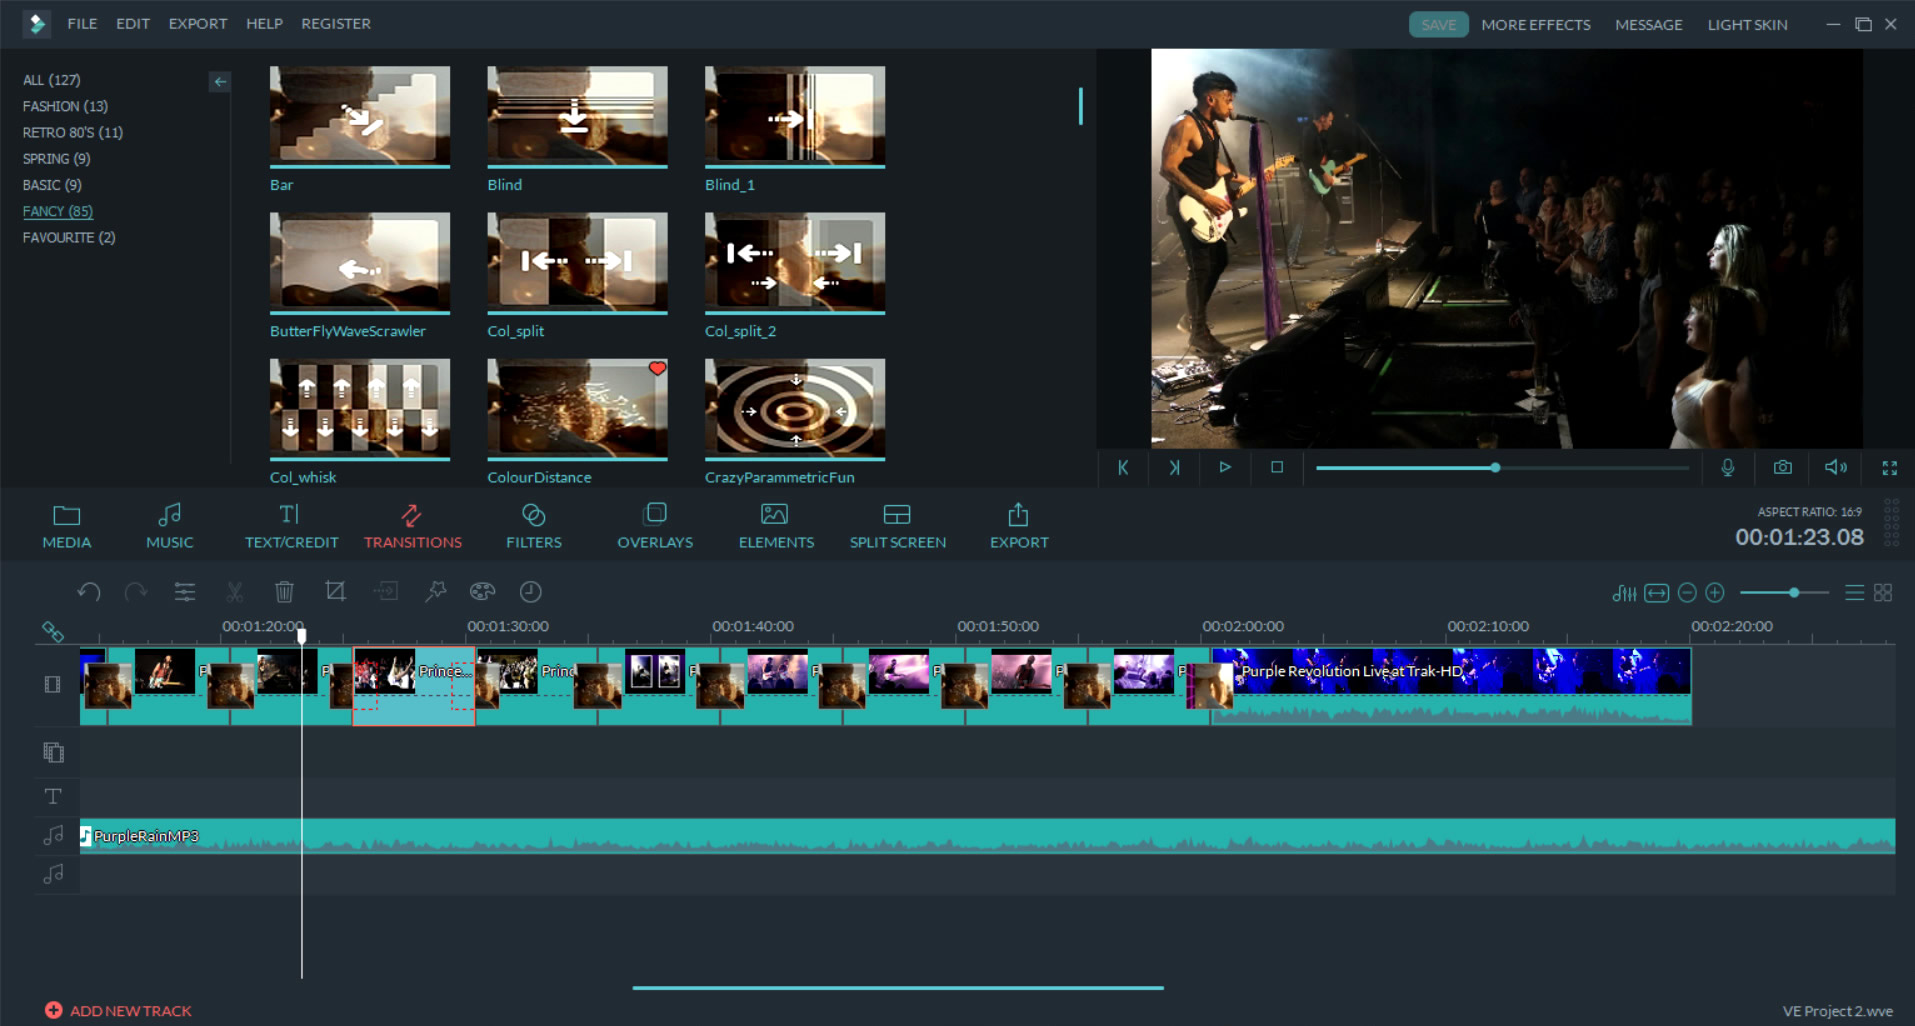
Filmora Overview
Filmora is an editor similar to Windows Movie Maker, but has much better overlay filters, titles, and transitions than other software.
The screen layout of the editor looks like this:
(Click Image to view full size)
Here is a two and a half minute video that gives a quick overview of Filmora.
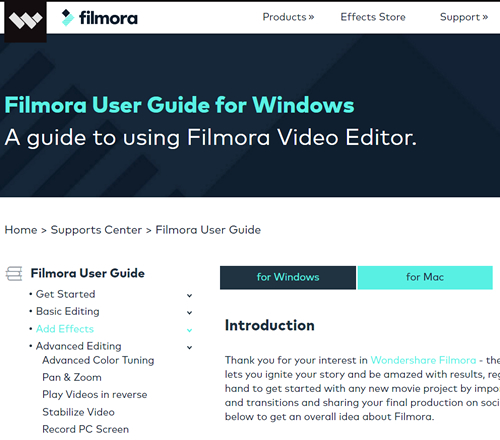
Filmora User Guide
Filmora comes with a comprehensive Online User Guide that includes witten text, screen shots, and how to videos.
The online User Guide can be accessed at this link:
We found the following video to be useful for learning how to get started with Filmora:
The above video shows how to do picture in picture as well as screen recording and titles, filters, and transitions.
Typical of Filmora everything is very simple and easy to do and looks great.
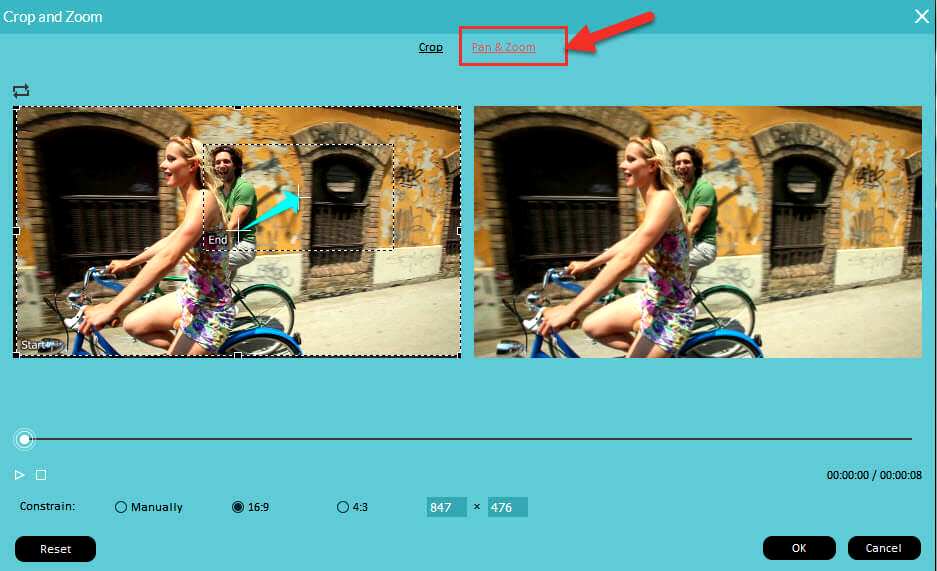
Filmora for Slide Shows
One of the big reasons that Filmora is great for making Photo Slideshows is because it is so easy to add the “Ken Burns Effect” for custom panning and zooming.
When we right click on our photo or video in the timeline, and choose crop and zoom, we are presented with an easy to use panel.
(Click Image to view full size)
Basically just click on the interior “End” crop and then move and shrink it to the position you wish to zoom into. It could not be any easier and makes slide shows look very professional.
It is all clearly explained step by step in the Online User Guide here:
To get the best quality slide show result we need to constrain crop our images in Photoshop to be exactly 1920×1080 pixels in size, and then save them as a high quality full JPG.
This means that when we put them into our Filmora timeline they are an exact fit. So on rendering they should not require any potential resizing that could affect their quality.
The 1920×1080 pixels sizing works fine for horizontal 16:9 ratio Landscape images, but what do we do about vertical Portrait images that we want to put into our Slide Show?
For Portrait images we used Photoshop and layers to make our own background with two white rectangles on it that become picture frames when we place portrait images onto them.
Eg. For Portrait images we need to make our own two image slide that is 1920×1080 pixels in size like this one:
(Click Image to view full size)
How to Color Grade in Filmora
Colour Grading is more applicable to videos than slide shows and is easily done in Filmora.
Colour Grading includes adjusting Colour, Brightness, Contrast, Colour specific Hue Saturation, and so on.
Filmora makes it very easy by having a series of Preset “LUTS” to choose from which can then be modified to taste. We access the artist paint palette icon above the timeline to get to these. We can also just start making our own colour grading from scratch, and we can save any settings we do as our own permanent presets.
A “LUT” is a “Look Up Table” for color correction, but we can think of it as just a preset effect that gives a certain look to the video clip, such as black and white, vintage old school, summer haze, etc. So if we choose a “LUT” called “Cool Blue” is will make our whole scene look cool and blue tinged like when someone is standing in shaded light.
The following video shows exactly how to do Colour Grading in Filmora.
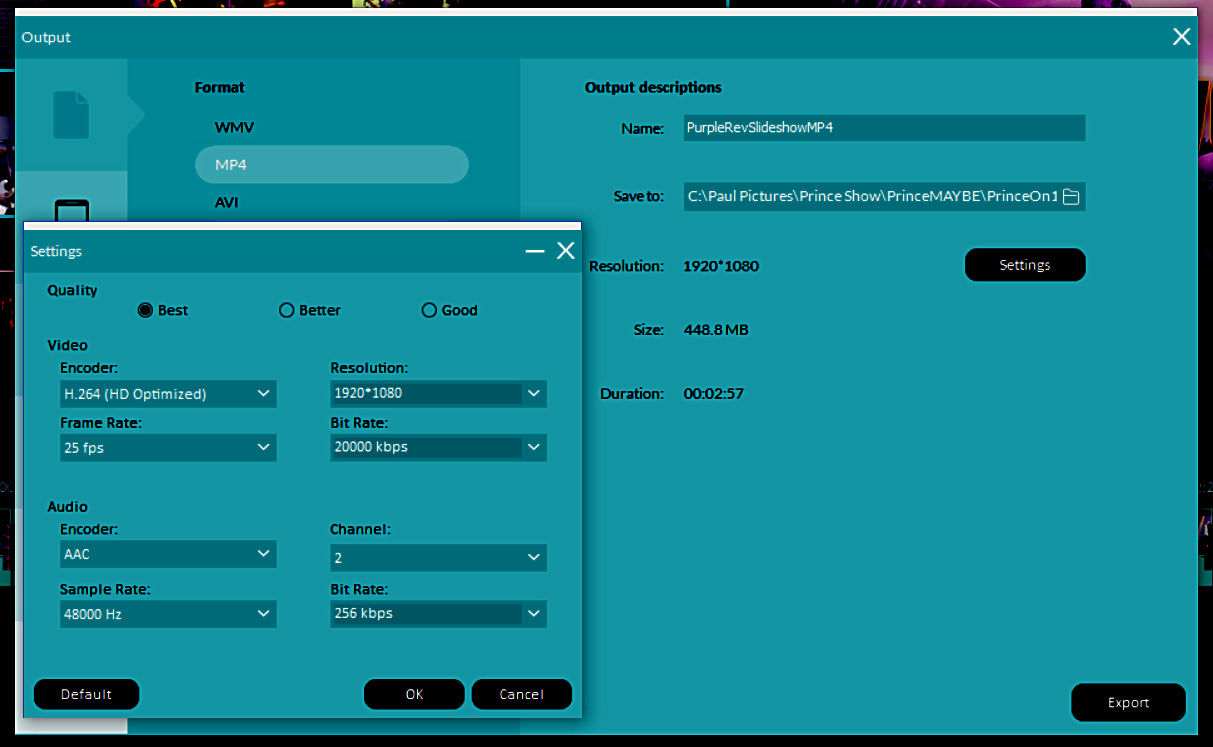
Exporting Filmora Video
Filmora offers a vast variety of output formats for our final video product.
As for most video destined for the web, the best output format is H.264 MP4 video in HD at 1080p that is 1920×1080 pixels in size.
Here are the settings that we used to Export our Music Slideshow Video:
(Click Image to view full size)
Putting Images On Top
The following video shows how you can overlay your own clear background PNGs over the top of a slide or video in Filmora.
This next video shows how you can make an on top image move around the screen, like a PowerPoint fly in type title:
Filmora Effects Packs
Filmora comes at a cheap purchase price but is a lot more versatile if additional Effects Packs are purchased.
Most of these are reasonably priced at $9.99 each. So far we have purchased the “Retro 80’s” and “Fashion” effects packs.
The following video gives an overview of Filmora Effects Packs:
The Filmora Effects Store is located at the link below:
Something we have not quite figured out is that not all of the available packs seem to be shown on the official Filmora Effects page, and there are two tabs on the page that can be clicked to list effects.
For example, we only found the “Retro 80’s” pack by going to the “Fashion” pack, where the “Retro 80’s” pack then came up as a suggested addition.
Possibly some packs are seasonal, and so something like a Valentines Day pack is perhaps only available around Valentines Day time of the year.
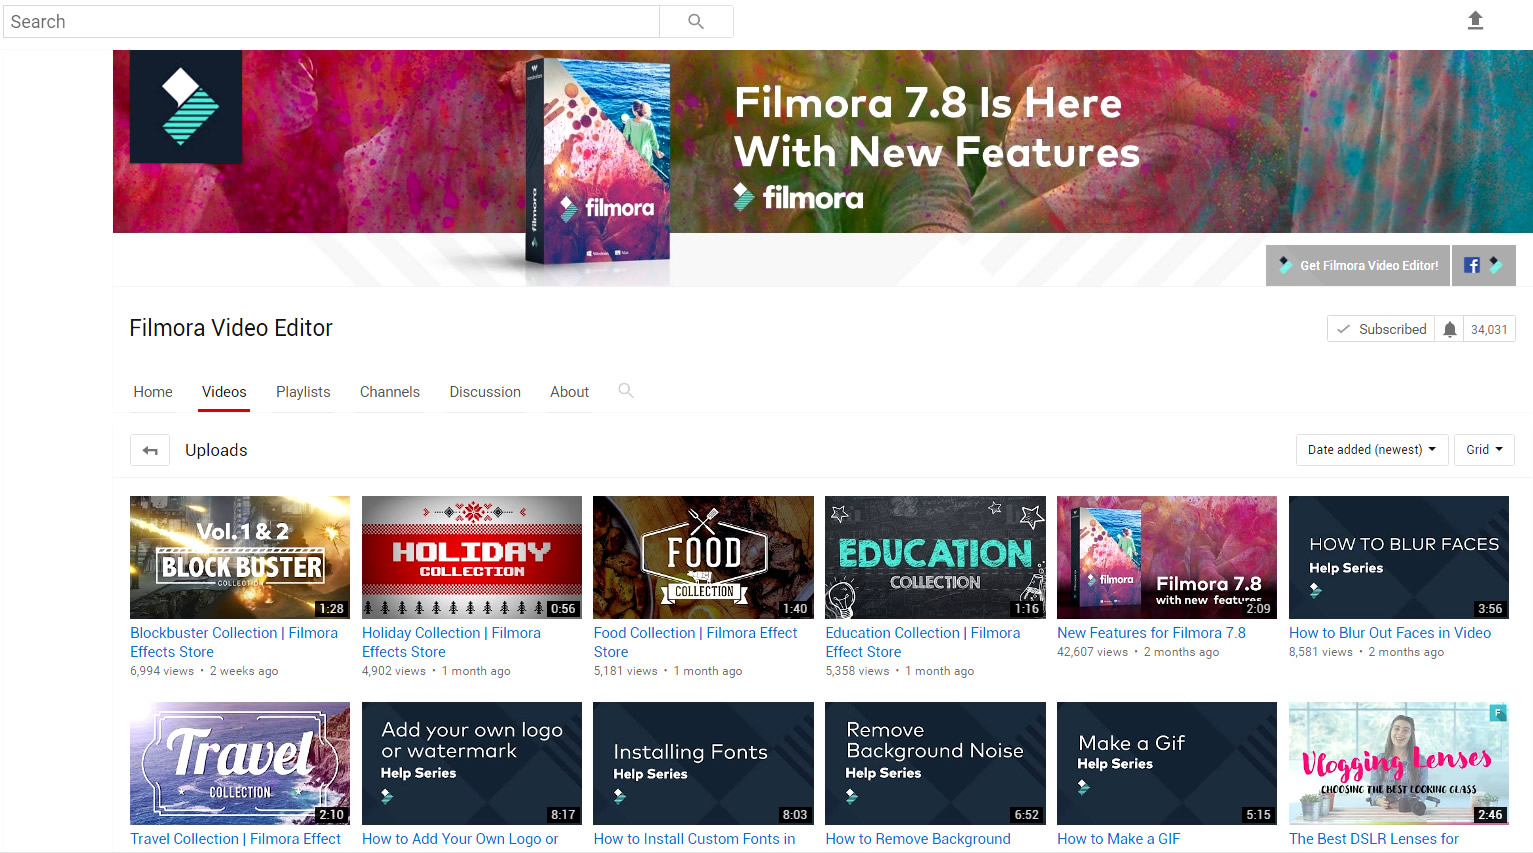
Filmora You Tube Channel
Filmora has a great YouTube channel that has over 120 videos to help us with everything we need to know about the product.
(Click Image to view full size)
Click the link below to go to the official Filmora YouTube channel:
Gabrielle Marie has a YouTube Channel called “Editing Hacks” with all sorts of useful things that can be made and done in Pic Monkey and Filmora like this video inside a picture “End Slate” for a project:
Filmora is available for Windows PC, Apple Mac, and Mobile devices.
Software is available as a free trial, but the free trial output videos will have a large watermark across the middle of them.
Filmora can also be purchased with a number of packages on offer including yearly subscription, lifetime copy, lifetime multi user, personal, business, and education.
Joining the community is free and gives access to additional tutorials and information.
These tutorials cover specialised video making and developing You Tube channels.
Coming to the community soon will be the opportunity for people to submit videos to competitions and write blog posts to the community blog.
Conclusion
We have been loooking for a Slideshow Maker for our still images, particularly for our music photos.
We have found Adobe Premiere and After Effects to be far too complicated for this task, and have been fortunate to get onto Wondershare Filmora.
Filmora is simple to use, has great special effects, and produces quality HD output. Going forward it also has 4K video capacity. It is at a great price point, and people can elect to buy it outright, rather than have to pay an ongoing subscription.
Filmora has great video editing processing as well, and so we can use it for simple movie projects that do not require several layers for multiple camera footage.
Our current plan is to develop a new Product Line for Photos By Passy that involves offering clients Video Slideshows made with Filmora, as well as the usual set of still shots.
Our vision is that this will produce additional online materials for our clients, diversify our product offerings, and set us apart from the competition. Filmora will be with us at every step along this journey.
With its amazing price, and ease of use, we recommend it to all photographers as the go to tool for basic video work and Slide Show presentations.
Click the link below to trial and/or purchase Filmora today:
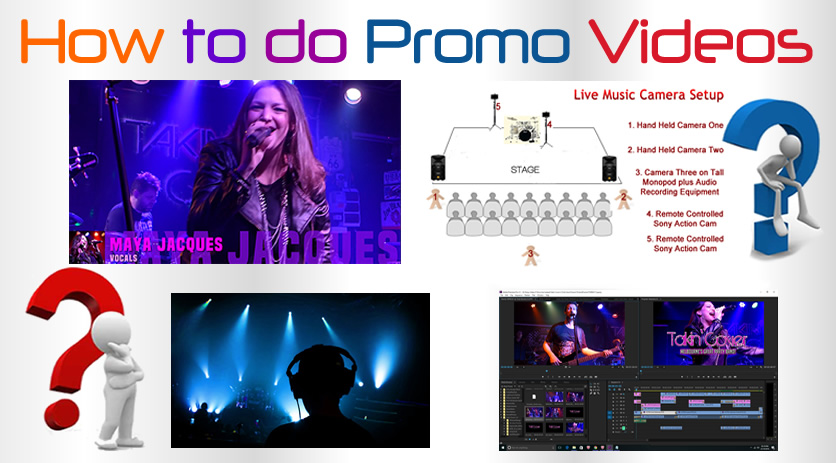
In this lesson we look at what needs to be done to make a good Live Music Promo for a band.
If you think that making a Promo Video for a Band is a quick and easy way to generate better income than still shots, then think again!
Drawing on our experiences working with a number of bands, we have found that making a Live Promo is a lot harder than you would think. There are a surprising number of challenges that arise when making a Music Promo Video.
One significant challenge is that you as the Video Maker, and the Band as the Performing Artists, need to make sure everyone is on the same page for the duration of the project.
We have already examined this challenge in a previous lesson which can be found at the link below:
In this current lesson we are going to look at some other challenges we have found when making Live Music Promo Videos.
The purpose of this lesson is not to criticise any of the bands we have done video work for, but rather to share some of our experiences from the learning curve we have travelled along while making Live Music Promo Videos.
Our primary objective is to share what has happened along our journey, and help people who are thinking about making a Live Music Promo Video.
The Promoter
It becomes very easy to forget about who the final end product is being made for.
The video is being made for a Promoter or Venue Owner to View.
This person is someone who is going to have a quick look at the Promo to answer these basic questions about the Band they are considering offering paid employment to:
1) Do they present professionally?
2) Do they sound okay?
3) Are they playing popular songs?
4) Is there a crowd there paying an admission price and having a good time?
5) Is alcohol being consumed by patrons and venue profit being generated?
6) What events does the band look suitable for: Pub Gigs, Corporate Functions, Charity Events, Outdoor Festivals, etc.
Promoters want to hear a few popular hit songs played well.
Promoters are not going to be fussed if there is audience background noise in the sound track. In fact it adds to the authenticity of the video.
Promoters are not going to check the video second by second to see that a cymbal got hit, but they did not hear a cymbal in the audio track.
They are not going to be critically judging video quality and technical perfection to see if they would employ the videographer for a job.
By having a quick look at a live audio promo video, the Promoter can quickly see what the band are really like in a live situation.
They can see that the band is the “real deal” and not just a set of nice Promo Photographs and studio recorded Sound Cloud samples.
The Promo Video is an authentic live performance, and not just a bunch of glossy marketing.
For the Band it seems it’s often very hard to envisage these video product requirements….
but they need to step away and put themselves in the shoes of a Promoter:
someone who just needs a quick confirmation that this band is suitable to give some work to.
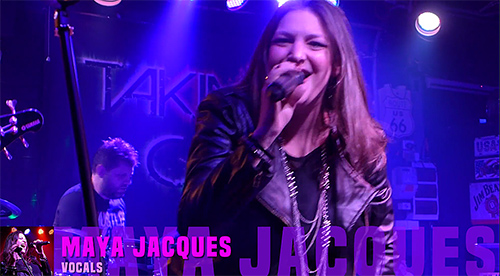
We believe the following “Beach Boys Show” video (not made by PBP) is a great example of what a Band Promo Video should be:
(Near the very end of this lesson there are some more example videos).
The Band / Client
Often the Band does not understand that a Promo Video needs to be made OF them, and not FOR them.
The band looks at the process and thinks this is a great opportunity for them to Produce, Direct, and Star in their own great glorified rock star video of what they think are plenty of their best songs.
The band will want to have their whole set filmed, and want to include obscure songs that are their personal favorites, and often have no idea in their mind at all about the needs of the Promoter.
The Promoter is usually a busy person who only has time to watch a short 1 to 3 minute Promo, containing 3 or 4 recognisable songs.
They do not have time to sit back and watch an epic fanfare of obscure melodies that are the band’s personal faves.
We have found this to be one of the biggest challenges: Many Bands do not understand or want to follow the Design Brief of a Short Promo Video.
Band Stage Craft
Another issue we have found while making Live Music Videos is that Band Members can exhibit very poor stage craft which totally ruins whole sections of video footage.
By this we mean people moving mic stands around during the video, drinking from cans of beer, having casual conversations during songs, turning their backs to the crowd during songs to twiddle knobs on amplifiers, fiddling around with ipads, and so on and so on.
There also needs to be some sections that are filmed where there is audience connection and involvement, eg. typically the hands clapping sing along type event during one or two of the target filmed songs.
A really significant problem has been that Band Members often seem to be reluctant to engage with the camera and put on a show for the video footage.
It is usually something totally new for them, and is probably quite fair enough that they do not know what to do when the camera is on them.
To counteract these problems we have developed an online Document all about Stage Craft that we insist Bands read through thoroughly prior to the show.
You can check out this document at the following link:
Limiting the number of filmed songs is the Videographer’s first task prior to the gig/performance.
As discussed previously the Band will probably want the whole 2 to 3 hour show filmed, which is totally not feasible.
The Band needs to be asked to supply a set list with 6 to 8 songs targeted for filming.
There also needs to be a one song gap between each targeted song to ensure all cameras have enough time to write to SD cards, and be reset.
This one song gap requirement is often a challenge for the Band, especially if they have pre-programmed sequencing or effects in their set.
After filming, and going through the Gigabytes of Video from all the cameras, selecting the “Best” 3 or 4 songs is the Videographer’s next big job.
Factors to consider when making this selection are which songs sound best, which ones have the best footage, which ones have great audience involvement, which ones have great stage craft and camera interaction, and so on.
Usually when you now present the Band with the short list of 3 or 4 songs, the Band will immediately want to know in detail why all of the other targetted songs did not make the cut.
This is fair enough, when you play in a band and only hear yourself and a bit of on stage foldback, you have no idea what the Band actually sounds like.
Some of those other songs could have been absolute rocking masterpieces, and so why were they dropped?
What we have found has to be done is to make a quick rough “lowlights” video of the rejected songs that showcases all of the issues in them. This video needs to be set to “Private” and the hidden link given to the Band so they can view these rejected songs.
An accompanying email detailing all of the issues also needs to be sent to the Band contact person.
(Pain in the neck extra work, but it needs to be done).
The alternative would be to get together with the band in person and go through all of the footage with them.
This is usually not do-able due to day job commitments and geographic dispersion of band members.
It is also probably more time consuming to you as the Videographer, and remember every hour spent on the job lowers your hourly pay rate and is time away from your normal life.
From the confirmed short list, the Videographer now makes Version 1 of the Promo.
The first challenge that usually arises now involve the Band being overly critical and concerned about the slightest musical mistakes and/or the most tiny non-synchronisation of moving sound and image.
On balance a small section actually looks and sounds great, but from the Band’s viewpoint it is an absolute catastrophe of epic proportions and must be immediately removed.
These are the type of microscopic items that a Promoter would not be overly concerned with, if indeed they even noticed at all that they were there.
Because the Band is the paying customer you will probably have to remove the sections, even if it tragically subtracts some great footage from the Project.
The next thing a Band will usually do is want to change the footage proportions in the Promo, eg. they will typically want 90% or more of them, and 10% or even 0% of the Audience.
This is a disaster for the Promo Video’s effectiveness. The Promoter must see clearly that there is a crowd there having a great time, and so this footage cannot be removed.
The next thing that the Band might complain about is the Live Audio, and the fact that crowd noise can be heard in the soundtrack.
They will despair and wish that the audio can be replaced with studio recordings or clean and sterile studio remixed desk feeds.
Well if you take out the Live Authentic Sound, then we are basically back to the package of Promo Photos and Studio Sound Cloud Samples!
Basically we might as well forget about having a Live Music Video done at all!
Technically of course it is possible with a skilled band to take a Studio Track and use it for 80% of the Soundtrack and then mix in about 10% to 20% live sound. This does create a “Live” sounding video. We have only ever done this on one project, and it worked out well because the sound in the small venue where we filmed was boomy and full of echo and noise.
However in the majority of cases a Studio + Live Mix is not an authentic representation of the Band as a live performing act.
The next typical obstacle is for the Videographer to fight very hard to have the Promo total duration be only 1 to 3 minutes long.
Often a Band will NOT want to align with having a Promo that is a maximum of 3 minutes in duration.
They will typically want longer segments of the songs that are included, and then want to add extra songs to the current end of the Promo.
Very soon the Promo will become 4 to 5 minutes in duration or even longer.
As the Videographer you must be determined at all times to make a SHORT Promo that satisfies the needs of the Promoter.
However often you will be stifled by the Band wanting to make their own rock star extended highlights video that has way too much content. This extended content is also often the wrong type of content.
So what do you do at the end of the day as the Videographer?
As the Band is paying you for the work, you often have to go against what is really needed and make an off-topic long duration video.
Filming a Live Promo
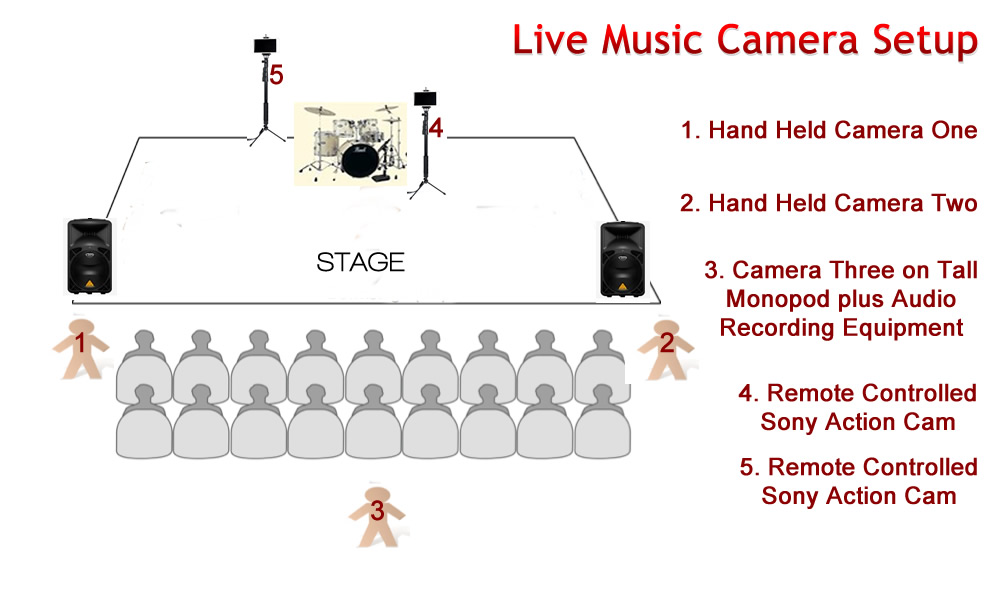
You need to set up one camera for a wide angle shot, a few rows back in the middle of the crowd, to have the crowd in the foreground.
This is the position that you also do the sound recording from, using stereo microphones set at a wide angle of 120 degrees.
This wide angle camera needs to be on a very tall Monopod. Tall Monopods are not easy to find, but Benro makes a good one that is about 190cm high.
You then need to have at least one other camera roaming around and filming close ups from the area in front of the stage.
This is so that you can have a wide angle long shot and then “cut in” to a close up, and then back out again.
Make sure that the wide angle camera records whole songs, so that you always have some wide angle footage to fall back on if none of your other close up camera shots are any good during a section of a song.
Currently at Photos By Passy we are using a five camera setup as shown in the following diagram:
(Click Image to View Full Size)
Cameras 1 and 2 are hand held and rove around the front of the stage filming close ups, and crowd interaction (while making sure not to film each other at all).
The footage needs to have space above people’s heads to that it can be image stabilised later in Adobe Premiere without decapitating anyone!
The Camera 1 and 2 footage also needs to contain as little zooming in and out as possible.
The operators of Cameras 1 and 2 also wear a Sony wrist band remote control to turn on and off the two stage mounted Sony Action cams.
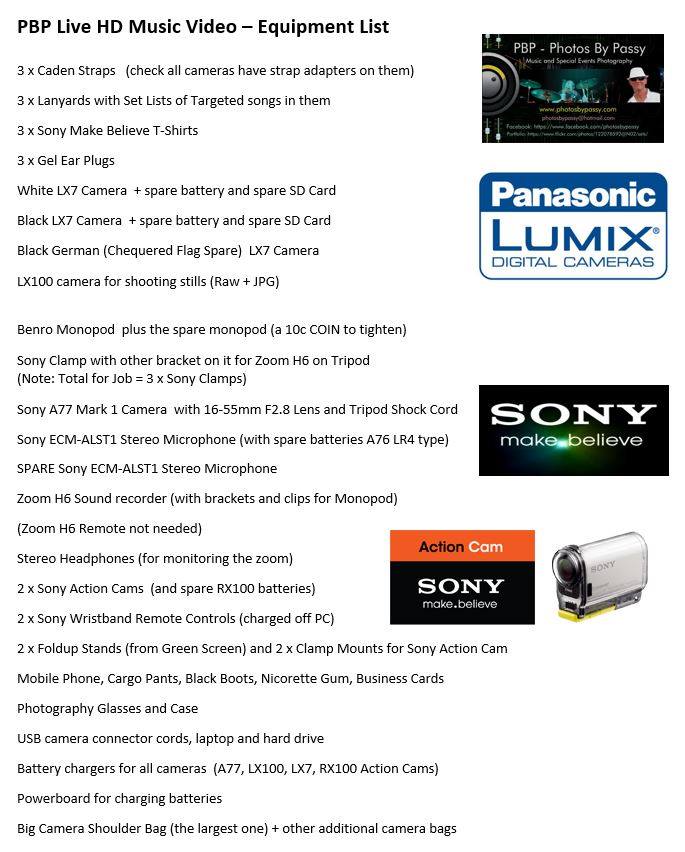
Here is our current full Equipment List for a live video job:
(Click Image to View Full Size)
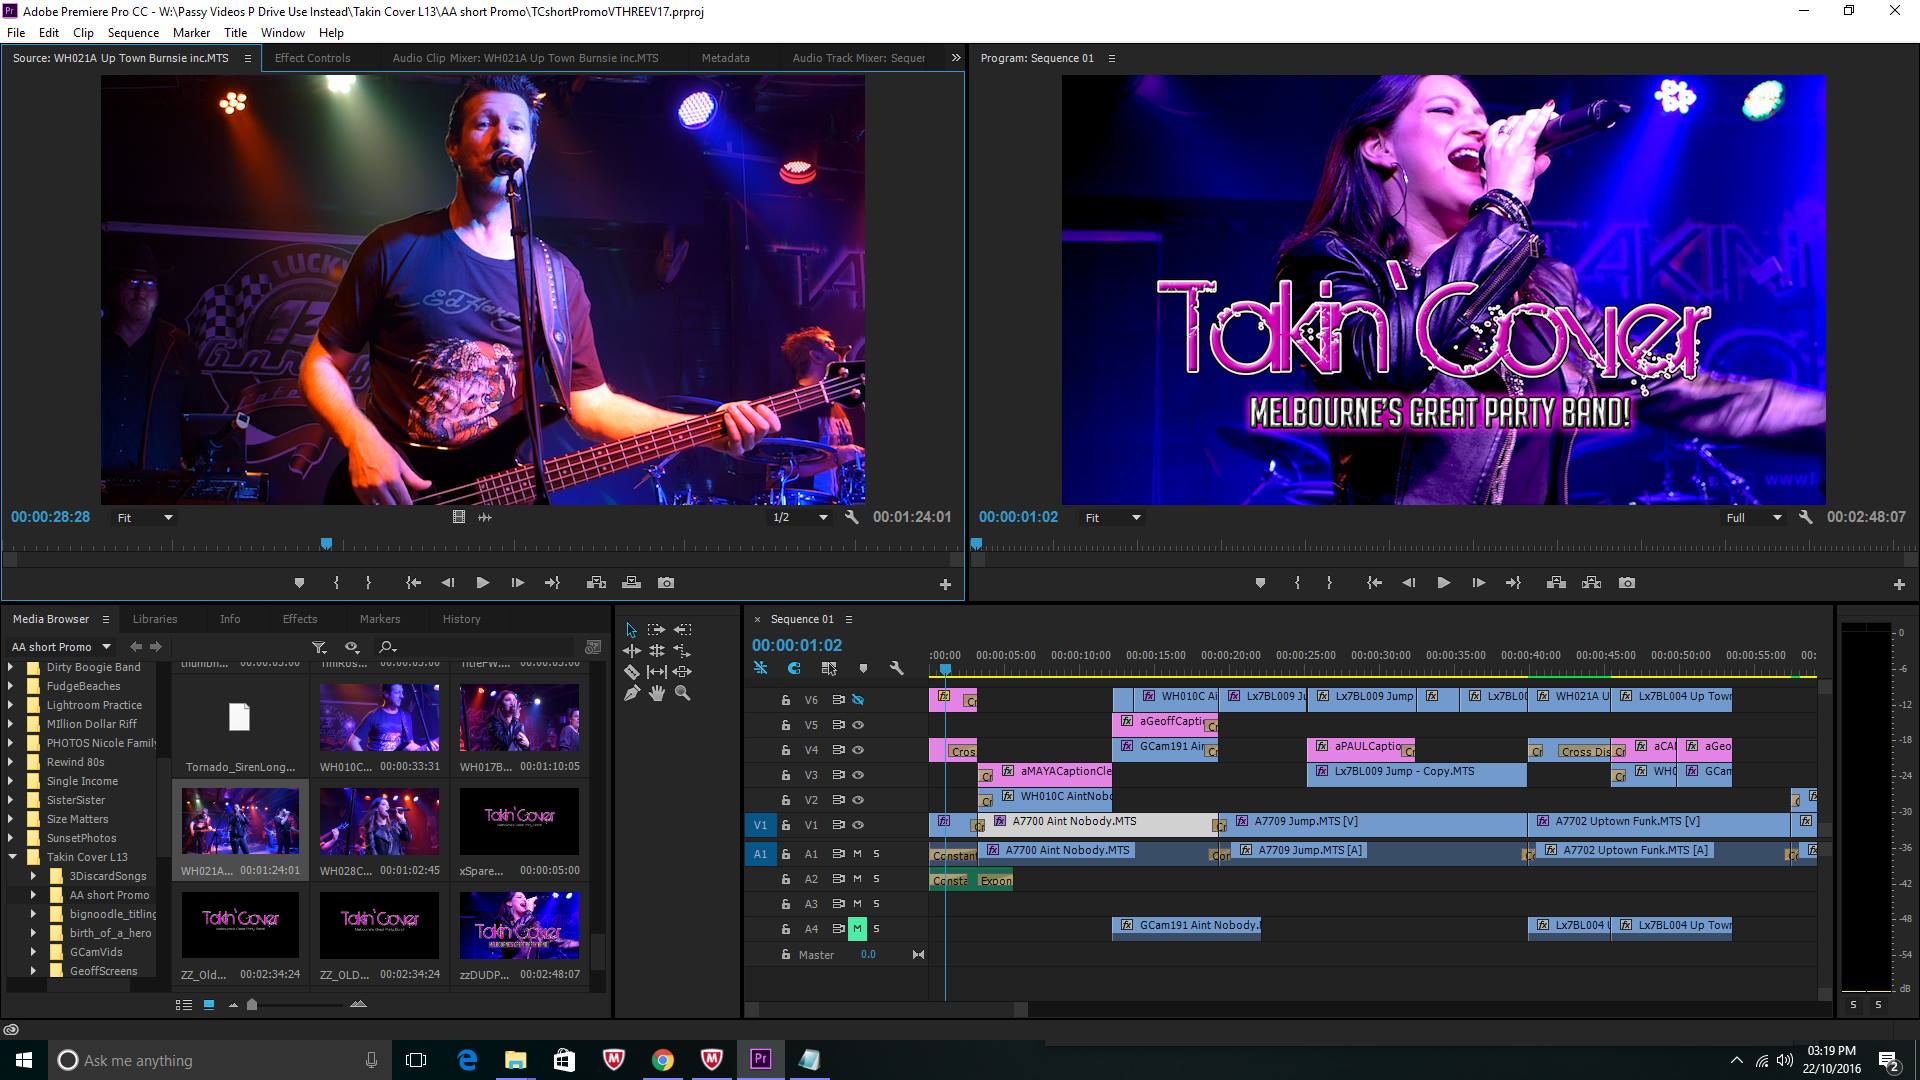
Editing the Promo
(Click Image to View Full Size)
You would think that editing the Promo would be fairly straight forward, pick the best footage from the best of the target songs that the band nominated for filming, and then put this together into snippets (probably choruses) for 3 or 4 songs with a total video duation of around two and a half minutes.
Well it would be that simple until the band gets involved at the review of the first version of the video, with often 20 or more questions about the video and the content that has been included.
The only way to keep track of all of these items is to get them in writing via email from the Band and start an “Action Items Log”.
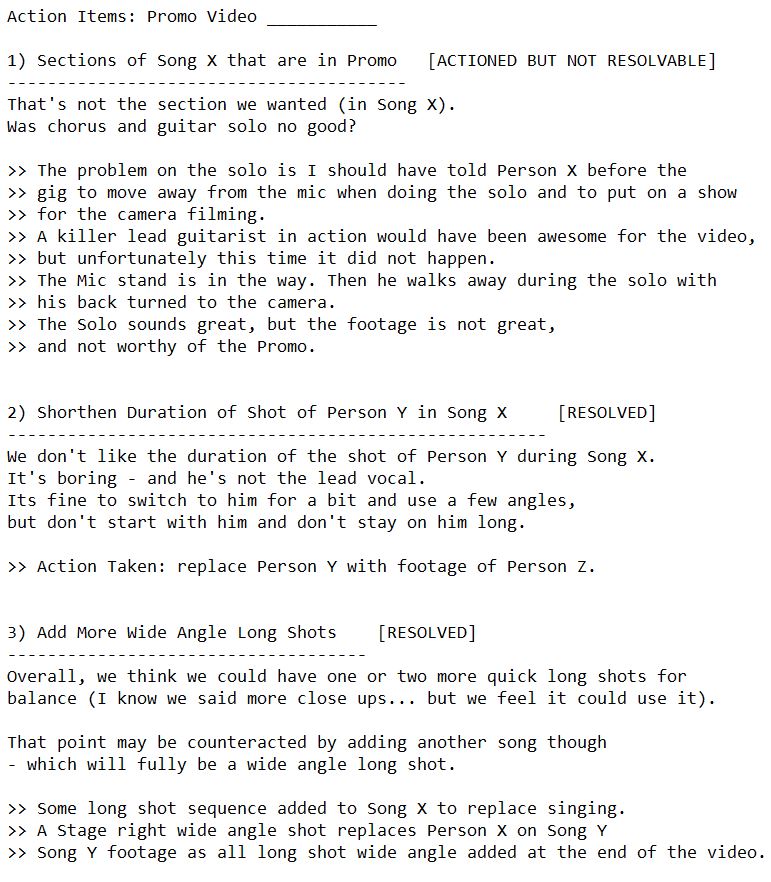
A portion of a typical Action Items Log is shown below.
(Click Image to View Full Size)
These example issues are fairly typical, and pretty soon a nice tight 1 or 2 minute Promo is blown out into a 3 to 5 minute Highlights Video.
The Band takes over Producing, Directing, and Starring in their own epic mini movie.
And this is where being the Videographer and Editor of a Promo Video becomes very frustrating.
It is difficult and time consuming to make all these changes, and as you do this the end product moves further and further away from being a short and sharp Promo Video suitable for its primary audience of Promoters and Venue Operators.
But the Band as the paying customer is of course always right.
Further Reading
The following articles on the Internet contain some useful material.
First up are a couple of Promo Videos that we have made at PBP.
They are reasonably good but not quite as good in selected content as we would have liked them to be.
Here are some YouTube Promo videos done by other people.
Ramble Tamble Credence Promo (Short)
A very professionally produced video that showcases the band superbly.
Australian Queen Show Promo
This is a great tight one minute Promo that gets the message across nicely and the audio track is authentic of their live sound.
Full Swing Band
The Interview at the start is a great idea, but a litle bit too long. The rest of the video is well edited and presents the band well.
Diamonds Cover Band
This is a very professionally made Promo, but with its pristine studio recorded audio, and super clean shots, it does not really show the band in an authentic live situation.
Shine Covers Band
This promo is good but too long in duration and very busy at times with a lot of fast cuts. It has a great collection of very well edited shots that market the band as a major showcase act. However it is apparent that the sound is not live and at times it sounds very sanitised.
Final Thoughts / Solutions
The purpose of this article has not been to “Trash Talk” any of the bands we have done video work for, but rather to share some of our experiences with any people who are thinking about being involved with the making of a Live Music Promo Video.
On these types of projects we have often found it extremely difficult to get everyone on the same page and work to a sensible brief for the Short Promo.
This has now happened on a number of occasions where we have worked with various performers.
For these reasons we will not be actively marketing Promo Videos as part of our regular product line at PBP Photos By Passy.
We are happy to make a live video OF a Band, but we intend to move away from making Live Videos FOR Bands.
But rather than just present all of these challenges, it would be nice to have some solutions.
The main solution we see it is to have a small set of great standard Promo Videos that we can show to prospective clients.
They then need to choose which of these sample videos they like best, and the aim is to make a video very similar to that one.
Then we need to make sure that the client fully understands and agrees to the design brief for the project:
1) Promo Video is short and sharp – 1 to 3 minutes total duration
2) Band presents professionally with great Stage Craft and band members interact with the camera
3) Band sounds okay and it is clearly noticeable that the audio tracks are recorded totally live
4) Band is playing immediately recognisable sections of 3 or 4 popular songs
5) A crowd is clearly visible and they appear to be having a great time
6) Alcohol is being consumed by patrons and venue profit is being generated
7) The band looks suitable for: Pub Gigs, Corporate Functions, Charity Events, Outdoor Festivals, etc.
Finally it is fundamental that the Band understands that a Promo Video is being made OF the Band, and not FOR the Band.
The Band will not get to Produce or Direct their own self indulgent rock star video of epic proportions, instead they will need to stay true to the up-front agreed Design Brief.
So in future if we get a Music Client who seems have the right attitude and is willing to work to the above seven point design brief, then we will definitely be able to help them out with a great Live Promo Video!
Camera Raw is basically a simplified version of Adobe Lightroom and comes free as part of Adobe Photoshop.
In this Lesson we show you how to Open Images in Adobe Camera Raw, directly inside Photoshop, rather than using Adobe Bridge or Mini Bridge.
“Camera Raw” is similar to “Adobe Lightroom” and can be used to adjust highlights, shadows, vibrance, saturation, clarity, and white balance.
“Camera Raw” is great for adjusting images that have too much brightness, or shadows or shade in them. It is also great for adding special effects type filters to images.
This “How To” lesson specifically covers Camera Raw 7.0 from CS6.
The newer CC version has even more features, such as the Radial Filter, and the Dehaze effect for fixing washed out bright skies.
IMPORTANT: DO NOT EVER PRESS THE ESC KEY IN CAMERA RAW, IT CLOSES YOUR IMAGE WITHOUT SAVING IT!
Fixing Dull Images
The following image was taken on a cloudy morning and is quite dull as there was no sun shining.
(Click to view the Image Full Size in a new Tab)
Using Camera Raw adjustments we were able to transform the image into the following:
(Click to view the Image Full Size in a new Tab)
The details of how we made the required adjustments are contained in the PDF Lesson document that can be found at the following link:
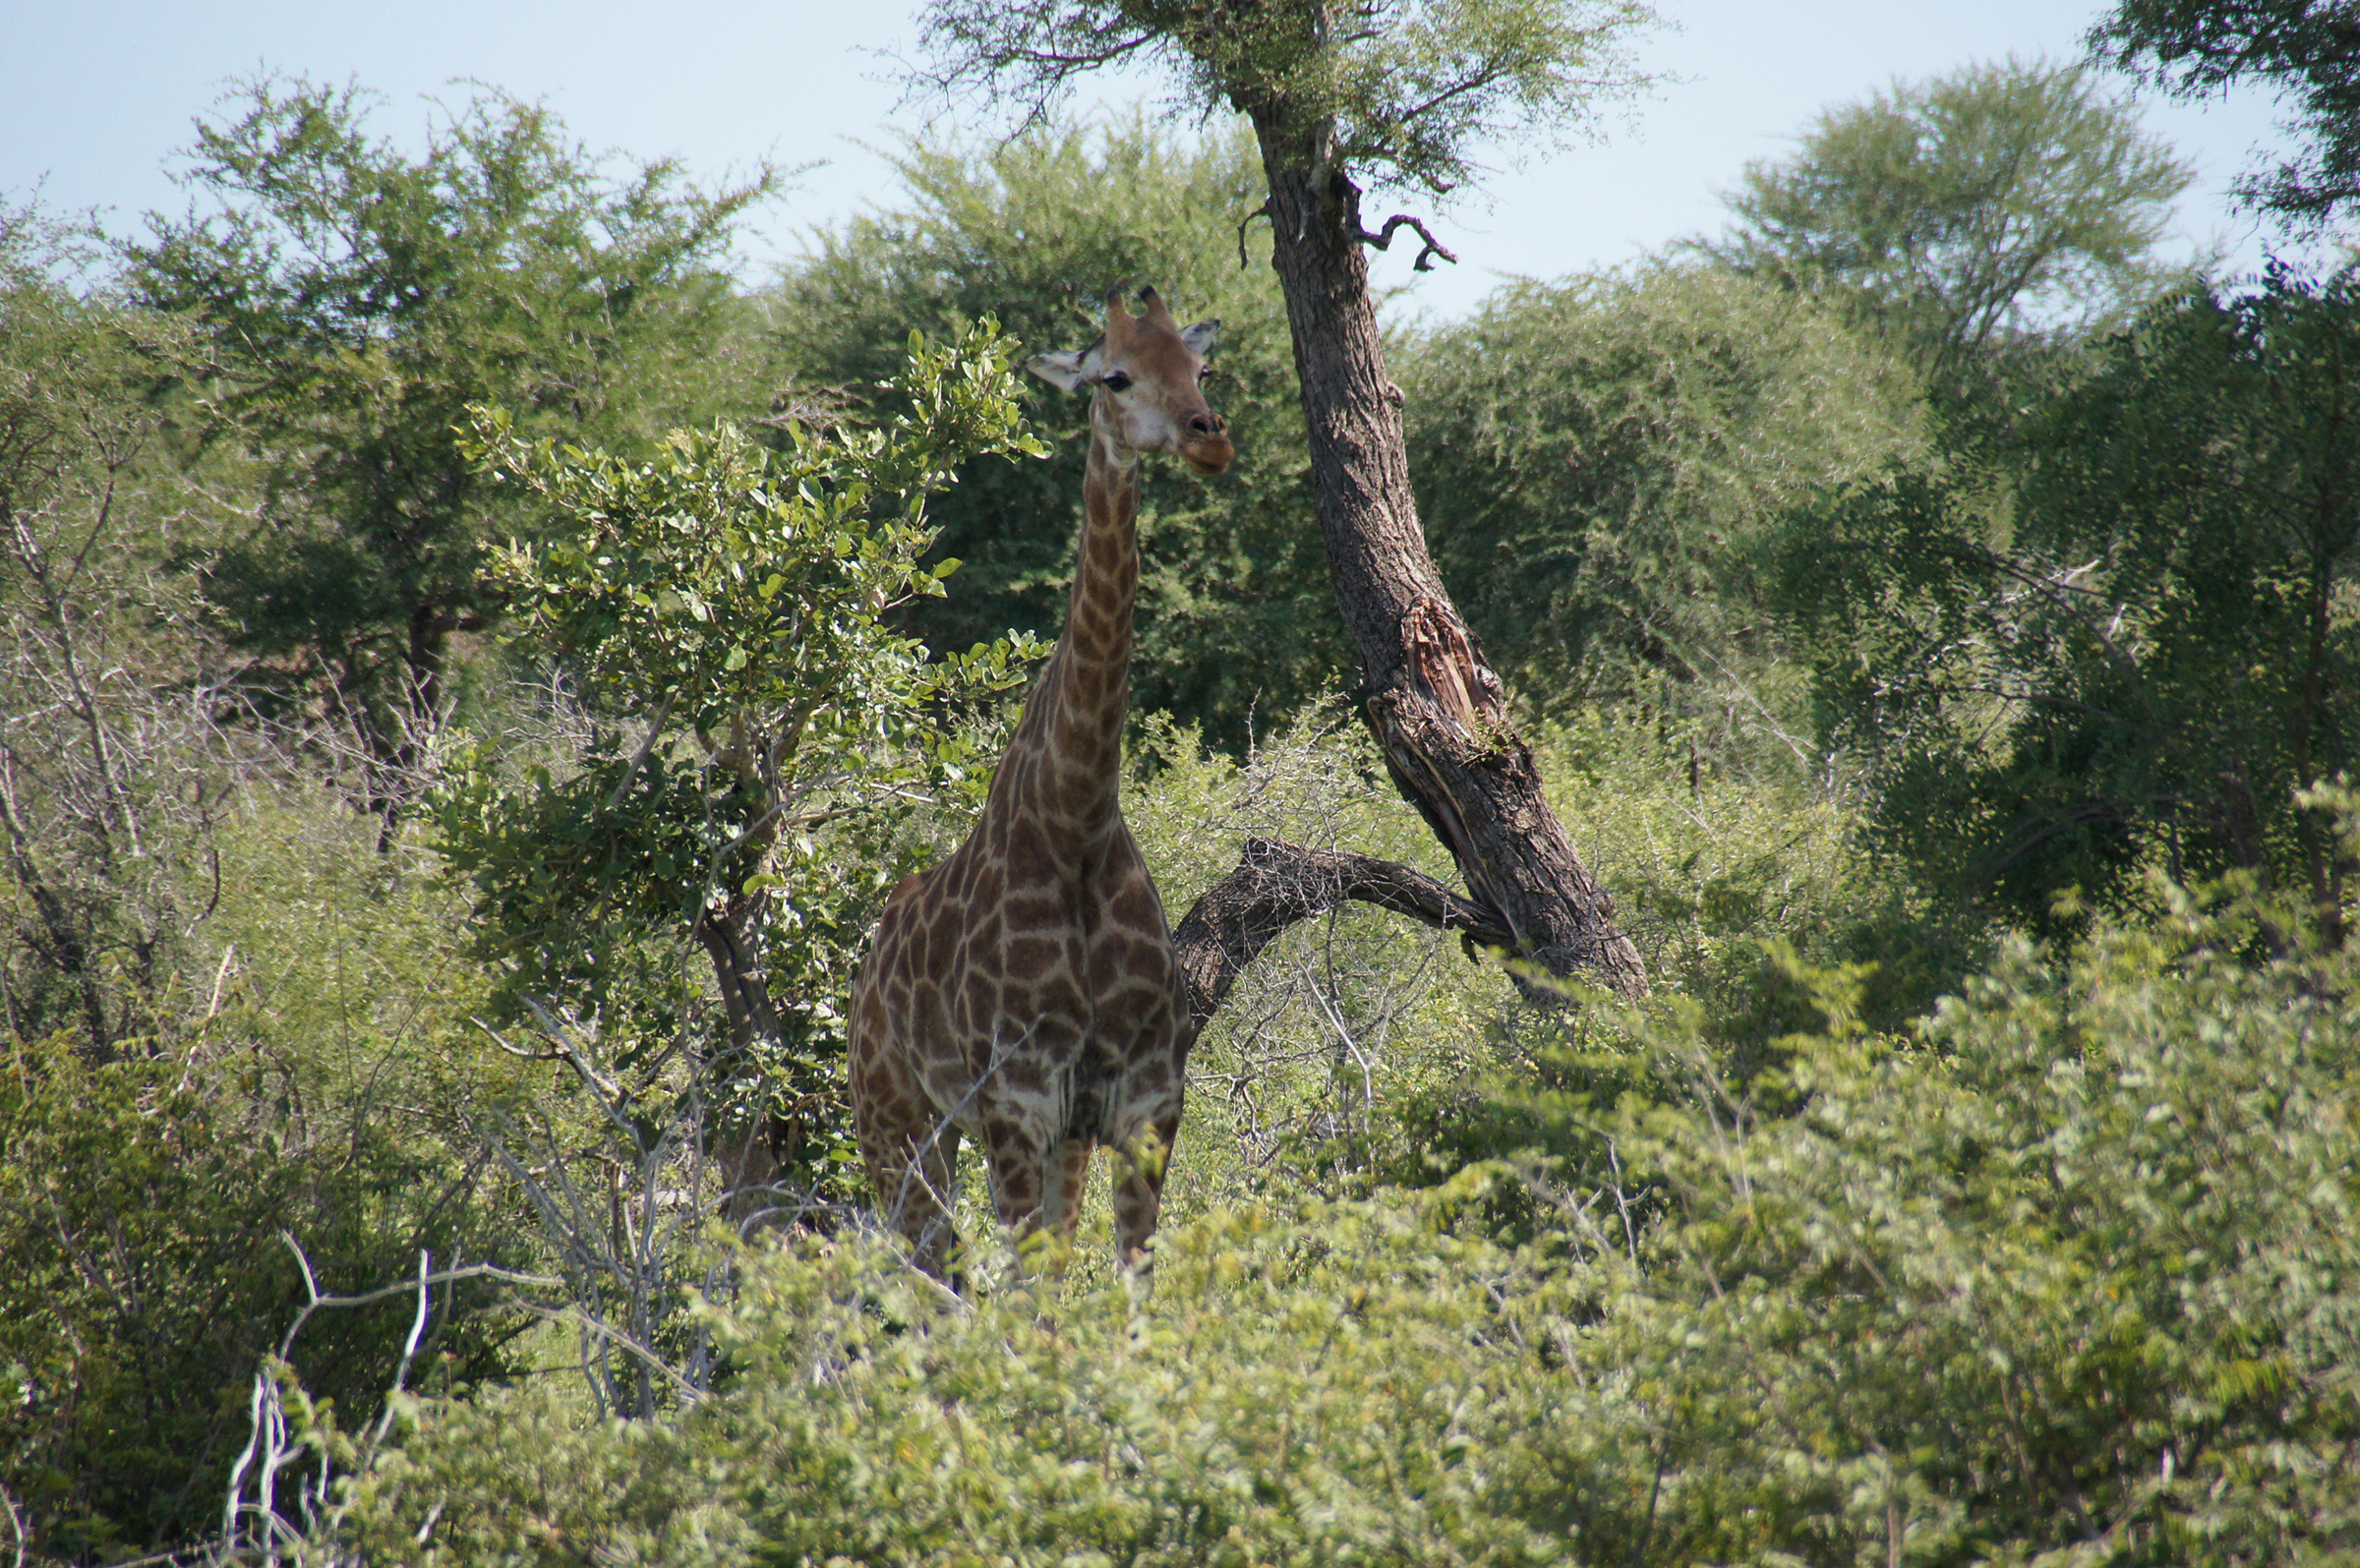
The following photo of a Giraffe in Africa was taken on a very hot dusty day, and is all washed out with very little colour or clarity.
(Click to view the Image Full Size in a new Tab)
Using Adobe Camera Raw we were able to dramatically transform the image into something a lot brighter and colourful.
(Click to view the Image Full Size in a new Tab)
The next image was taken early in the morning and due to the dramatic difference between the sun and the shade the camera has had difficulty calculating the correct automatic exposure.
(Click to view the Image Full Size in a new Tab)
Here is the same image after processing in Camera Raw:
(Click to view the Image Full Size in a new Tab)
The details of how we made the required adjustments are contained in the PDF Lesson document that can be found at the following link:
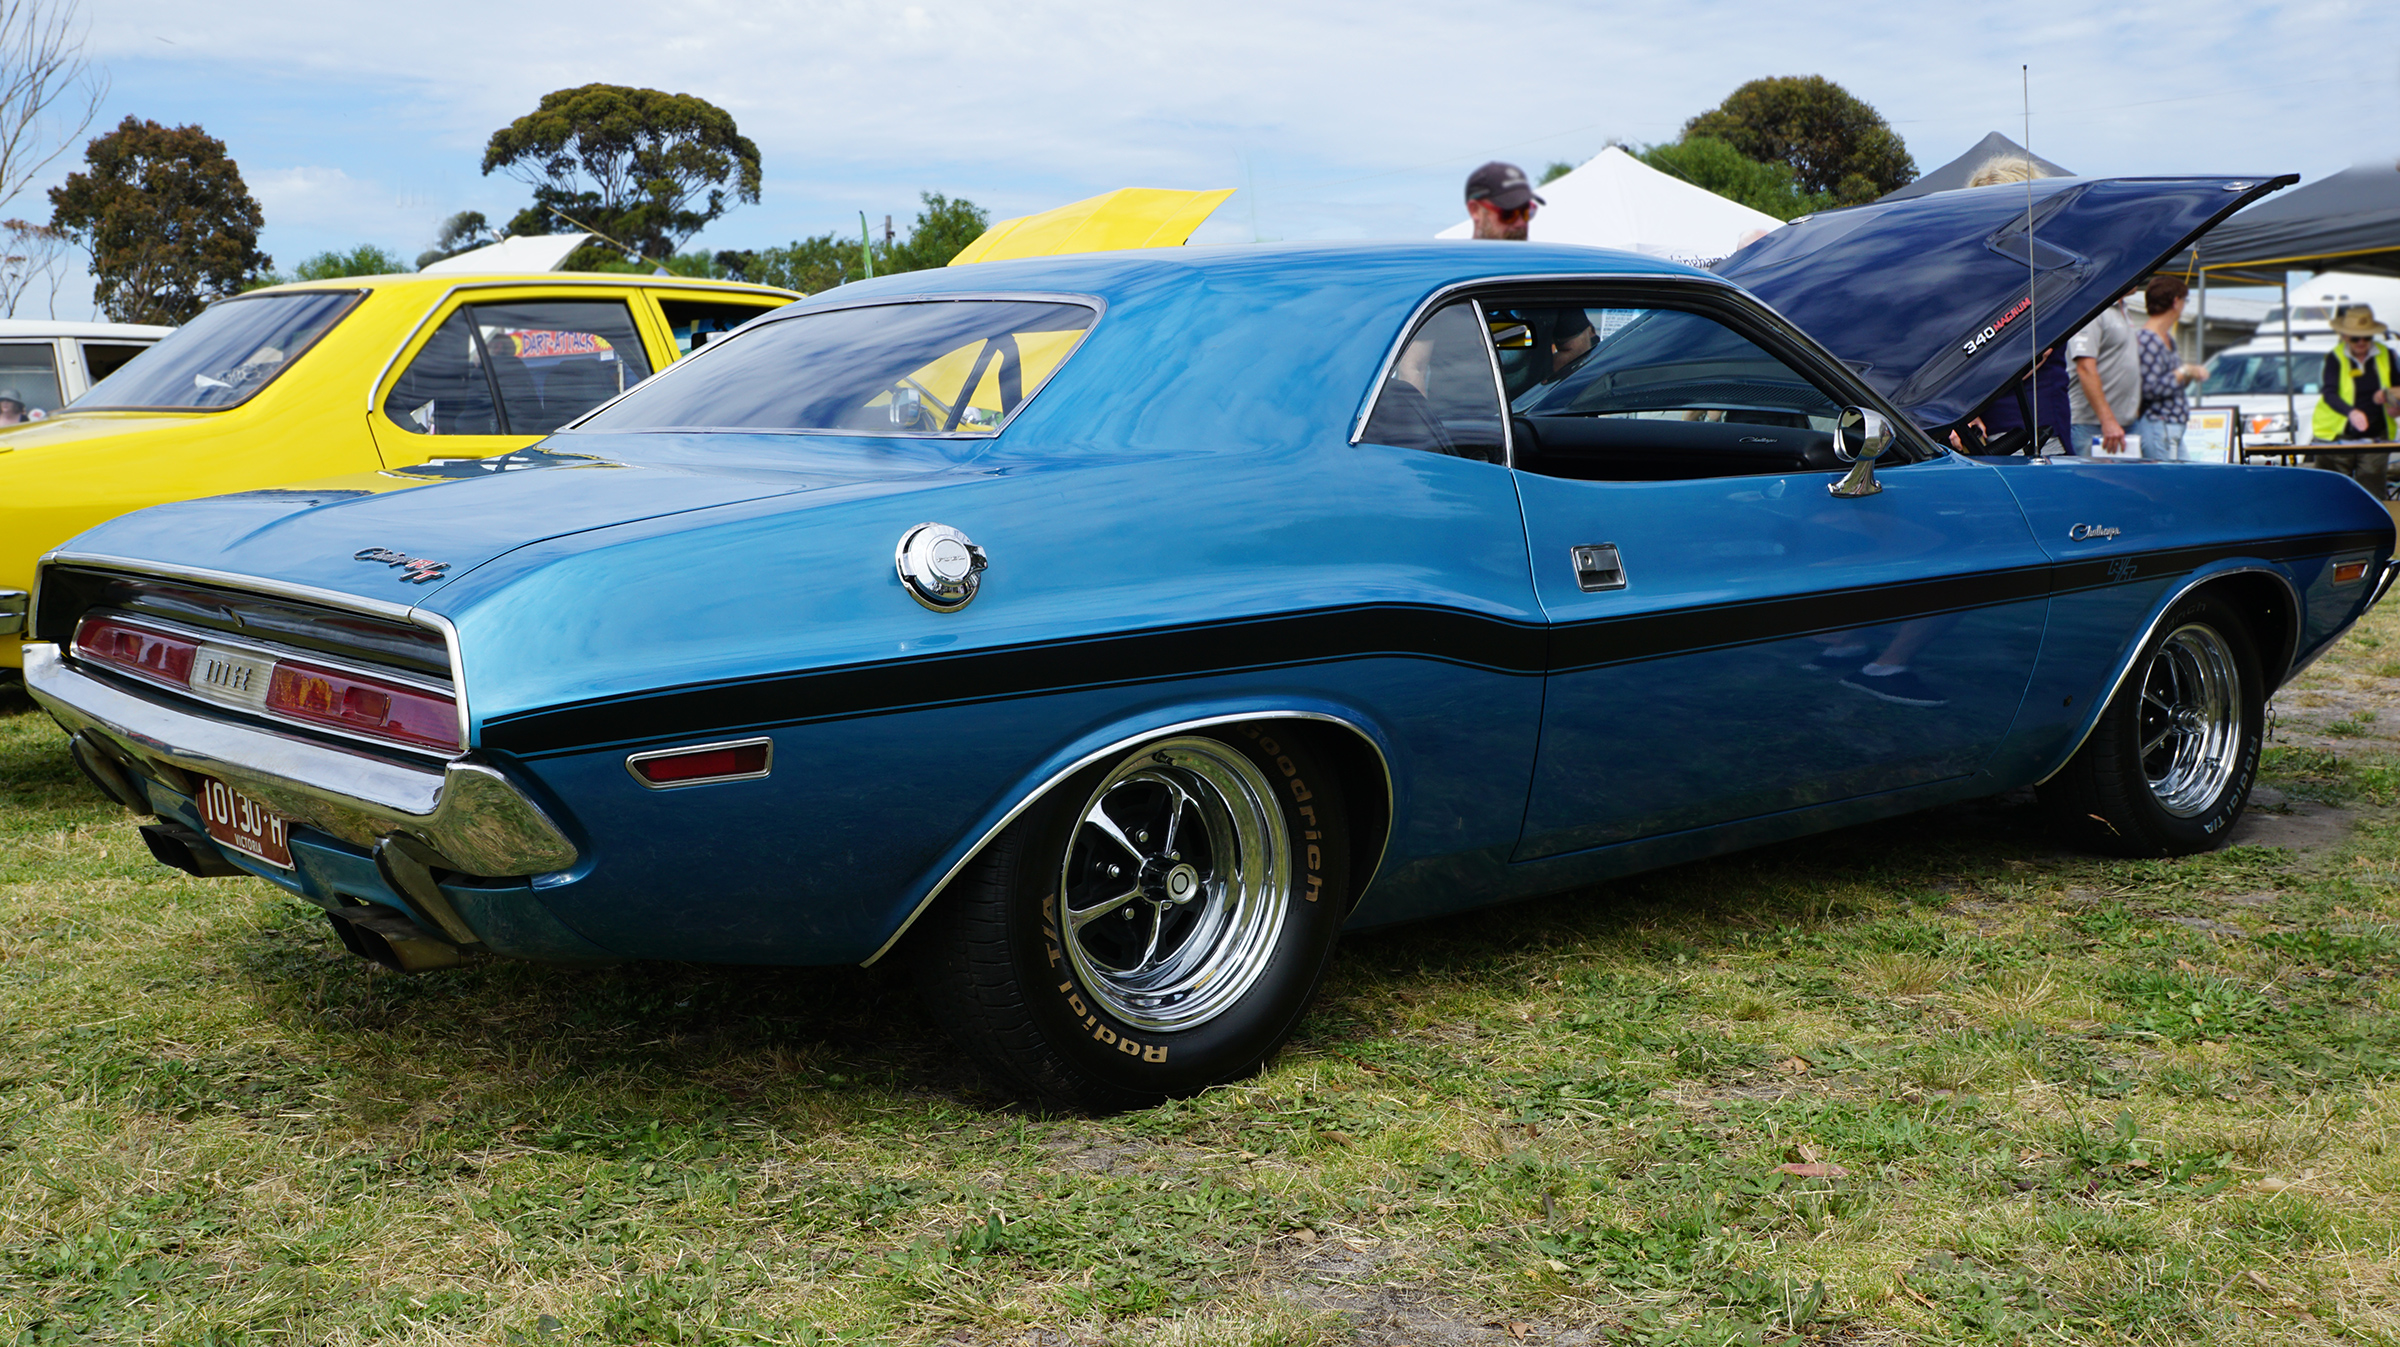
In the following before and after examples, there are patches of bright grass alongside the cars.
Using the Graduated Filter in Camera Raw we can cover the grass in shade, which will de-emphasize the grass and make the car stand out better.
Here is a before image with bright sunlit grass alongside the car:
(Click to view the Image Full Size in a new Tab)
Here is the same car after we have placed a graduated filter over the grass:
(Click to view the Image Full Size in a new Tab)
In this next example we have added in the shadow, but then used the adjustment brush to bring the wheels out of the shade, as well as changing the clarity and saturation and then doing some blurring tool work in Photoshop.
Here is the Before image of the car:
(Click to view the Image Full Size in a new Tab)
And here is the After Image of the same car following processing in Camera Raw and Photoshop:
(Click to view the Image Full Size in a new Tab)
Saving and Using Presets
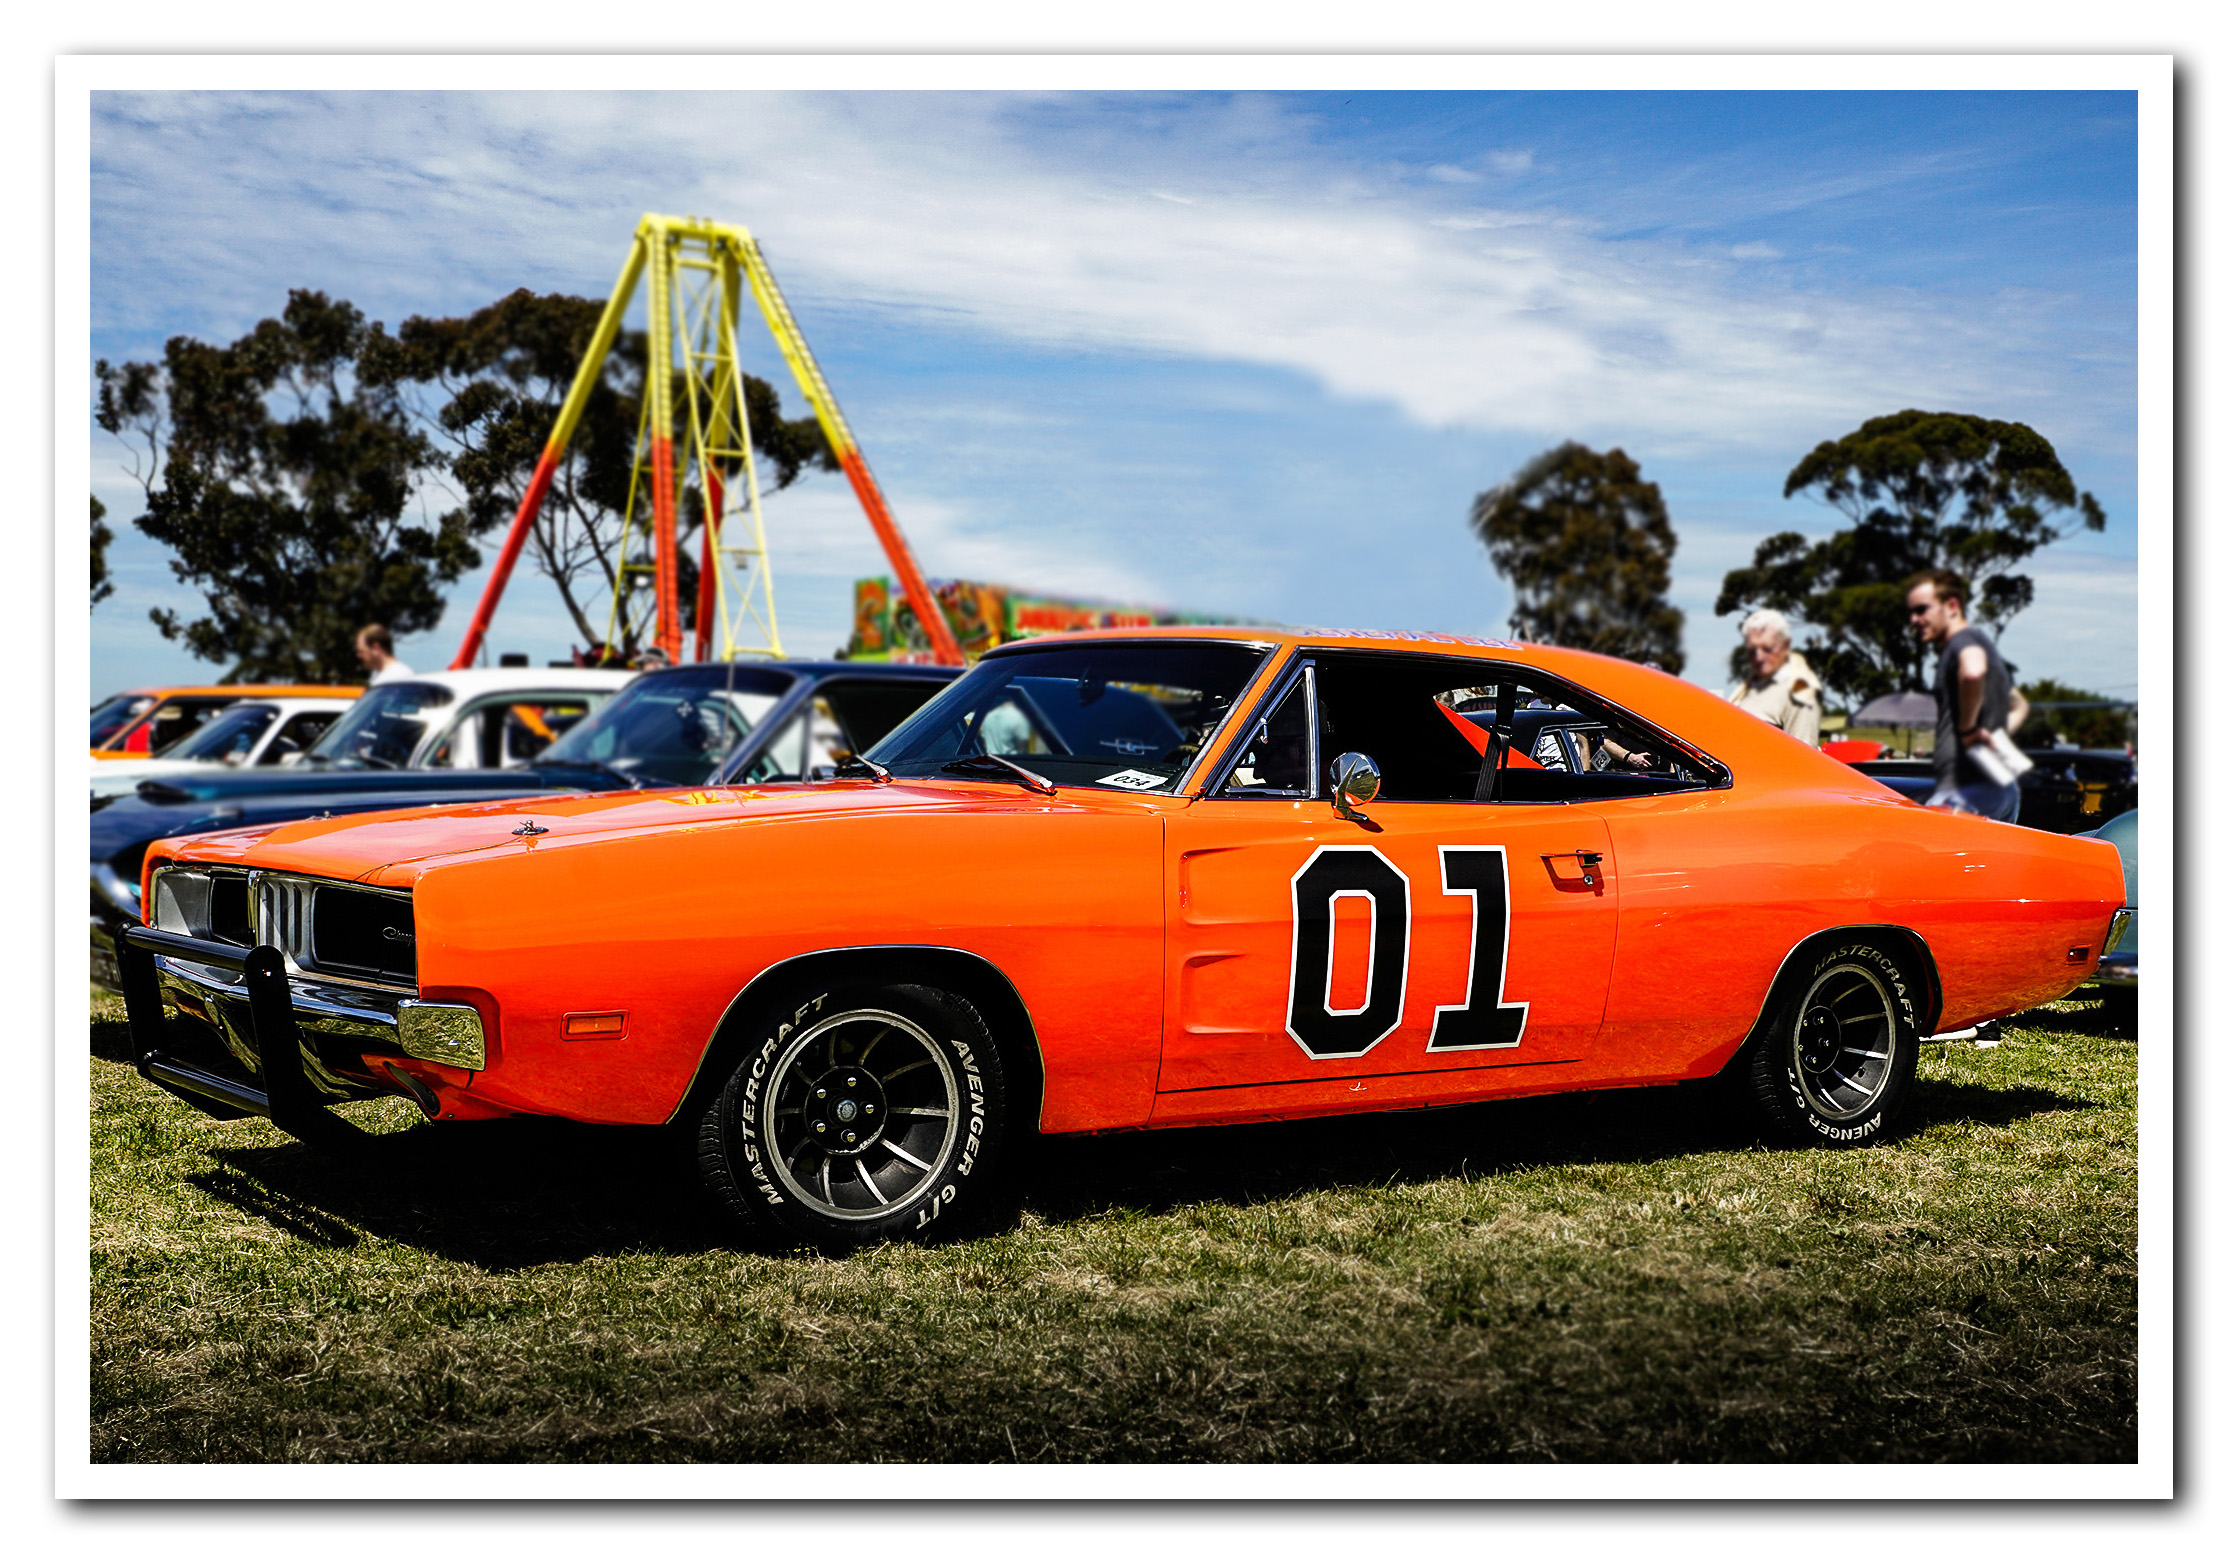
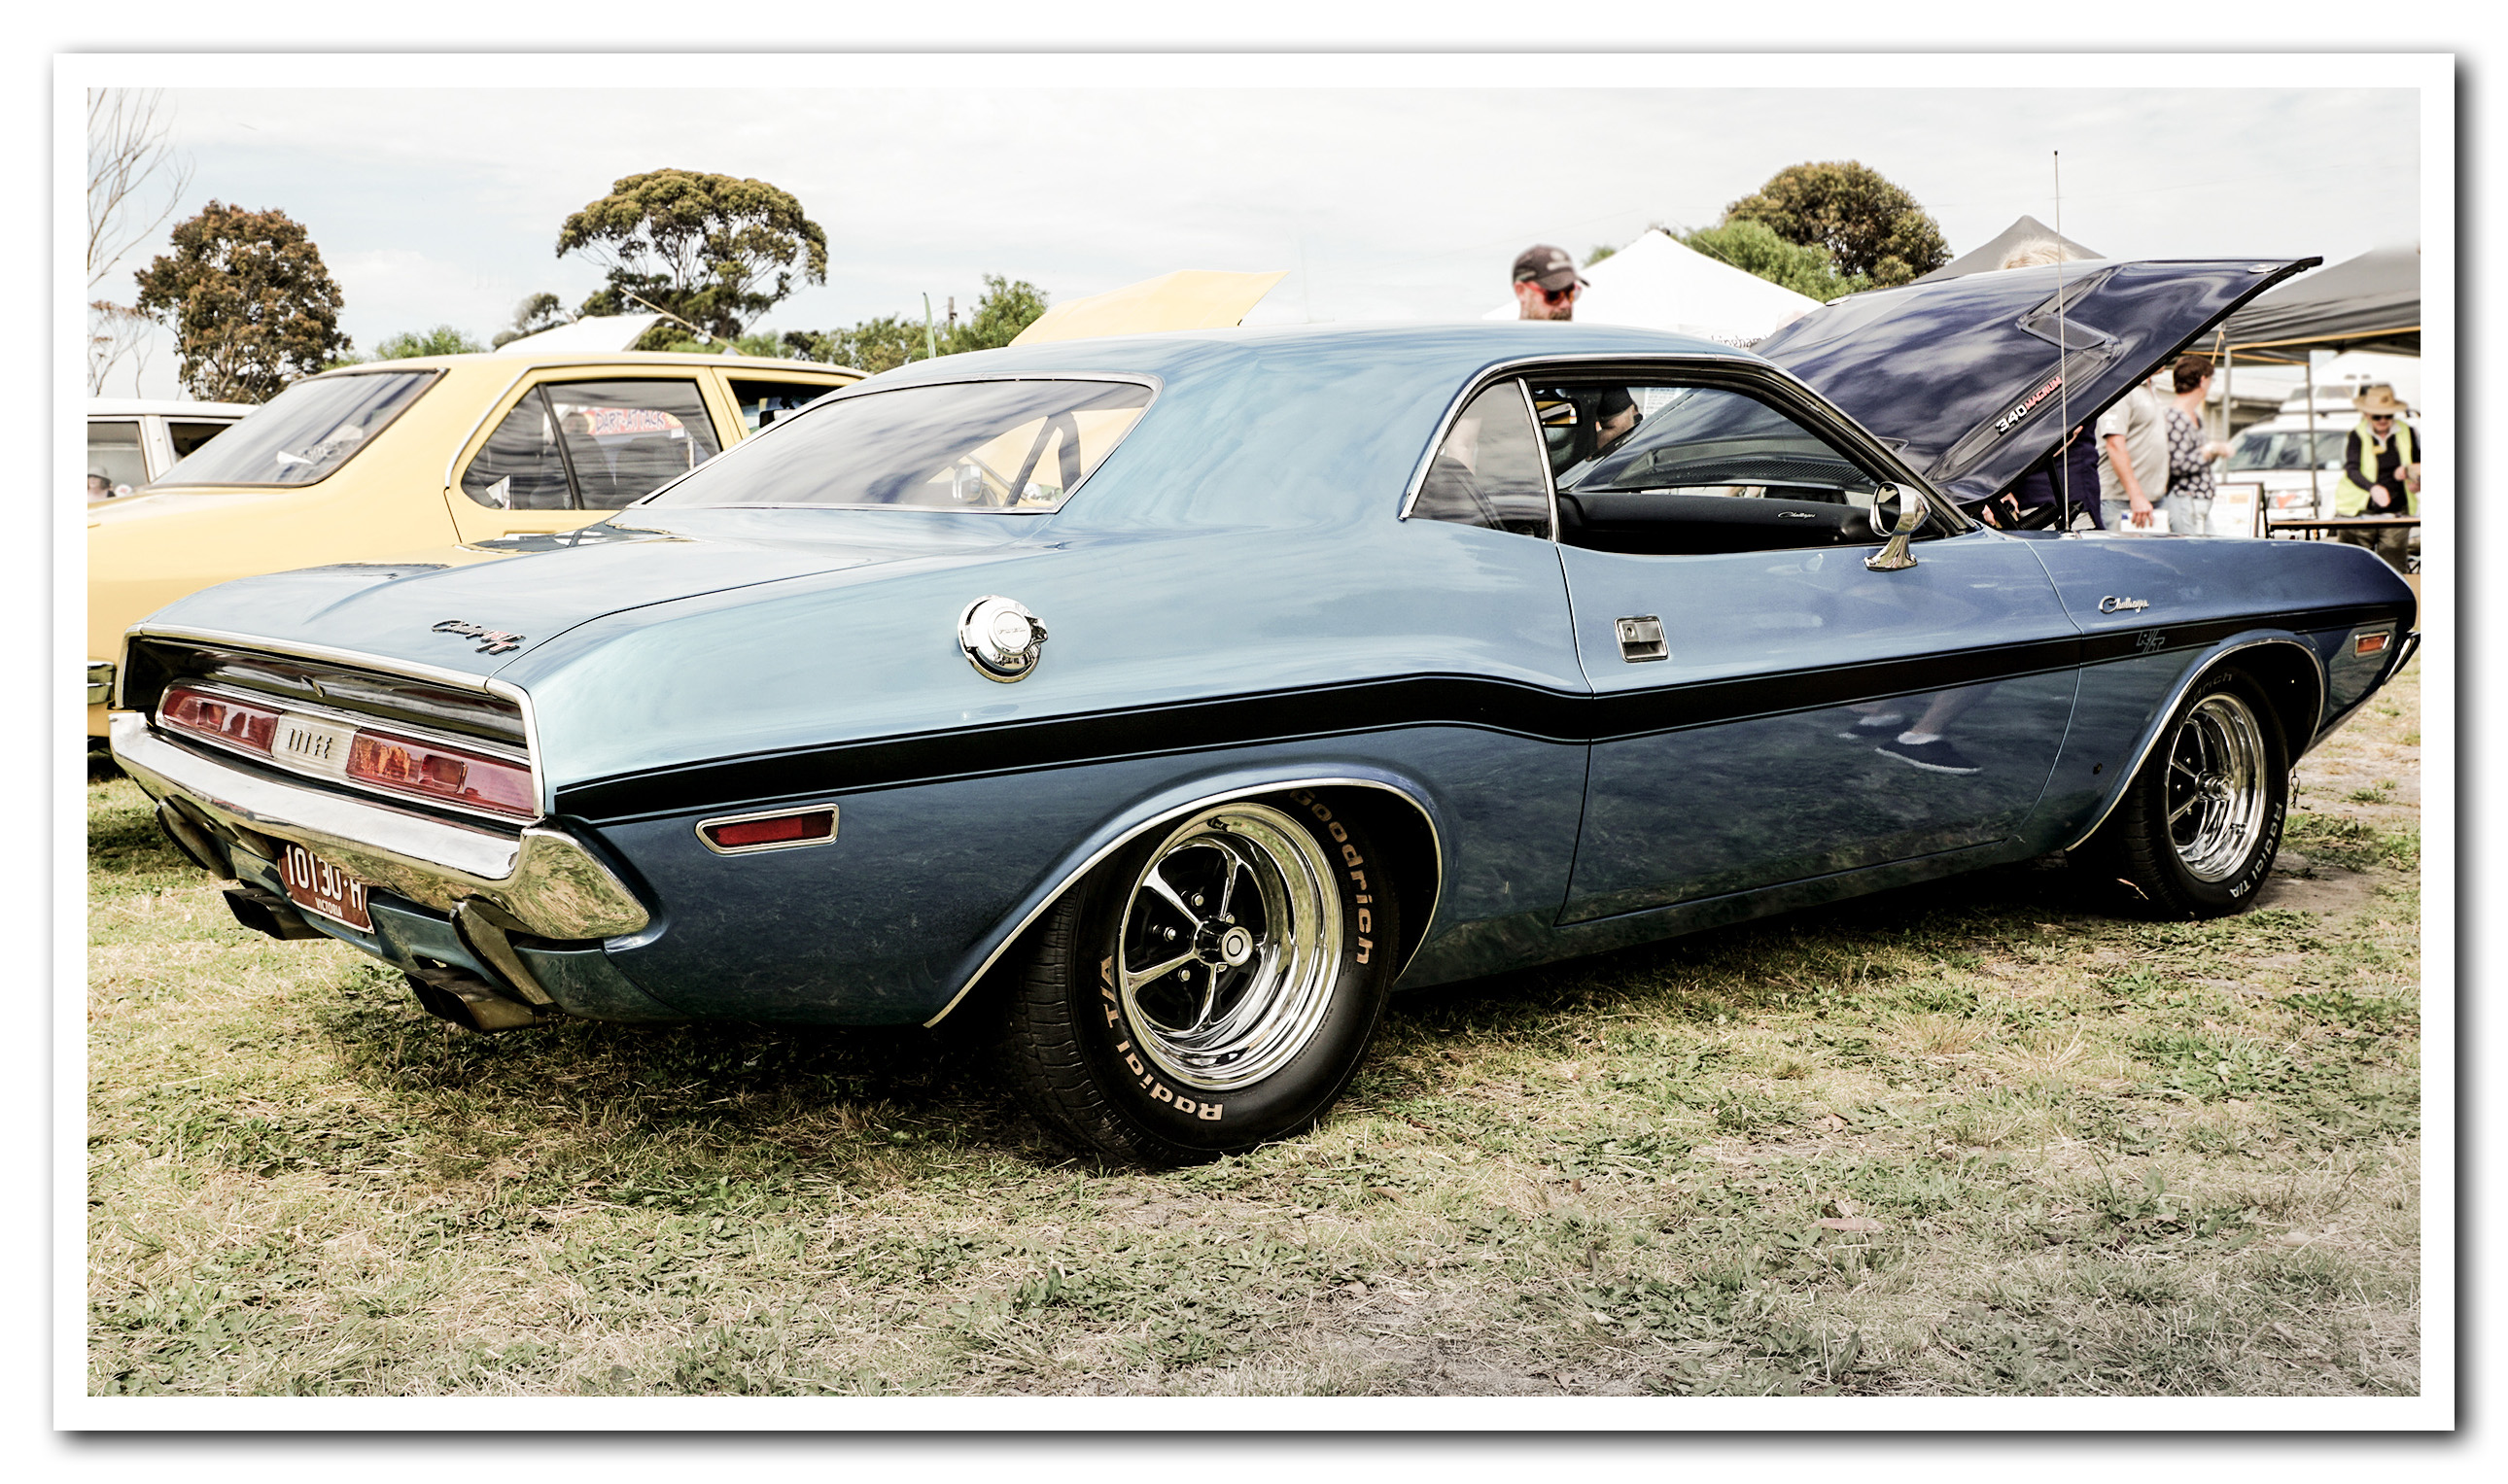
Here is the original image of a Blue Dodge Challenger at a Car Show:
(Click to view the Image Full Size in a new Tab)
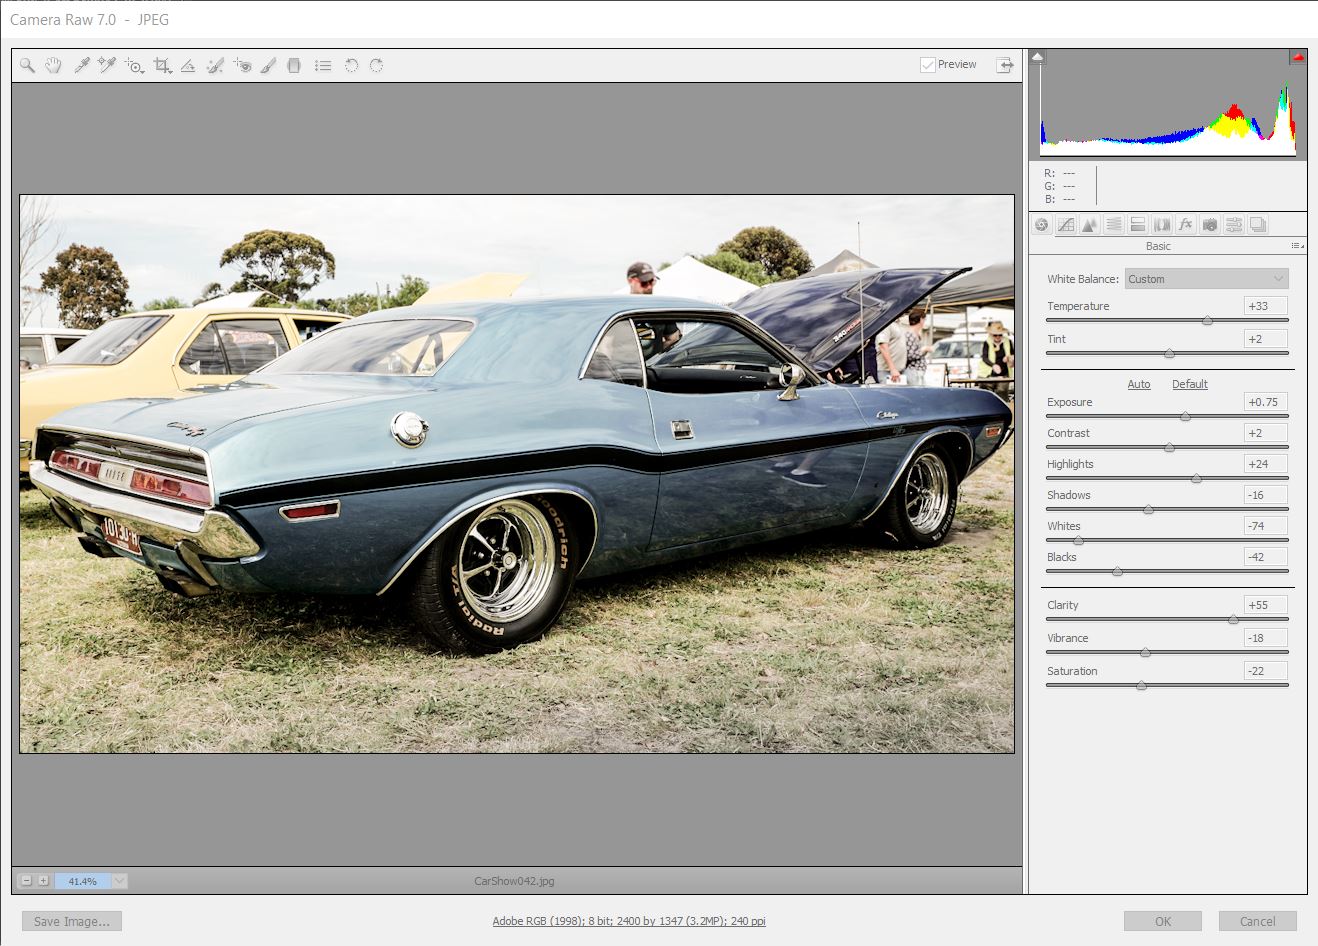
Using Camera Raw we created a set of adjustments to change the above image into an old retro style photo like this:
(Click to view the Image Full Size in a new Tab)
These are the settings that we used:
(Click to view the Image Full Size in a new Tab)
Because we have several other car pictures that we would like to apply the same effects to, it would be ideal to save these settings into the Camera Raw Presets Library.
This is easily done, as shown in the following seven minute YouTube video:
Once we have saved a Preset for our Retro Car Photo look, it is then easy to bring it up and apply it as a starting point on other photos.
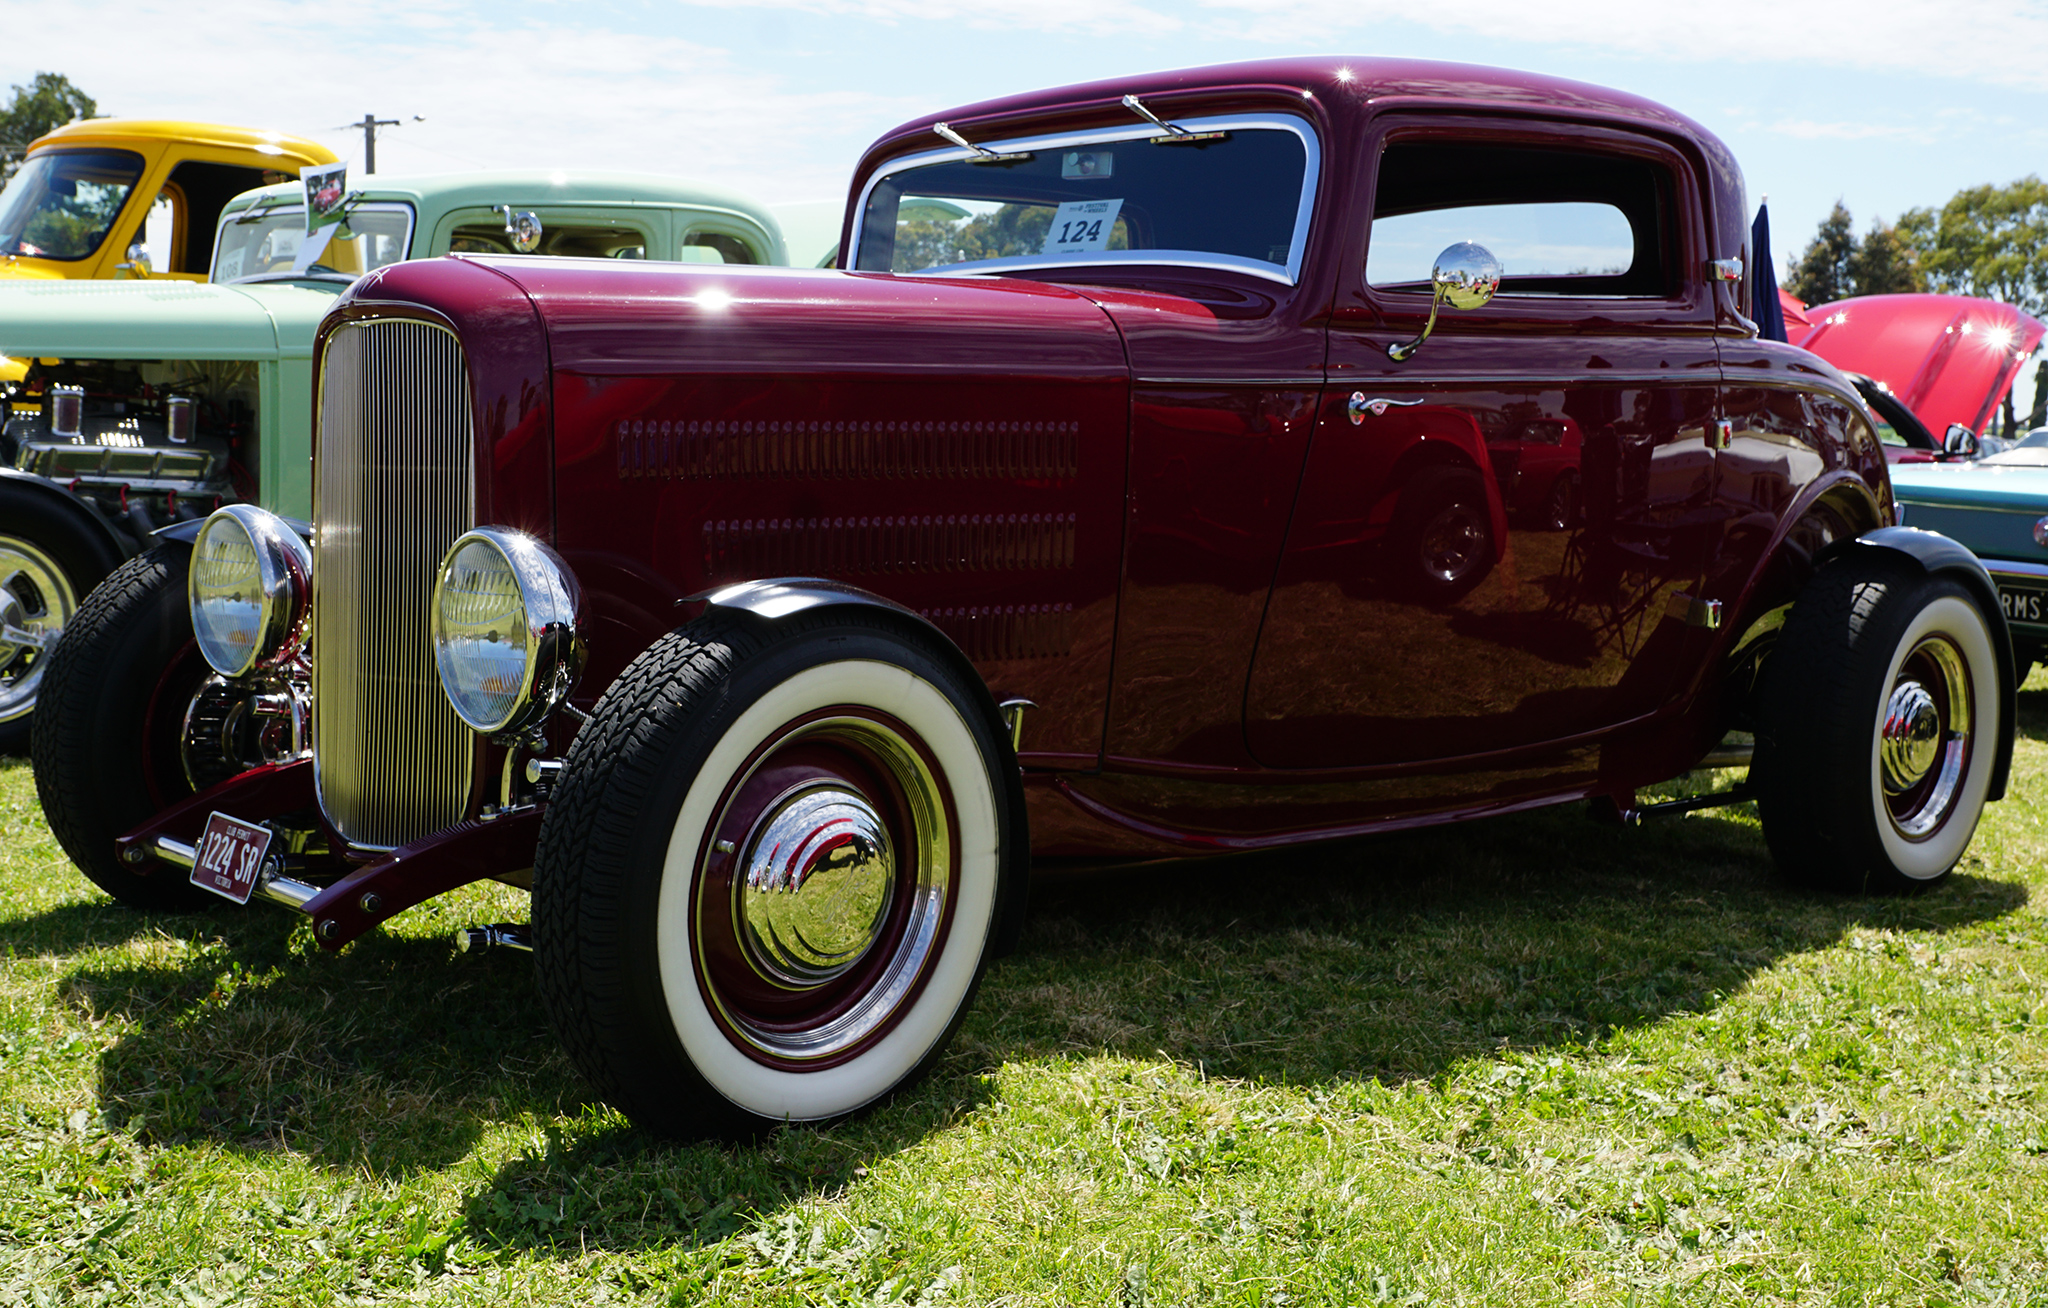
Here is the starting photo:
(Click to view the Image Full Size in a new Tab)
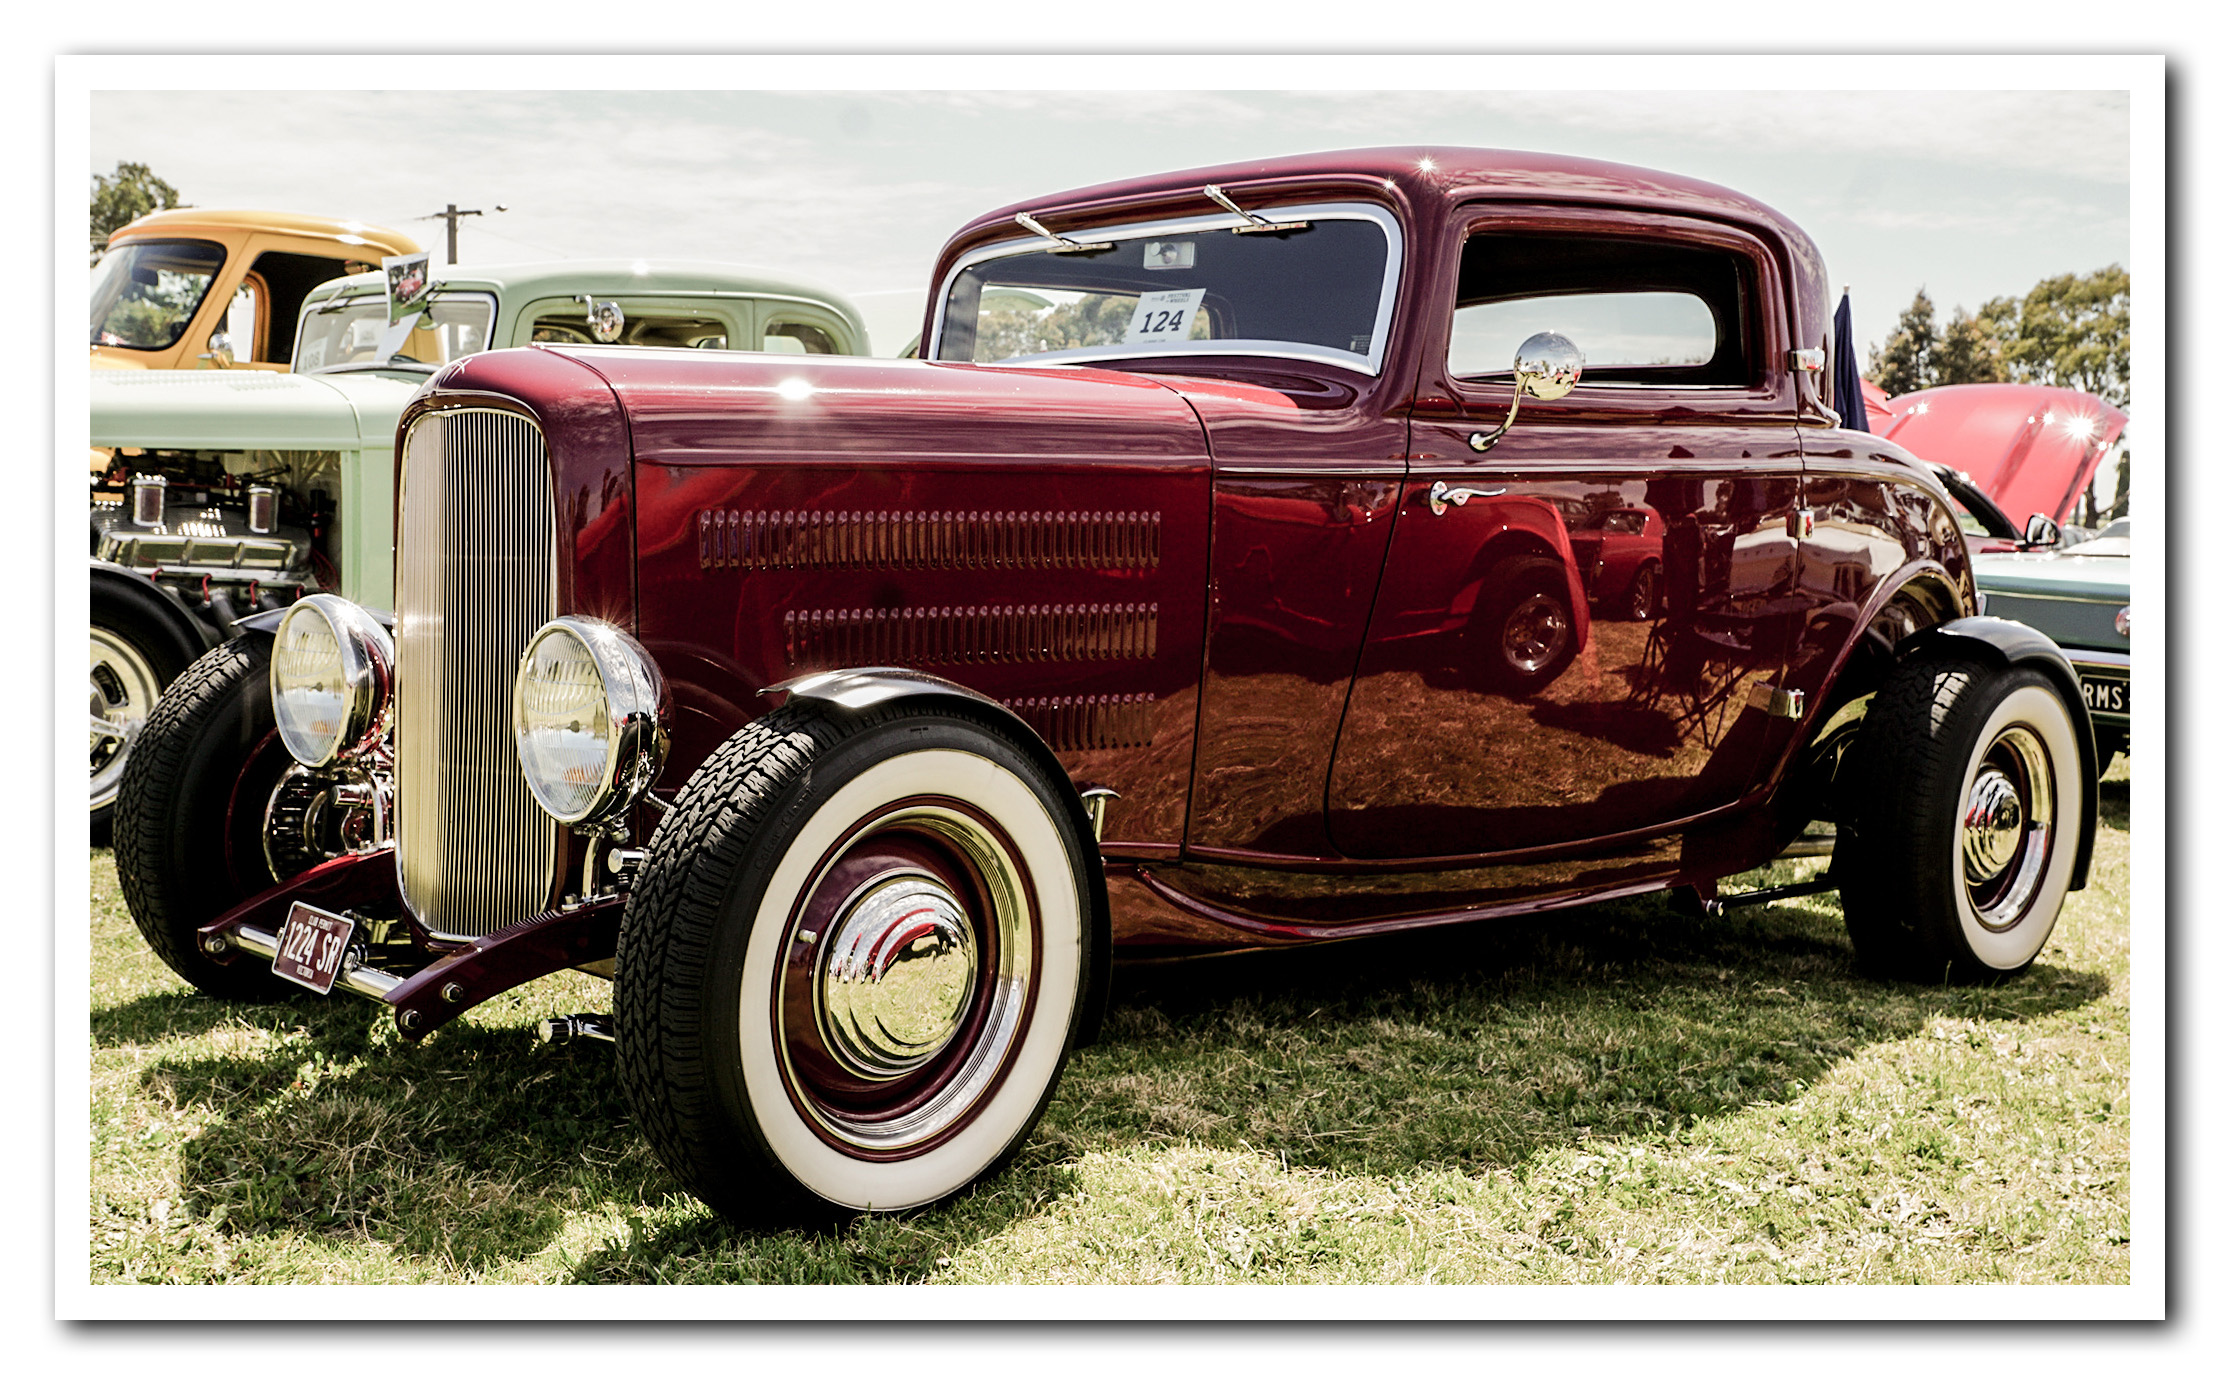
and here is the same image after applying our retro look Preset and some simple cropping:
(Click to view the Image Full Size in a new Tab)
Special Effects
Camera Raw Presets and tweaking them allows us to create our own set of filters that can create Glow and HDR type special effects.
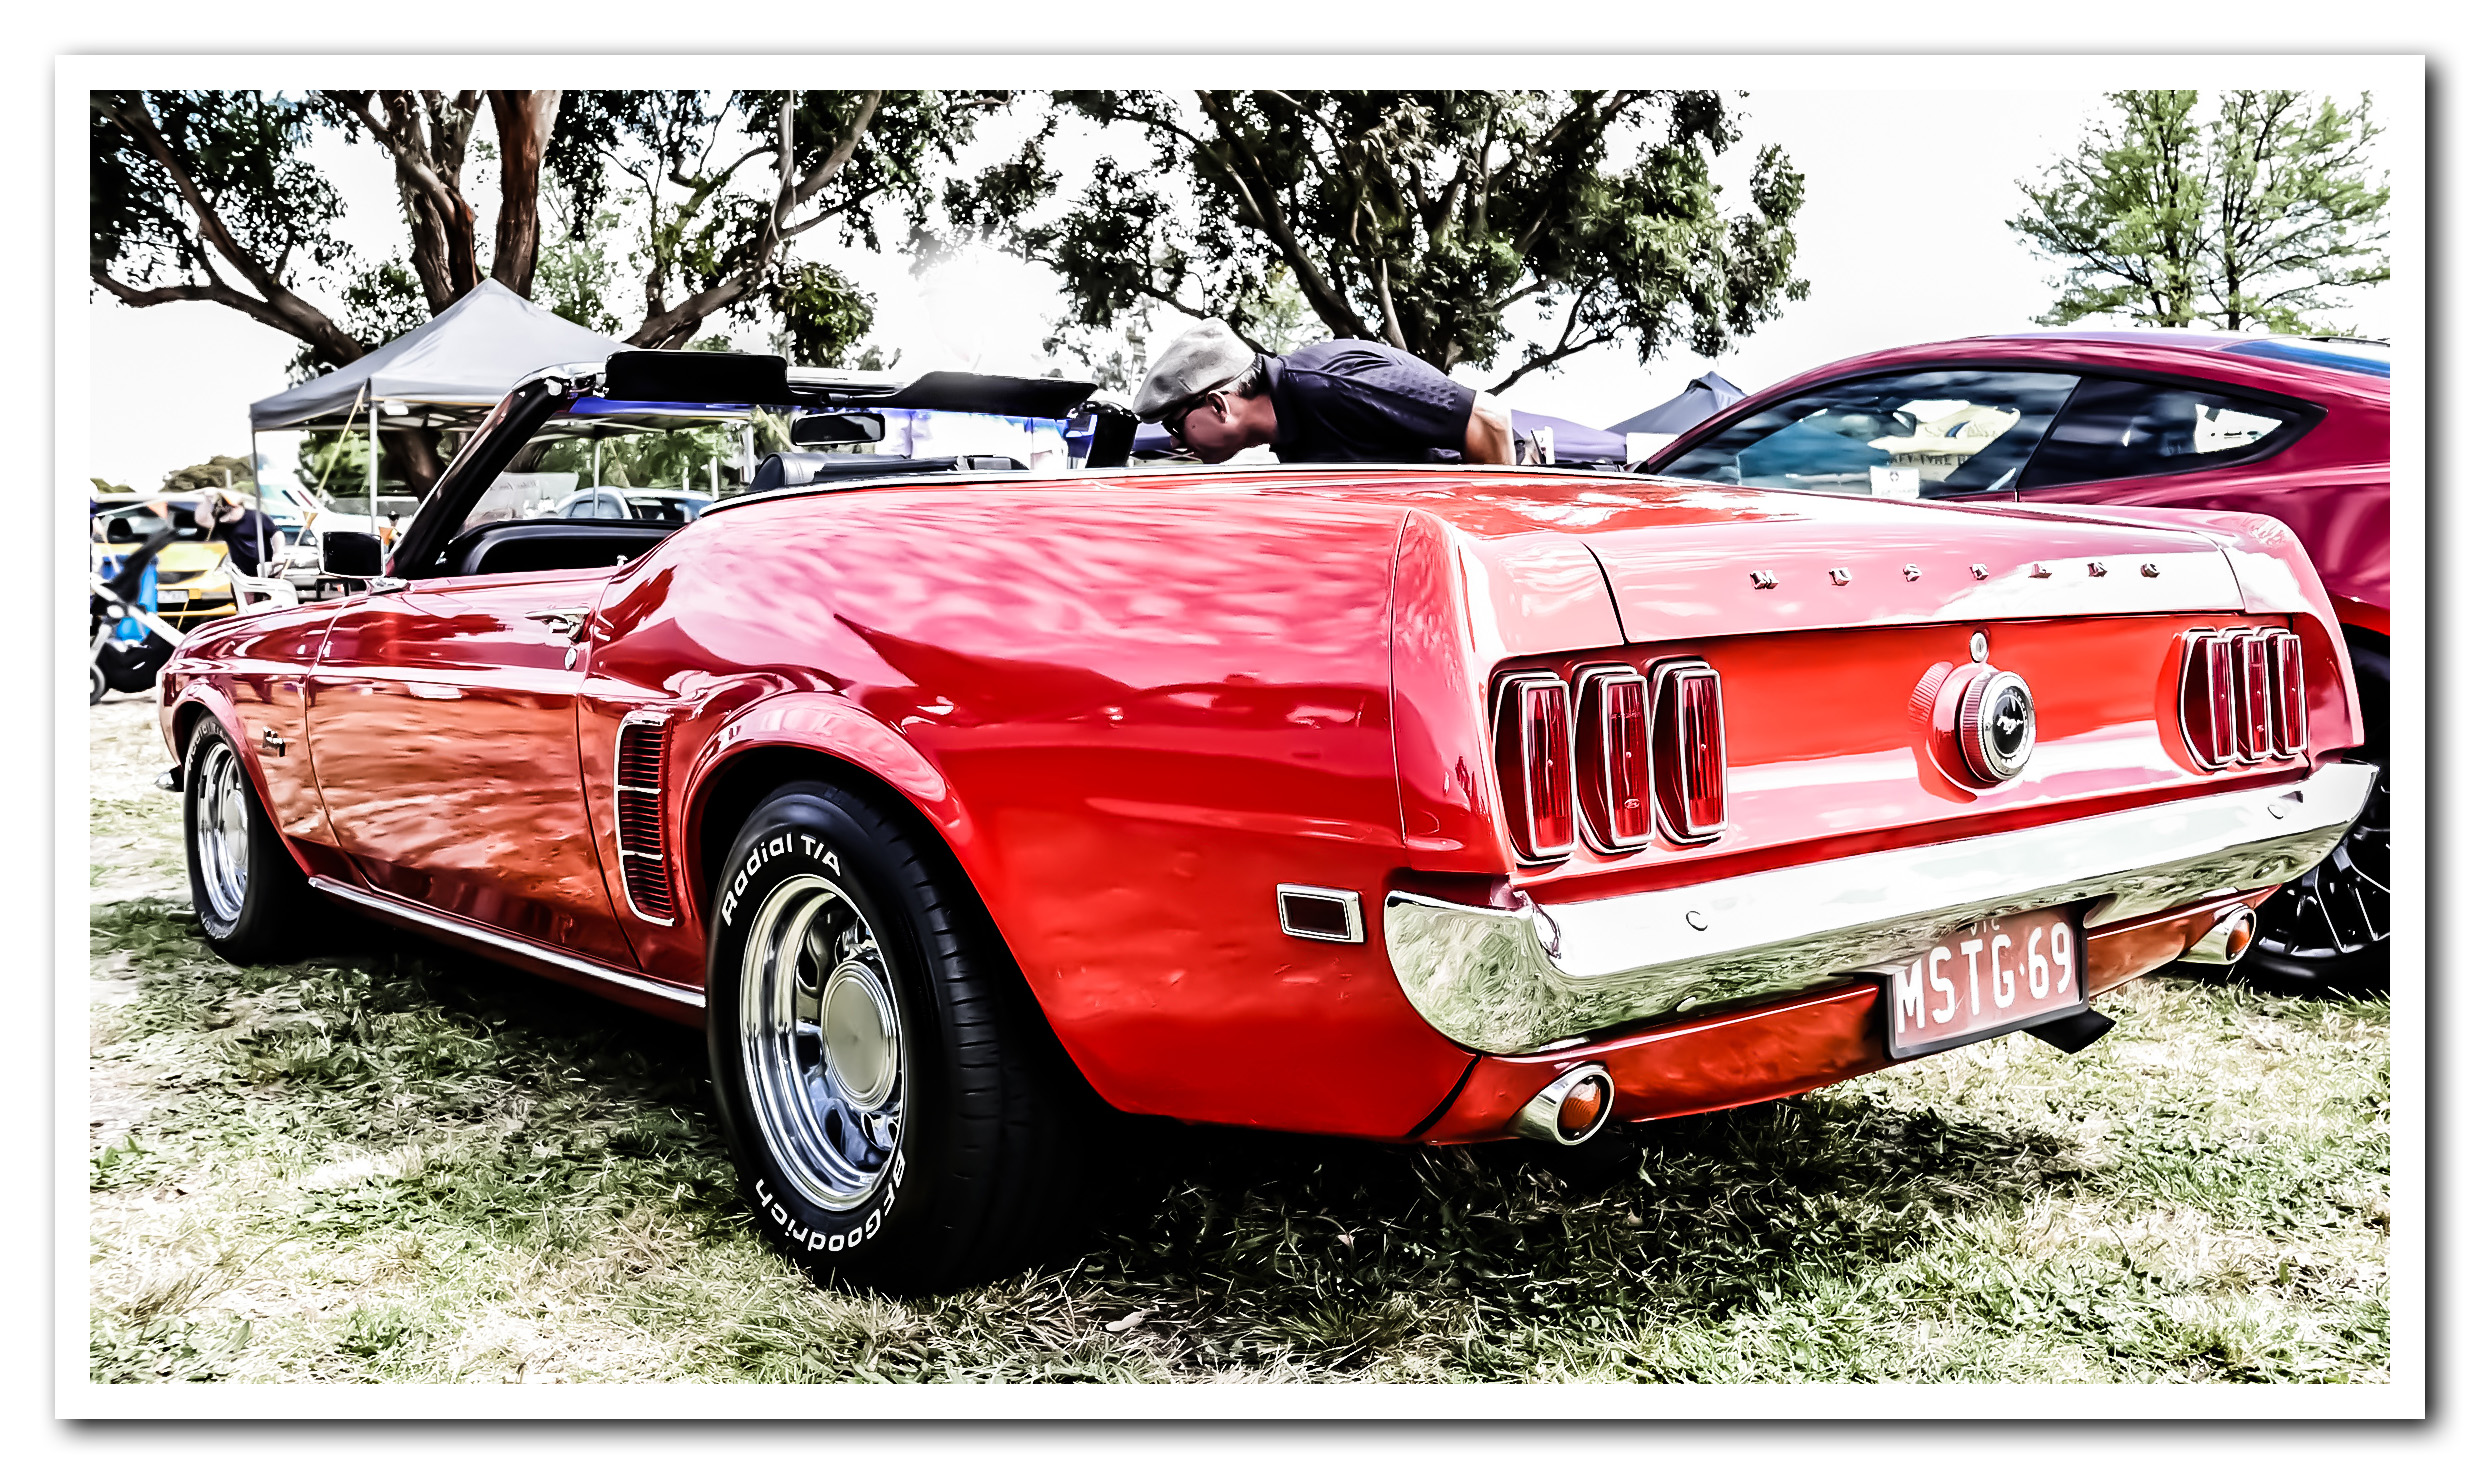
Here is a starting Photo of a fabulous Ford Mustang:
(Click to view the Image Full Size in a new Tab)
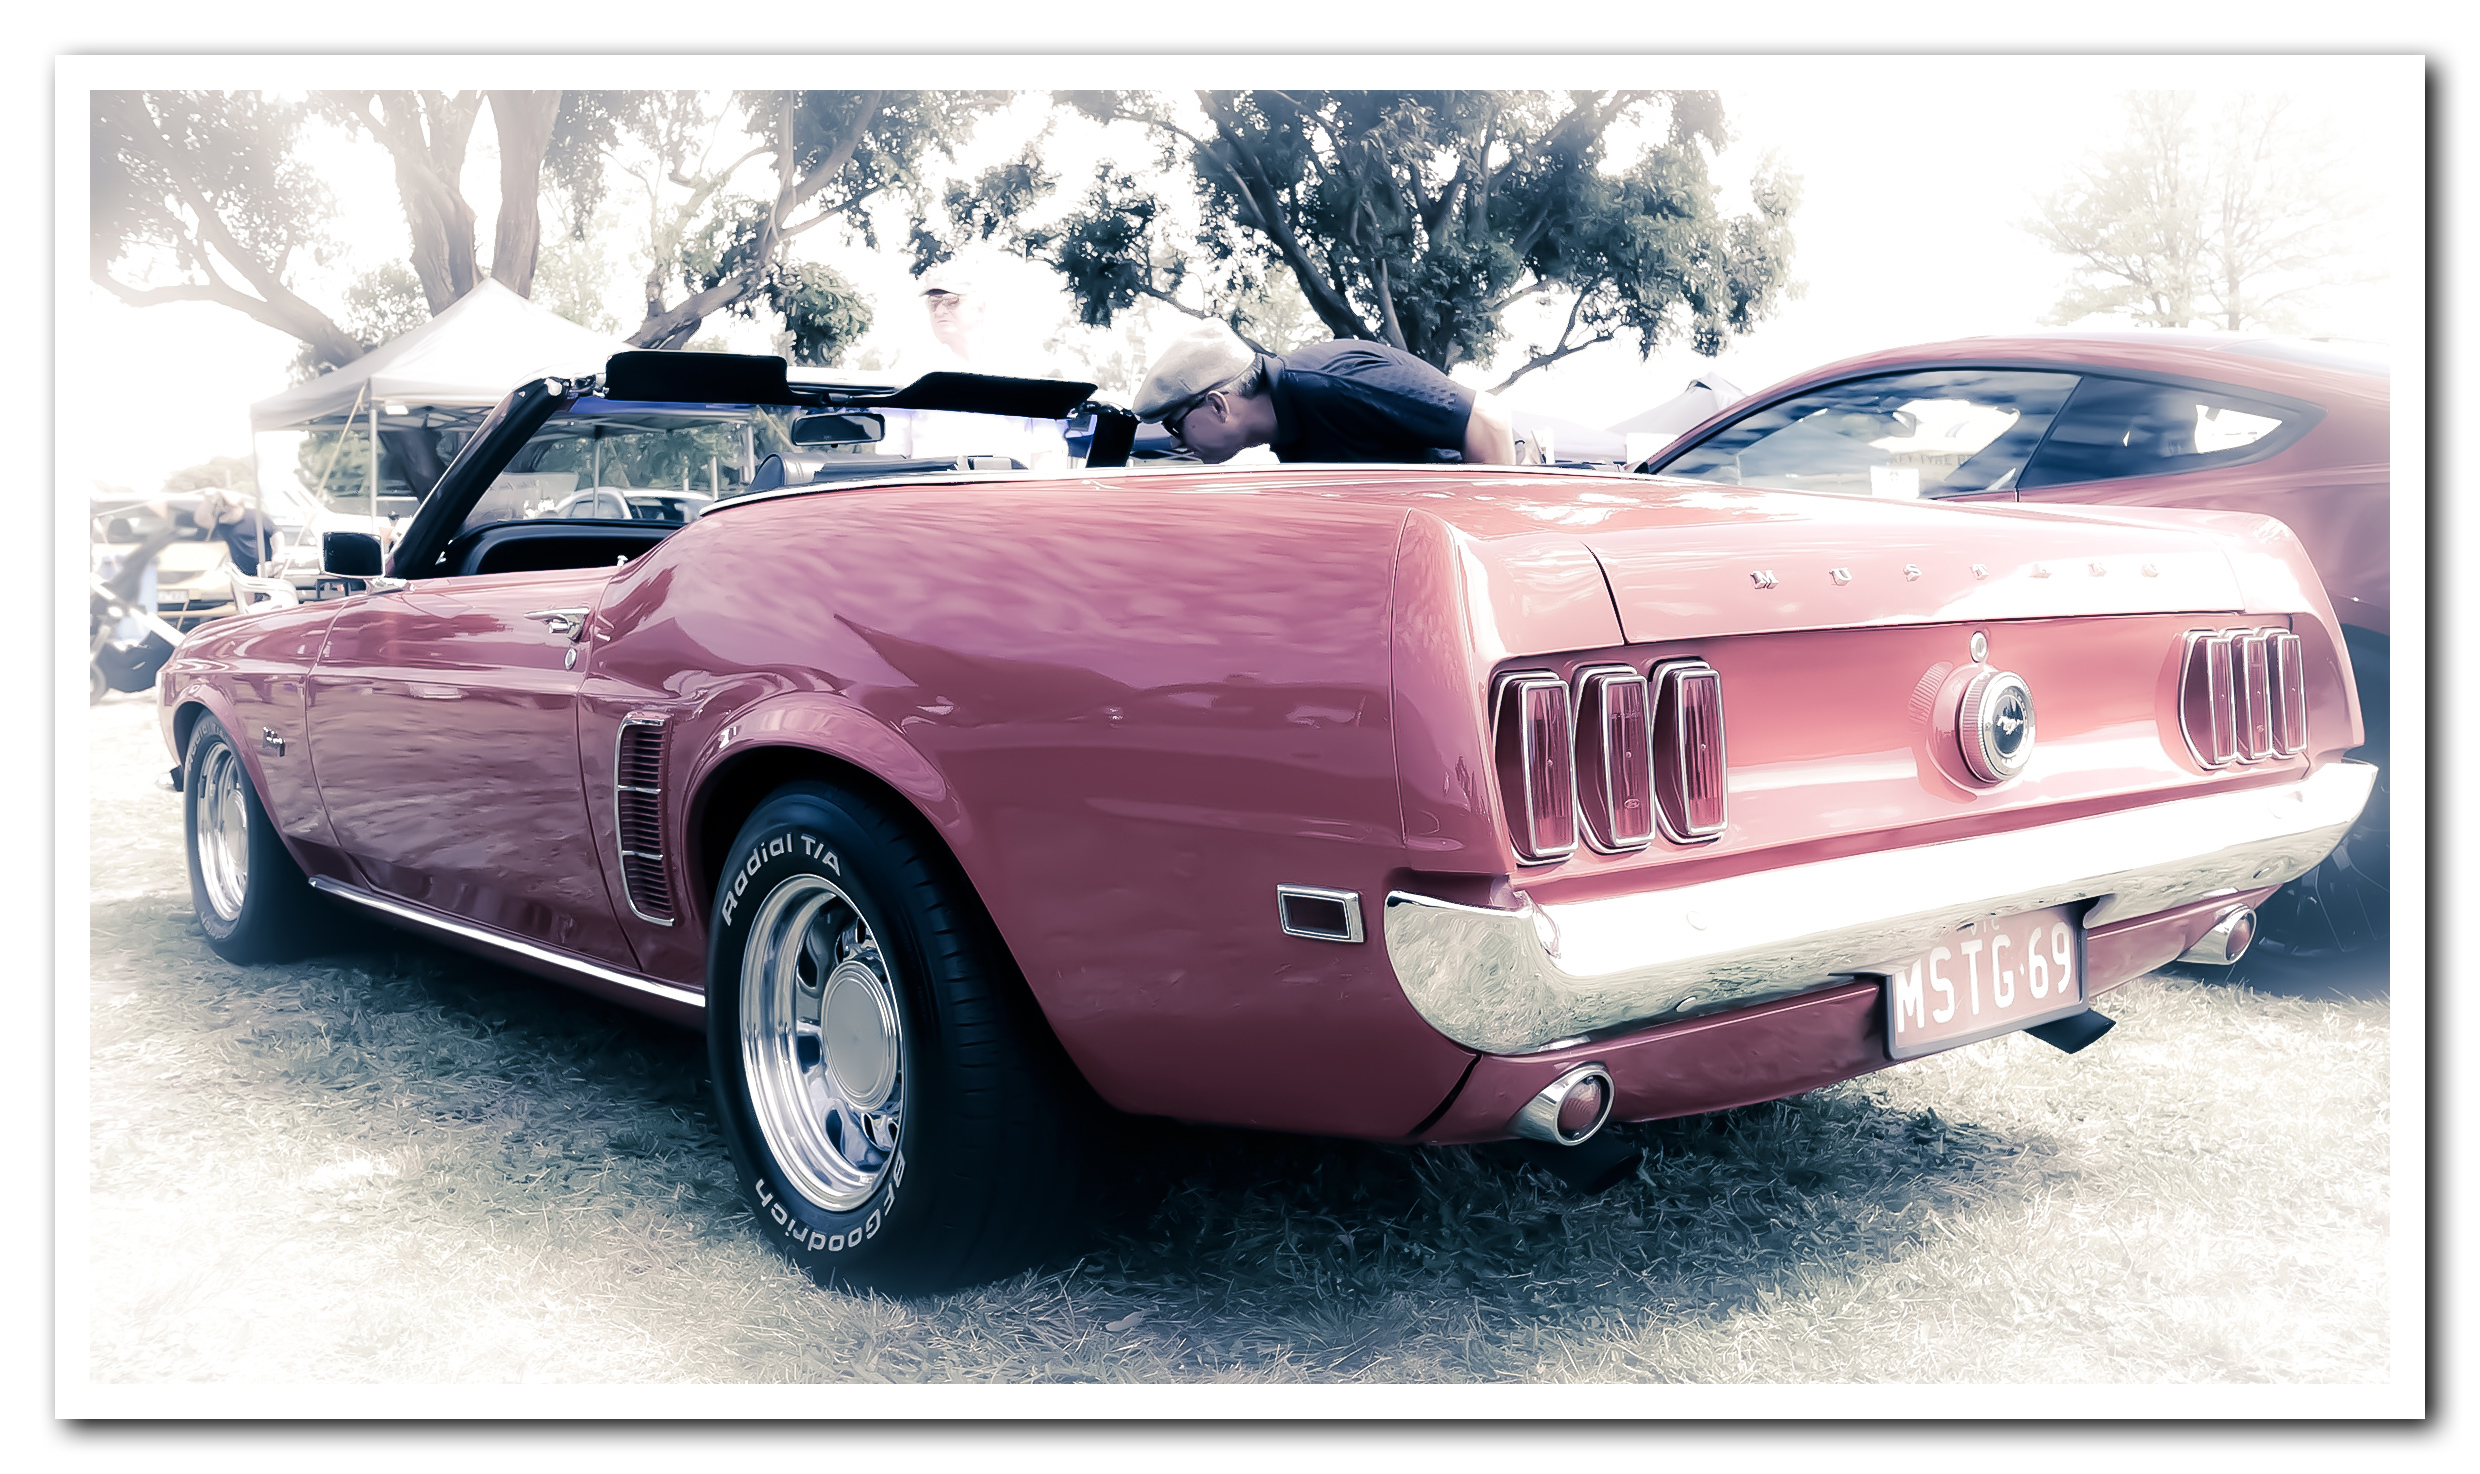
And here is the same photo as a HDR type image after processing in Camera Raw (mainly pumping the “Clarity” all the way up).
(Click to view the Image Full Size in a new Tab)
Or we can add a different set of adjustments to create that “Dream Car” look:
(Click to view the Image Full Size in a new Tab)
Adjusting People Pictures
Camera Raw can also be used for making subtle adjustments to People Pictures.
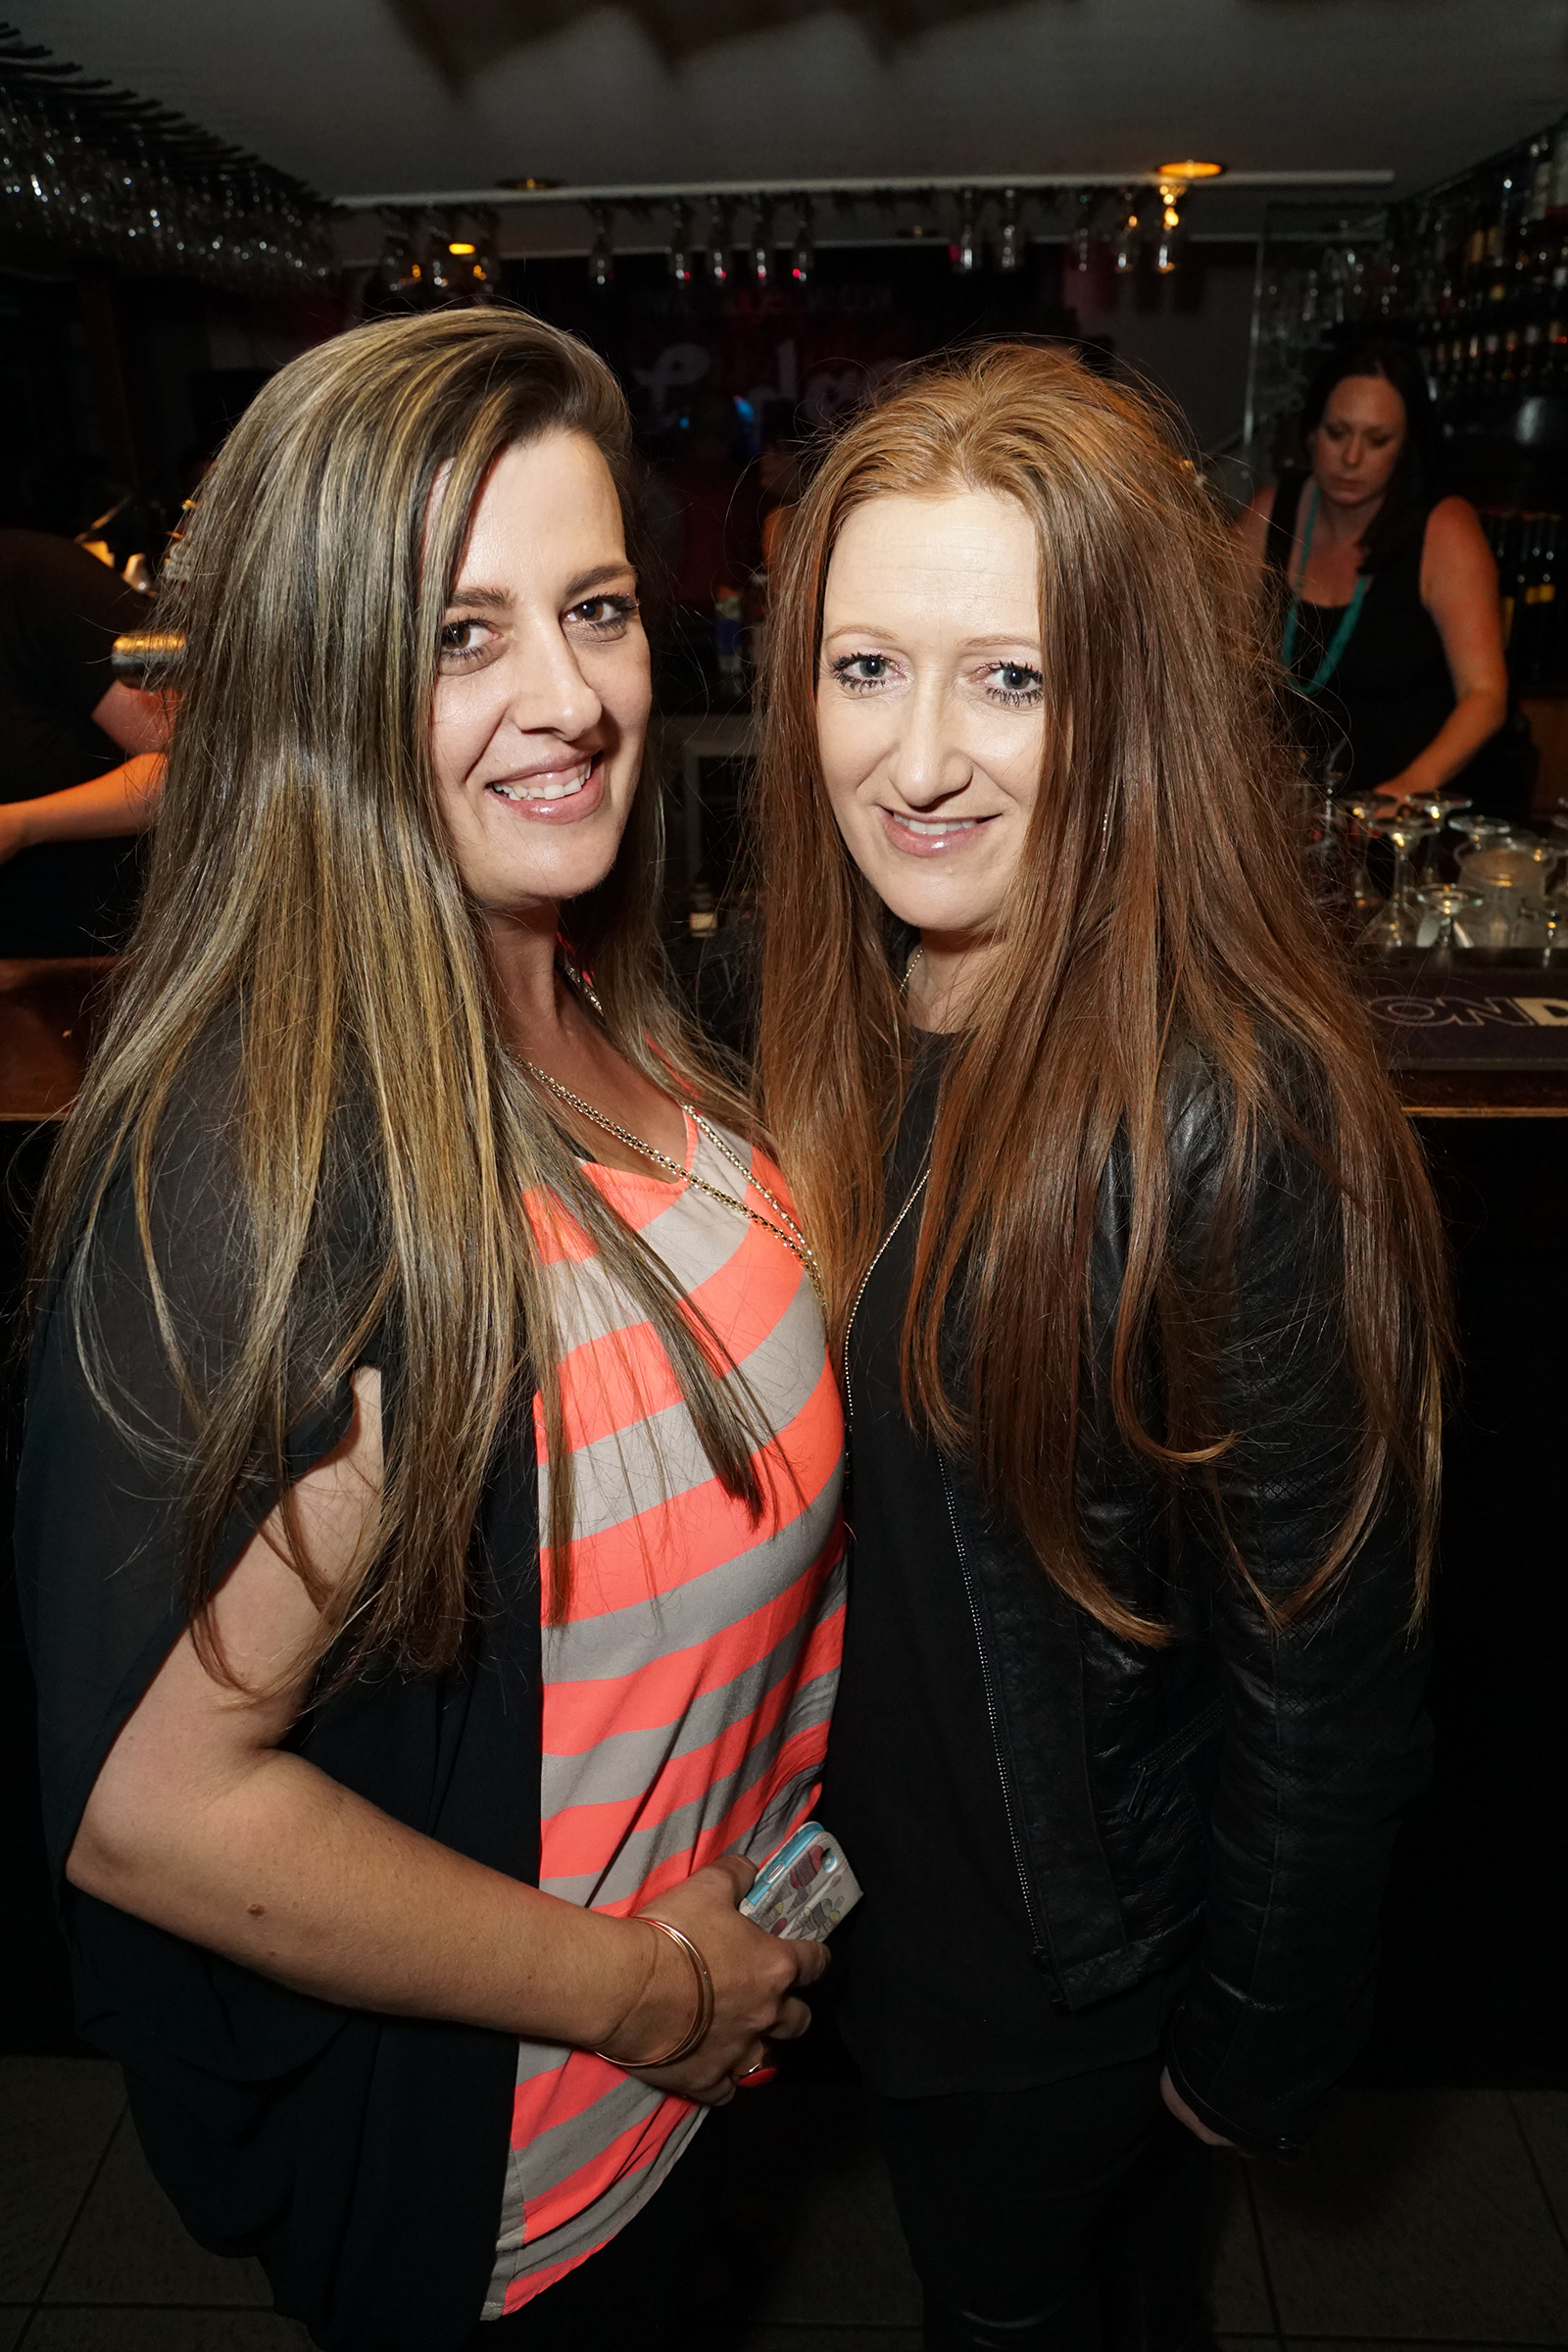
For example here is a Before Image:
(Click to view the Image Full Size in a new Tab)
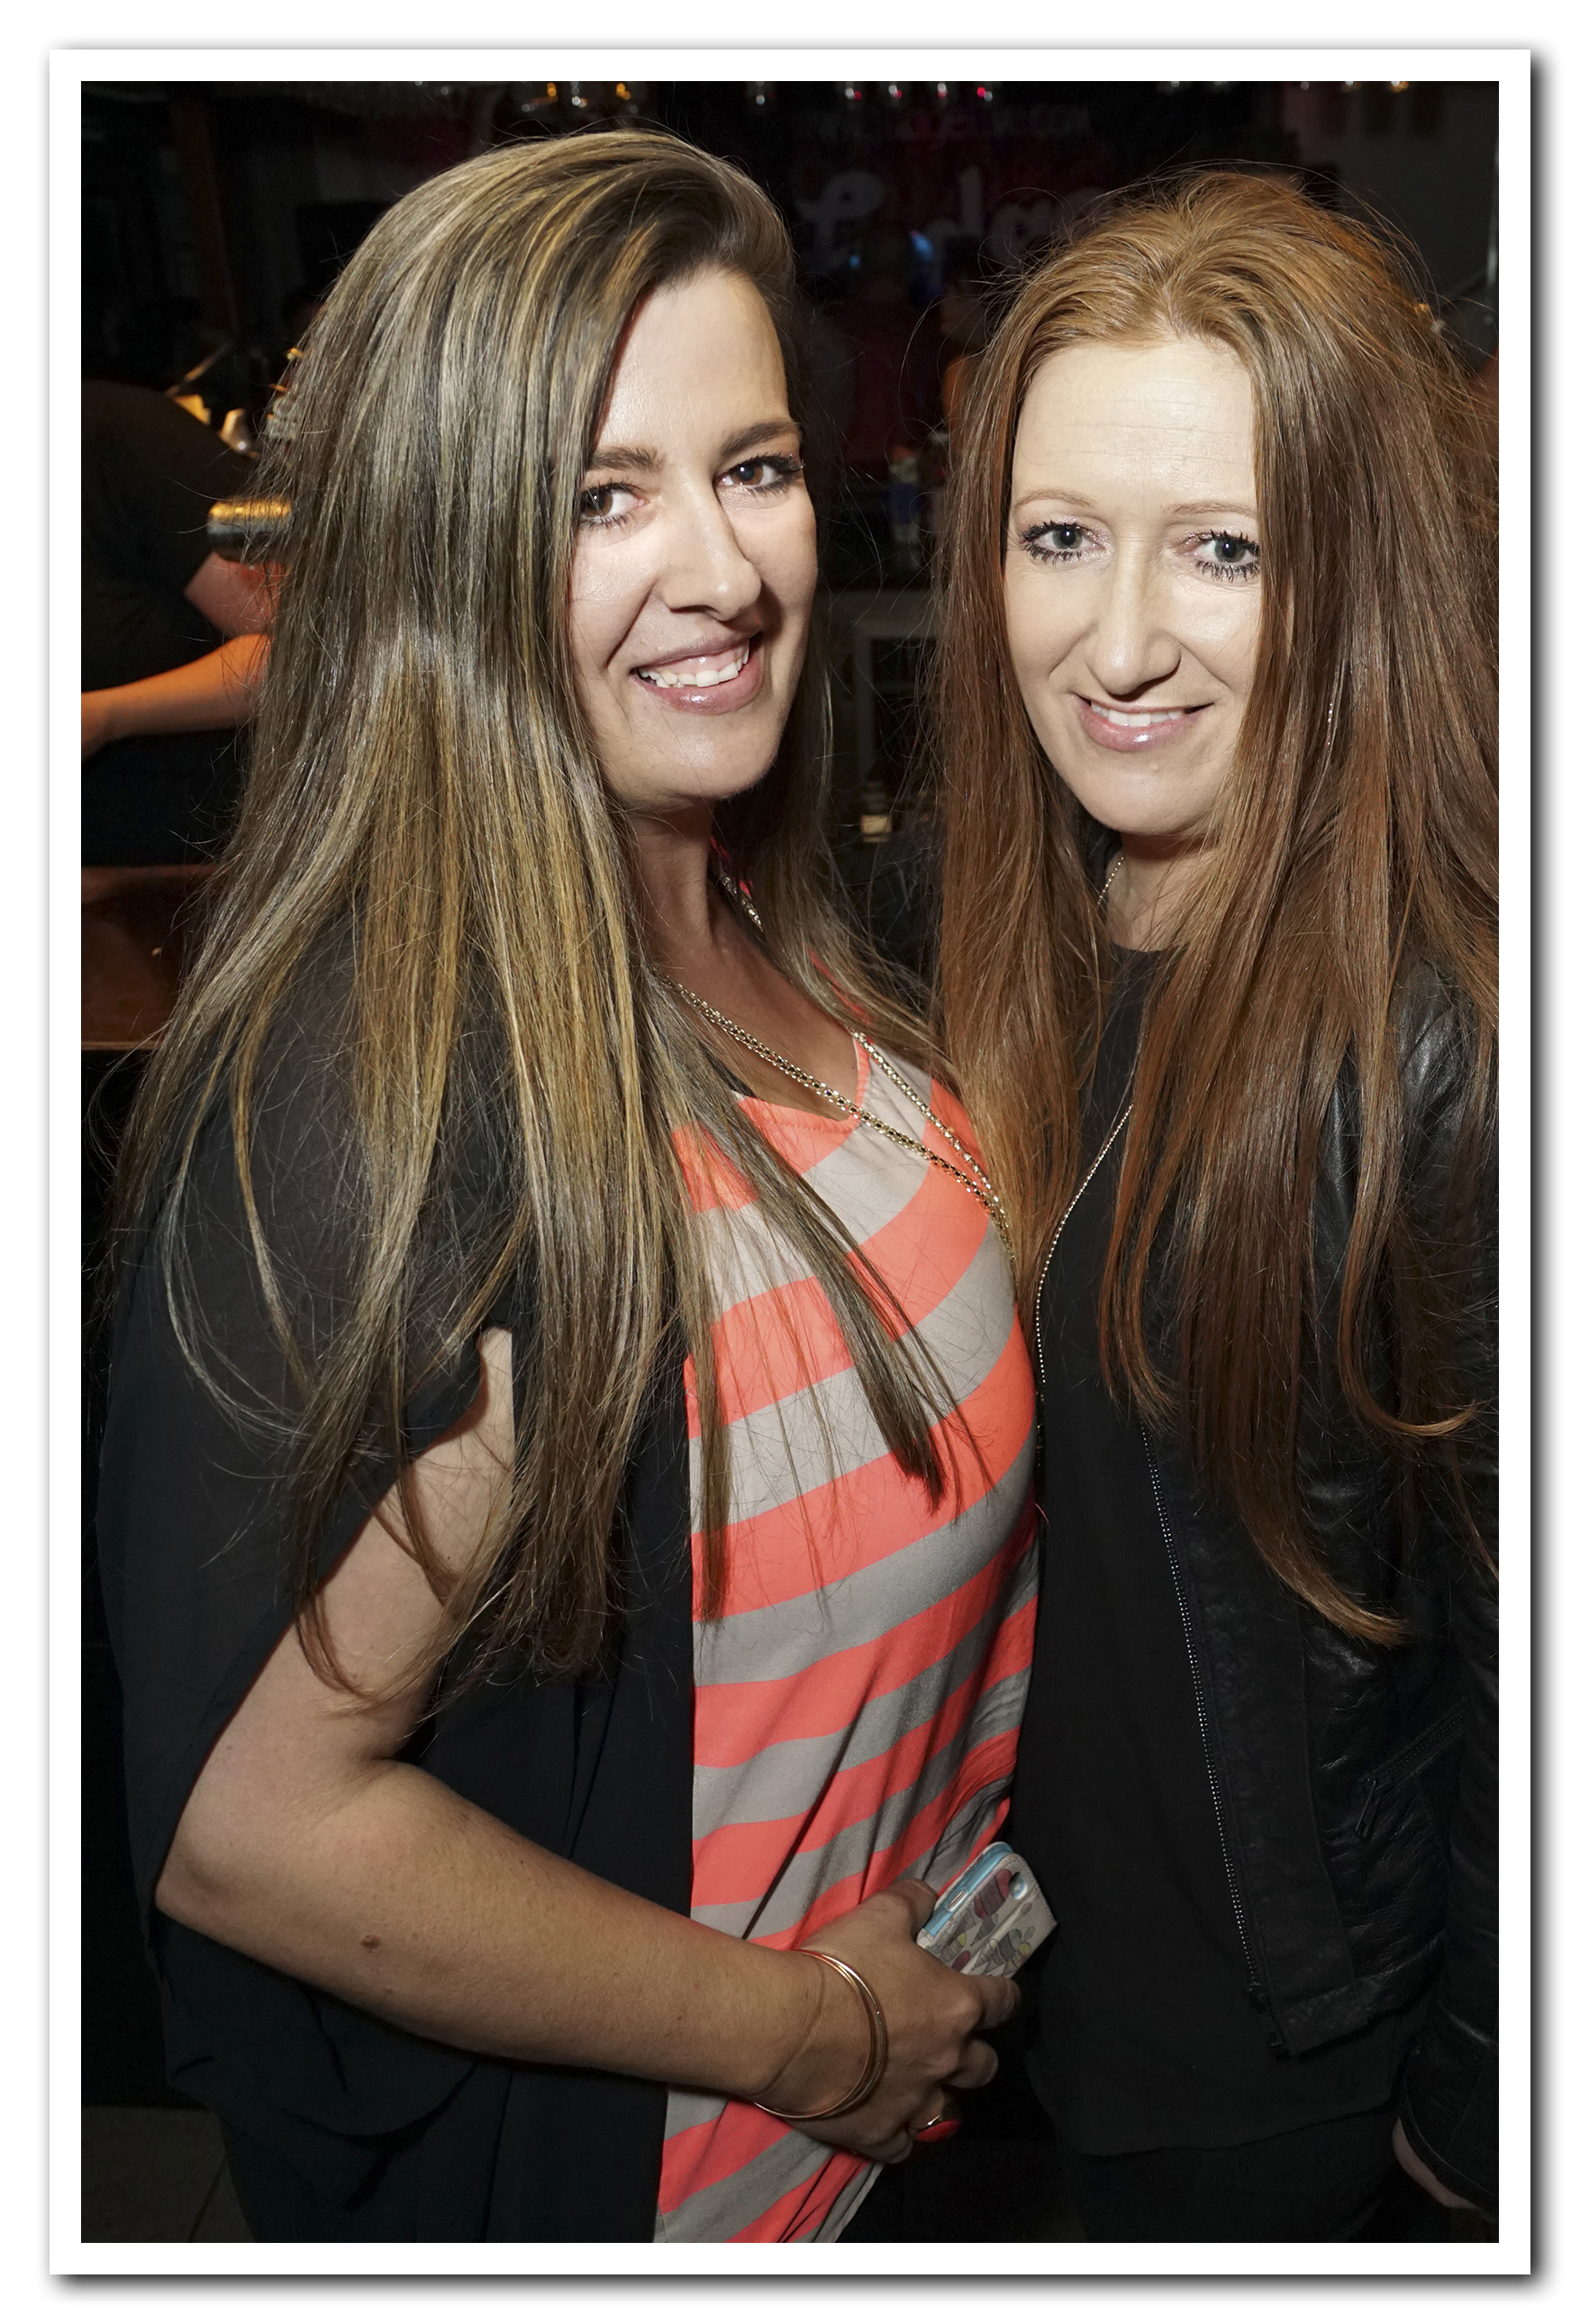
and here is the After Image:
(Click to view the Image Full Size in a new Tab)
The difference between the Before and After images is very slight: the idea is to lighten up the eyes a little, and make the hair a little bit lighter.
Photos Through Glass
When we take a photo through glass, there is often reflection and over exposure as in this example:
(Click to view the Image Full Size in a new Tab)
There is also a problem in the above image that the Lizard’s head is in shadow and not showing up clearly.
Here is the same image after some adjustments in Camera Raw:
(Click to view the Image Full Size in a new Tab)
Full Camera Raw Tutorial
We have created a full Tutorial on Camera Raw which can be accessed in the PDF document below:
As well as the free Photos By Passy Tutorial, here is a selection of the best YouTube videos we found on using Adobe Camera Raw.
First up is an official Adobe 7 minute video about using Camera Raw on a dark and gloomy image, and really bringing the light and colours up to create something quite spectacular:
The following 12 minute video from Lynda.com is good, except near the end where the quality of the image they are working on becomes quite grainy. Goes through fixing Exposure, Highlights, and Shadows, on the Basic Panel really well in the first part of the video:
The lady who made this next video has a very American voice, but her 30 minute video does give a very comprehensive overview of all the adjustments that can be made in Camera Raw, particularly for Landscape Photos:
This 15 minute video is okay and shows how to touch up a dark sand dunes image using Camera Raw:
Five minute video specifically on the Basic Panel Clarity, Vibrance, and Saturation:
Great 10 minute video all about the Targeted Adjustment Tool:
Video showing the basics of using a Graduated Filter:
Video showing how to apply Multiple Angled Graduated Filters:
Video showing the Clone / Heal Brush in Camera Raw:
The Clone Tool (paint brush with spots around it) is also called “The Spot Removal Tool” and here is a video about using the Tool to remove Spots.
In this 5 minute tutorial, Camera Raw is actually accessed using the Filter Menu in Photoshop, but this only works in the latest Photoshop CC. In earlier versions of Photoshop we have to use File > Open As on the original image.
Camera Raw Presets and Snapshots seven minute video:
Camera Raw is an extremely useful tool for pre-processing photos before taking them into Photoshop.
It is very similar to Adobe Lightroom, and handy to use if you do not have access to the Lightroom App.
For more Great Tutorials about Photography, Videography, Cameras, and Adobe Products, check out our “How To” page at the following Link:
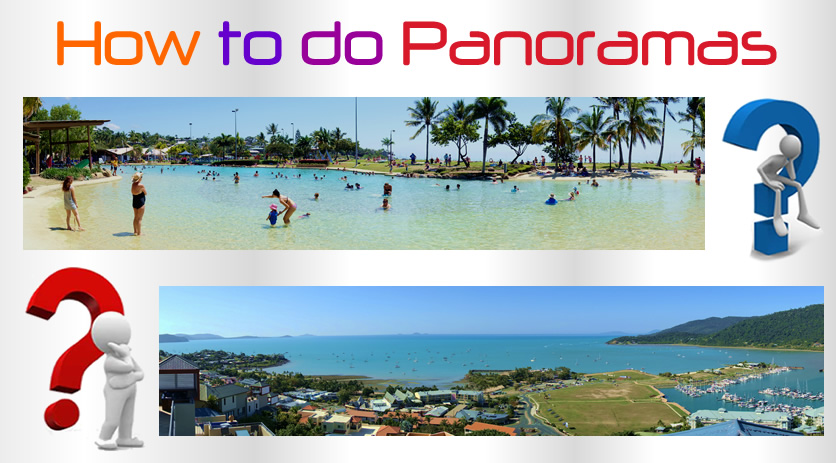
A Panorama image is basically several photos stitched together to create one big wide angle scene.
It is best to pan the camera from left to right while holding it level, or using a tripod, and take between 3 and 5 separate photos,
eg. a Left, a Center, and a Right Photo for the most basic Panorama. Also make sure you do about 30% overlap on the photos.
In fact all Photo stitching software works left to right, and so always pan from left to right.
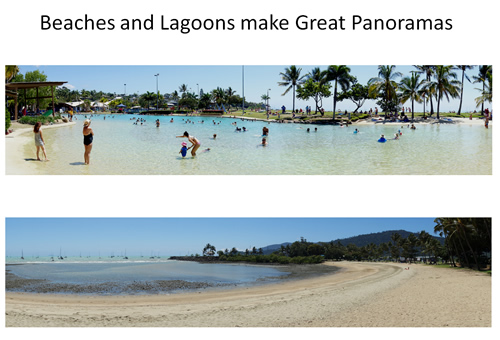
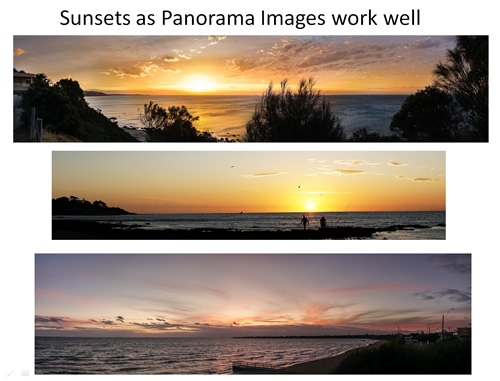
Panoramas are great for Landscape shots, Beach shots, City Shots, Sunsets, or anywhere that you need to take a big wide view into a single image.
We could buy an expensive wide angle lens to get Panorama shots, or a 360 camera, but all of this is totally unnecessary, as we shall see in this lesson on how to make Panoramic Images.
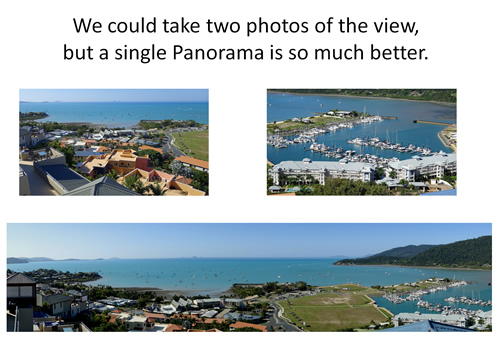
Example Panorama Photos
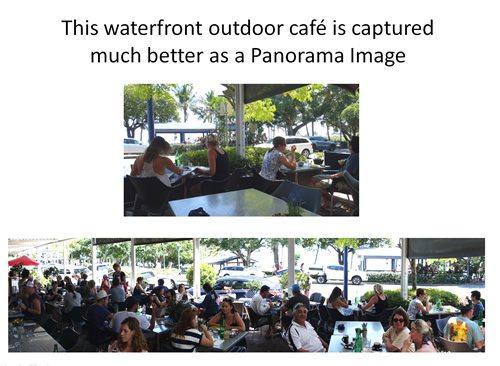
Taking a Panorama shot captures the whole view so that the image is a lot more like actually being there.
Often a sweeping Panorama image can capture the look and feel of a location far better than just a single image.
Taking a Panorama often produces a semi circular type view, and this is great for images of Beaches.
Panoramic Views are great for capturing Sunsets.
If you are on a PC and want to take a look at the previously shown examples full size, then click on the link below:
Many compact cameras and even DSLRs have Panorama Modes on them that will automatically stitch a series of photos together.
Here at Photos By Passy we use Sony cameras and have found their Panoramic Mode to be brilliant.
In particular the very compact Sony RX100 pocket camera has a great Panorama function which is excellent for travel photos.
The following video shows just how fast and easy it is to use the Sony RX100 for making Panorama Images.
The camera instructs you to move the camera left to right, but it takes a little bit of practice to get used to the speed at which you need to rotate. If you rotate too slow or too fast, the camera does not build the Panorama and tells you to try again.
We have also found that a tripod is not necessary, and as long as you follow reasonably well along the line of the horizon, it stitches together the image really well.
Eg. Just find a horizontal line, like the horizon of the land or sea meeting sky, and try your best to stay horizontally steady and locked on while rotating your body.
A problem can arise if we are facing into the sun anywhere in the Panorama. In this case we simply point at the sunny area and lock the exposure using the AEL button on Sony DSLR Cameras.
Eg. What we need to do is get a consistent exposure throughout the Panorama. Often, one part of the landscape is brighter than others. Make sure we set up for this brightest scene. We want the final image to look like what we see through the camera, as if we had made the Panorama from one single photograph.
Panoramics are great for Sunset Photos, see our lesson on Sunset Photography for more information:
Even if you do not have an auto Panorama function on your camera, sets of individual photos can still be taken and stitched together in Adobe Photoshop. In fact, sometimes we get better results from individual images stitched together than we do from using in-camera auto panorama.
In fact we suggest for important shots that you do a an auto camera panorama, as well as taking a set of overlapping still shots for back up.
Adobe Photoshop and Bridge
If you do not have a Sony Camera with auto panorama function, then you can get Adobe Creative Cloud to stitch together three to five individual
photos into a Panorama very easily, as shown in the following video.
You have to start off by bringing your three photos into Adobe Bridge. (Bridge is a simple windows explorer type application that is customised for images. Once the three to five images are all selected in Bridge, it is simply a matter of going to the top menu bar in Bridge and doing Tools > Photoshop > Photo Merge as shown in the video.
Adobe Photoshop
The following fifteen minute video shows how to create a Panorama in Photoshop, as well as providing some expert tips on shooting Panoramic images.
In this method we do not have to use Adobe Bridge, and start straight away in Photoshop and do File > Automate > Photo Merge as shown in the video.
Note that you “Browse” to select your images after opening the Photo Merge function. Also it might take 2 or 3 minutes for the merge process to run.
After doing the merge there will be 3 to 5 separate layers, right click in the bottom right hand side layers panel and do “Merge” to create one layer to work with for doing touch ups and adjustments.
The Photoshop Auto Merge function works really well, even for hand held non-tripod sets of 3 to 5 photos.
We have found that some Panoramas turn out better by doing individual overlapping shots in Photoshop Merge, rather than using the camera’s auto panorama function. Therefore we recommend for inmportant shots to do both: use the camera auto panorama as well as taking some overlapping still shots as back up.
After Photoshop merging we often get some checkered flag blank areas around the outside edges of the merged image.
This can be fixed by cropping, but it is better to try “Content Aware Filling” so that we do not lose any vertical size.
Content Aware Fill Empty Edges
Rather than crop down to remove checkered flag edges on a merged image, we can select these edges all together (hold down shift) with the magic wand and contiguous off. It is important to select all the blank transparent checkered flag areas together at once.
Next we do Select > Modify > Expand and expand the selection by 20 pixels, (which is needed for the next “content aware” step).
Finally we do Edit > Fill > Content Aware and click OK. We wait a few minutes and Photoshop miraculously fills in all the blank areas by smart copying in some of the surrounding scenery.
Eg. If we merge four images, it is likely that our image will be about 15,000 pixels, or 110cm (about 3 feet) wide, and so processing takes a while. (Eg. up to several minutes).
This whole process is shown around the 10:34 mark of the video below, it shows the selection, expansion, and content aware filling.
Adobe Lightroom
The following video shows how Adobe Lightroom CC can be used to stitch together a Panoramic Image.
The final panorama image created from the dull original raw images is superbly amazing!
Simple Panorama Tutorial
The link below has a nice simple written Tutorial about Panoramas.
Important tips from the Simple Tutorial are these:
Overlap the images – according to Adobe, the images should overlap by at least 40%, but no more than 70%. Outside of this range, Photomerge may not be able to align the files correctly. Shoot around 7 to 10 overlapping images to get around a 150 to 180 degree Panorama.
Keep the camera settings constant – we need to keep focal length, focus point, and exposure constant throughout the series of images so that Photoshop can combine them later on. The easiest way to do this is to take one shot on P, look at the camera settings, and then dial those settings in on manual mode. Also focus on a suitable object about 1/3 of the way into the scene, and then change the camera to manual focus so that the focus will be constant. (Or just use manual focus with peaking to focus on an object about one third of the way into the center of the scene).
Shoot vertical – this is a little counter-intuitive since we are making wide panoramas. It’s usually best to shoot vertical (portrait orientation). Since we will “Photoshop Merge” multiple frames together later on to get as wide as we need, shooting vertical will give a taller overall panorama. Also, we will probably need this vertical space for cropping, and for using a 6000×3000 type Template to make a 360 Sphere image to load to Facebook. (Facebook 360 Spheres are explained later on near the end of this lesson).
Panorama Shooting Tips
These tips are for if you are taking a set of individual shots that you plan to stitch together in Photoshop.
If you are using a Sony (or other brand) Camera set in Panorama Mode, then the camera should do all of its own settings automatically.
With a bit of practice you should be able to shoot basic Panoramas in Panorama mode without even using a Tripod.
However, if you want to get a high definition photo to make a wall hanging print from, then the individual shots method is probably better.
1. Use a sturdy tripod and try to stay level when panning the camera and taking your 3 to 5 shots.
2. Make sure you have plenty of overlap of the sceneray inbetween Photos, eg. about one third or 30%, and an absolute minimum of 25%.
3. Do not shoot in auto mode (or some images might be dark and some bright and they will not stitch so well. Use Manual Mode so that the exposure stays the same in each image you take, (or hold down the AEL button on Sony cameras).
4. Overshoot the length and height of the Panorama so you will have room to crop later on.
5. Try not to have your camera lens set at wide angle for each shot, use a middle zoom setting to avoid image distortion.
6. Shoot with an aperture between f8 and f11 to f16, (which might mean using a 1 to 3 second shutter speed) with ISO as low as possible around ISO 100. This should give the sharpest most detailed images.
7. Focus could shift from image to image, and so set up the first image with the area most important to be in focus, using Manual mode focusing on the camera.
8. Use slow shutter speeds which will blur moving objects like cars, people, and animals. Try to avoid moving objects if possible.
9. At slow shutter speeds the images might be too bright, (like at the beach) and so you may need to use light reducing ND Filters.
10. Do not use Polariser Filters at all because as you pan the camera the light angle changes which shifts the Polarising.
11. Make sure your lens and sensor are perfectly clean. One dot will make a machine gun line of annoying dots across the photo in auto Panorama Mode! (These dots can be removed with the clone stamp tool in Photoshop but it is best to avoid them if possible).
If any of your Panorama faces into the sun (like a beach or sunset photo), it will be hard to get the exposure to be uniform.
The basic rule is to set the exposure for the brightest part of the sky, and shoot in Raw + JPG. If we do not do this and let the brightest part burn out and have whites, we cannot fix these in Lightroom or Photoshop; but we can fix dark areas where the sun was not shining.
Getting great images is a combination of manually setting your camera exposure for the sky (and then holding down the AEL Auto Exposure Lock button on the camera while framing and taking the shot, especially on Panoramic shots).
This definitely applies when using a Sony DSLR like the A77, which has a brilliant in camera Panoramic function, as well as an AEL button.
Manually pre-focussing with focus peaking turned on is also vitally important.
Making a Facebook 360 Sphere
It is possible to make your own Panorama Photos do the “360 viewing thing” in Facebook, but you need to use special Photoshop Templates to do this. Read on for details.
Inside this folder, there are a whole bunch of Photoshop FB Templates that you can download, such as 360 degrees, 180 degrees, 120 degrees, etc.
These all have EXIF data pre-built into them to make sure you get an FB rotatable Panorama.
We can use these Templates for putting old Panorama photos we have lying around from a normal camera into FB.
All of the templates seem to be very square shaped and are 6000 pixels wide.
It is hard to see what template file is what in the dropbox folder, so click on each one read what it says, download it, then back button to the main folder, then just keep downloading these templates until you have a few of them: 360, 240, 180, 120, etc.
There seems to be a mixture of PSD and JPG type files in the Templates. Copy all of these downloaded templates into a folder that you can keep forever on your PC.
Once we had the Templates downloaded, we then opened the 180 degree PSD Template file that is a 6000×3562 Template.
Then we did File > Place to bring in one of our Beach Panoramas.
The problem is our camera panorama photos are too skinny and only fill the middle horizontal one third of our Panorama, we would have needed to shoot some of the sky, and the scenery right down to our feet as well to fully fill this FB Template.
Next we saved the image as JPG with the extra white space at the top and bottom.
When we added it to a Post as a Photo the 360 Sphere Panorama load to FB worked okay; however the image displayed all curvy on the top and bottom. However we could hand rotate it through 180 degrees okay. So it was a usable result.
We also tried the 120 degree template, but this left weird blank ends at the end of it when rotating on the phone.
It seems that for our Sony Panorama Mode images, the 180 degree template works best.
So the trick to converting your Panoramas is to get one of the download Photoshop Templates and paste into that, then save the result as a JPG (not a PSD and not a JPG for WEB, but a full high quality JPG). When we load this image to FB, Facebook will load it as a rotatable sphere photo and all will be good.
Further Reading
Here are a couple of web lessons with tips and tricks in them to help with Panorama Photography.
An essential part of producing photos and videos for clients is to understand their needs and expectations, so they end up with a Media Product they really love.
Communication and artistic vision is often a tough path to navigate, so making sure everyone is on the same page at the start of a Photo or Video Project is vitally important.
Clients and Photo Projects
Photo Projects do not seem to be nearly as troublesome as Live Video Projects. Often we can Photoshop individual images to improve them, or instantly remove them if the client is not happy with some of the images.
The only problems we have encountered thus far with Photos was one issue with a singer where he did not like his mouth open near the microphone in pictures because he thought it looked like he was about to perform a sex act on the microphone!
The only other issue we have had were on some Band Promo Shots, where we produced photos of Band Members smiling and having a good time, but they really wanted a far more serious look with nobody smiling.
To solve these “not on the same page” problems with Photos, we ask prospective clients to view similar themed Photo Galleries we have made for other clients.
We also often put together a Pinterest Board of Images so that they can look at it and tell us what they like.
Making a Production Video is far more complicated and time consuming than taking some still photos of a show, or holding up an iphone and pressing record. There is no quick-fixing of Videos with Photoshop, and it is difficult to remove or crop many video sections.
It is vitally important to fully understand the Clients Needs and their Desired End Products before the Project commences.
For Example, here is a video we made for a Client which we thought was a really good product, and captured a typical live performance.
However, there were a number of aspects of this Production that the Band were not happy with.
These were as follows:
1) Video Soundtrack – They believe we “promised to get them a multi-track desk feed from the venue and remix it into the video soundtrack”. They felt cheated when this did not happen, and the sound track contained only live sound with crowd noise evident.
2) Fonts Used – They loved the font we used for the band member identification, but they hated the font we used for the “catch phrases” that displayed as the songs played. They said the font did not fit in with their branding, and was inconsistent with the rest of the video.
3) Breaks in the Set List between Video Recorded Songs – They were not happy that we could not record songs back to back, due to SD Card writing limitations.
4) Footage Quality Changes between Wide Angle, Drum Cam, and Close Ups – They did not like how the wide angle footage looks grainy and less sharp than the close up shots. They believed it interfered with flow and continuity. They also did not like that the Drum Cam footage was not as clear as full lighting shots of the singer.
5) Not Being Up Front about OUR NEEDS – They were annoyed that we were not up front from the beginning about our needs during the project: eg. one song break between targeted songs, one point of contact with the band, fast decision making and turn-around times.
6) Too Much Footage of Audience Singing – They were not happy with the “Rain” song that featured a lot of audience singing. In their opinion this made out like the band was too lazy or incompetent to sing the song themselves.
7) Release of Videos to the Internet – They were really annoyed that we uploaded what they believe were not finally approved videos to YouTube. A music venue also linked to one of these videos on the venue’s Facebook page. The band believed that the whole marketing image of the band was compromised by such activities.
All of the above issues resulted because there was not enough clear communication between the Team at PBP and the Band throughout all stages of the Project.
Video Production Check List
To overcome these types of issues in the future, Photos By Passy has developed a comprehensive Video Project “Check List” to make sure “everyone starts on the same page” and the project runs smoothly to a happy completion.
The Main parts of this checklist are as follows:
1) Establishing all Client Needs Before Starting the Project
2) Making Clients Aware of Product Limitations
3) Supplying a List of Our Needs to the Client
4) Agreement on Delivery and Distribution of Final Products
The full Check List ended up being 13 pages long, and it can be viewed at the link below:
By using this Video “Check List” for all of our upcoming Live Music Video Projects we are confident that Clients will only engage us if our type of Product is what they really want. Furthermore, when engaged for a Live Music Video Project, we will be able to meet all of their needs and expectations.
There will be no controversy, confusion, or misunderstandings, and the Project will be one where all stakeholders are happy with the final outcomes.