Subject: Photo Composition
Like great Works of Art, the elements in a Photograph need to be arranged in a manner which is interesting and pleasing to the eye.
In addition, Photography is a two dimensional medium. Therefore we need to make use of the elements which are present in the photo to create a sense of depth and three dimensions.
Photos also need a main focal point, as well as leading our eyes on a journey through the picture.
Having these things makes for great photos, which are pleasing to the eye, and we call this “Composition”.
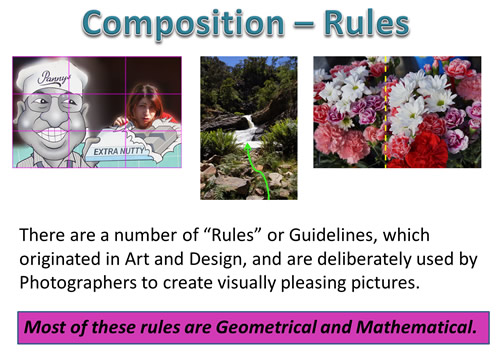
In this article we look at a set of rules which pertain to good composition.
These “Rules” are as follows:
1) Fill the Frame
2) Beware the Background
3) Avoid the Middle
4) The Thirds Rule
5) Leading Lines
6) Depth and Scale
7) Symmetry and Patterns
8) Viewpoint and Angles
9) Space to Move
10) Cropping Body Parts
These rules are not exhaustive, and there are other additional ways of making photos look great. These are discussed in the Videos and Reference Items at the end of this article.
The material which follows covers the main general rules of composition, and shows lots of practical photo examples.
Portrait Photography is a whole other world involving poses, background blurring, lighting angles, and using off camera flash. This material is not covered in our article.
Landscape Photography is another separate genre of work, involving the use of filters and long exposure times. This level of detail is not part of our article, but we hope to do a separate article on this another time.
Even with the above exclusions, the article which follows is still a very long one, and so take your time working through it.
At the end of the article there is a Quiz that contains several example photos for you to work through and make composition assessments on.
So let’s get started with our Top 10 Rules of Composition.
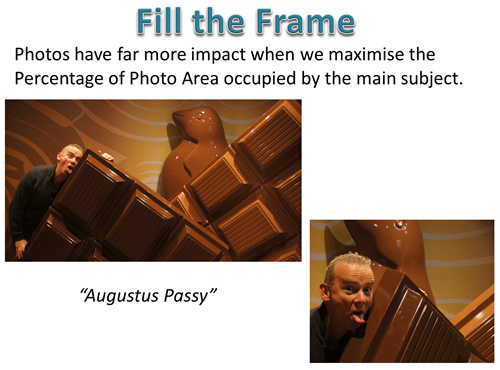
Fill the Frame
It is easy to take a picture which has lots of “empty” or non-important space in it.
With the high number of Megapixels on many digital cameras, this is not a problem, and we can “Crop” or Reframe the picture in Photoshop later on so that at least 60% of pour photo is filled with the main subject.
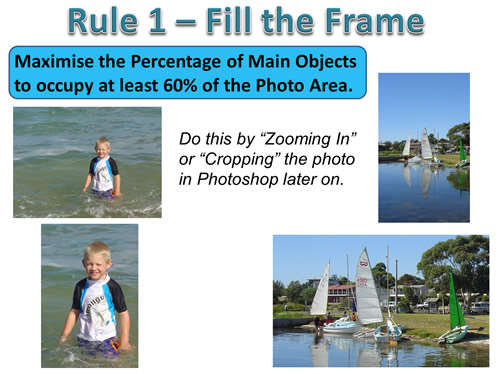
However, it is a good idea at the time of shooting, to zoom in if we can, and fill up the frame with the important subject material we want to capture.
Beware the Background
Sometimes a great picture is ruined by having a busy distracting background in it.
Other times there may be strange items in the background, which directly interfere with the main subject.

Often there are distractions in the background which are unavoidable.
We can use Photoshop to “Crop” (or Reframe) the picture, and then use additional tools to fix or even totally remove all distractions.
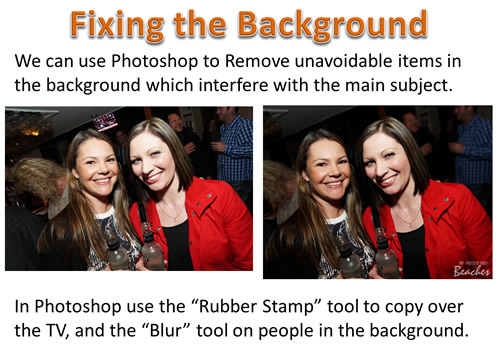
Remember: The background behind our subject can sometimes dramatically interfere with the final result.
Usually this is not good, so be careful!
Avoid the Middle
For beginner photographers, especially when using Auto Focus, the main subject of the photo ends up directly in the middle of the picture.
This creates a rather boring photo, and a better composition effect is to place the main subject off to the side in the photo.
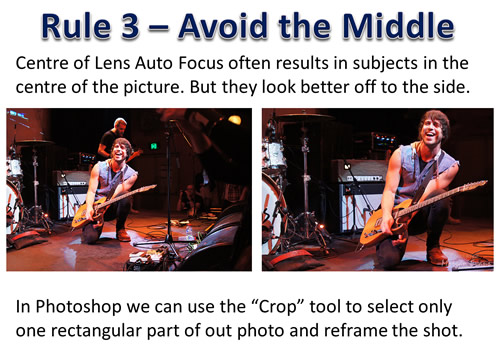
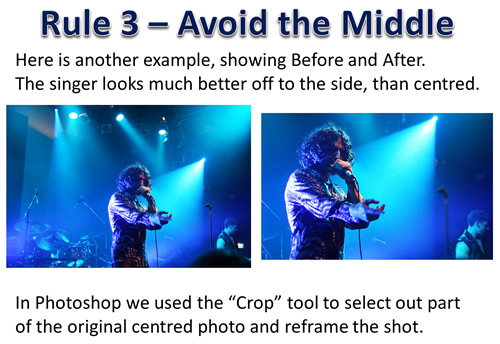
Here is another example of an original shot being too centred in the Middle.
Because this was a large 24 megapixel photo, we were able to use cropping in Photoshop to change the composition and make a “new” improved picture.
In the “Thirds Rule”, (which we look at in detail in the next few sections), there are ways to compose our pictures which avoid having the main subject in the very centre.
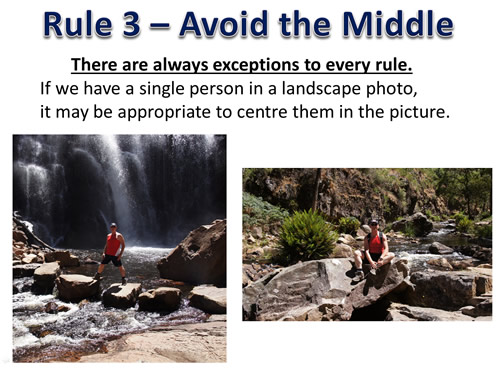
There are always exceptions to every rule, and we often have a single person pose in a Landscape photo to supply a reference point for us to visualise the actual size of the vista.
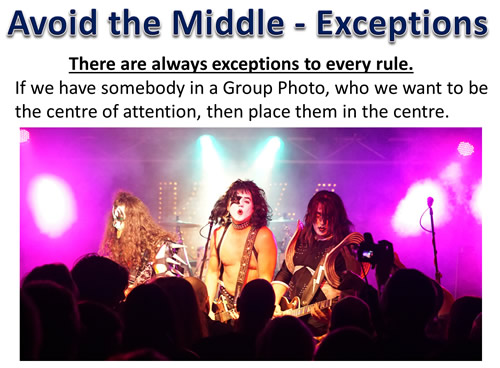
We can also make somebody in a Group Photo the “centre of attention” by placing them directly in the middle of the picture.
Here are some more exceptions in some photos taken in New York City by Musician/Photographer: Nicholas Roy.
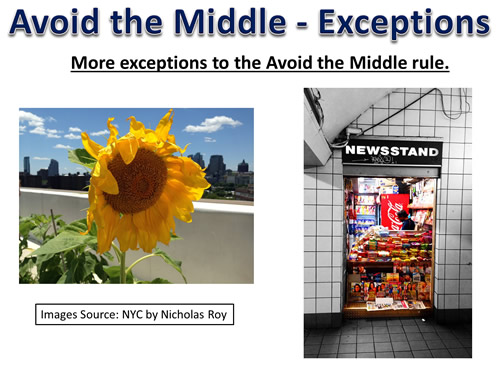
The Sunflower and the Newsagency are “Framed” by the rest of the picture, and well placed to be the centre of attention.
“Framing” is another Composition technique which works really well in photos like these.
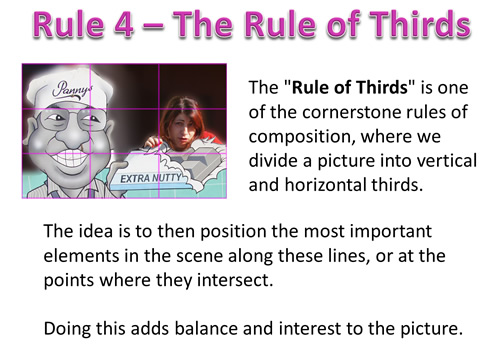
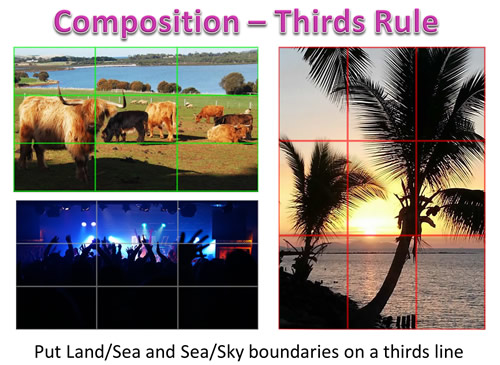
The Thirds Rule
The “Rule of Thirds” is one of the cornerstone rules of composition, where we divide a picture into vertical and horizontal thirds.
This creates 9 rectangular areas divided by 2 vertical and 2 horizontal lines.
Because there are nine reactangular areas created, it is sometimes also called the “Rule of Nines”.
The idea is to position the most important elements in your scene along these lines, or at the points where they intersect.
Doing this adds balance and interest to the picture. Some cameras even have an option to superimpose a rule of thirds grid over the LCD screen, so it can be referenced while setting up your picture.
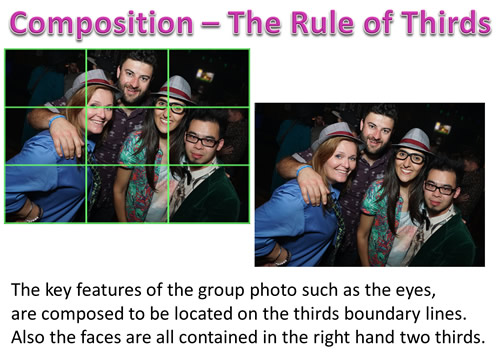
In this first example, the Rule of Thirds has been followed “Religiously”, and we have placed key features so that they sit right on the thirds grid lines.
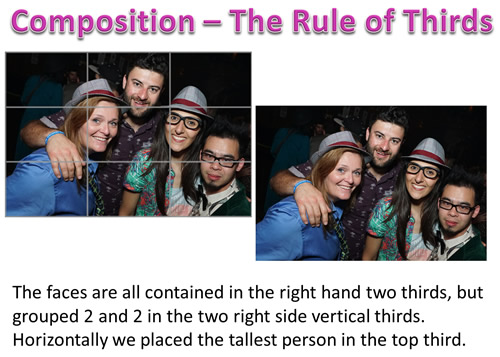
However, in the next example of cropping the same original photo, we have placed key items inside the boxes formed by the thirds grid.
Sometimes a better image is obtained by not placing key features directly onto the grid lines, but instead placing them inside the thirds boxes.
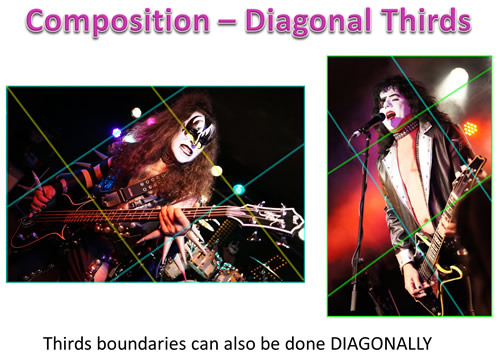
We can also use Diagonal Thirds for placing key features onto the grid lines.
Another aspect of the Thirds Rule is to place land/sea, sea / sky, and other key boundaries onto one of the horizontal thirds lines.
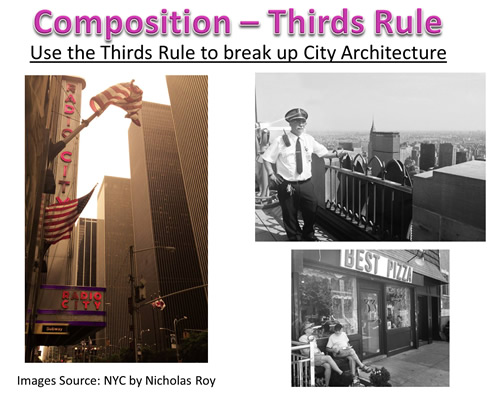
Here are some New York City Photos from Musician/Photographer: Nicholas Roy which use the thirds rule very well.
It is often important to have a balancing element, and not empty space, when we position our main subject off center into the left hand one third of a picture.
This is covered in the next section “Thirds Rule – Major and Minor”
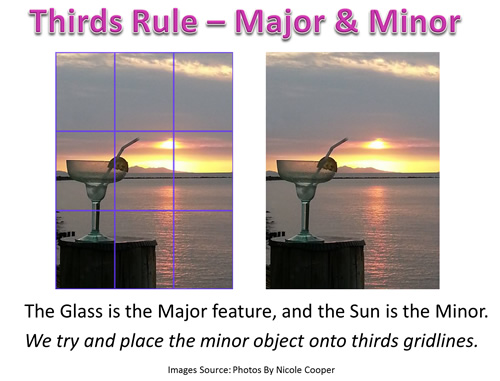
Thirds Rule – Major and Minor
When we have a main subject, and other items around them, it is a good idea to use the Thirds Rule and place key minor objects on the thirds crossover points.
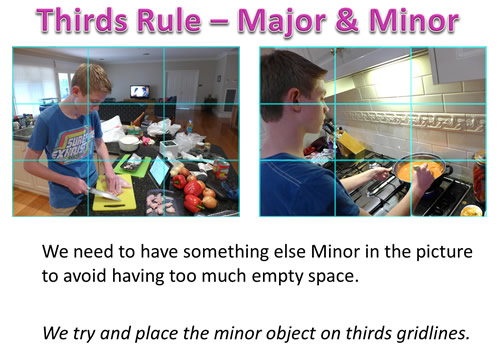
Here is another example of using Major and Minor within the Thirds Rule.
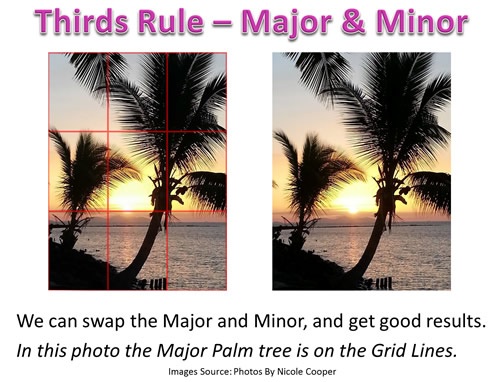
The Major and Minor items do not have to be directly on thirds Gridlines; they can be contained within thirds boxes.
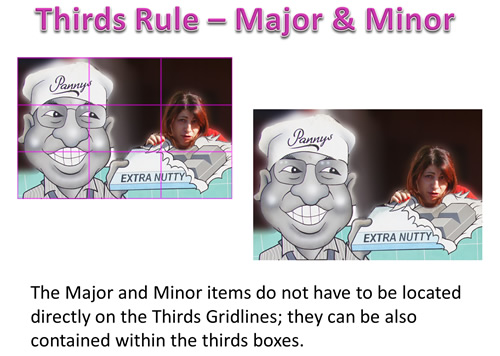
In some cases we can apply this rule the other way around, and place the Major object onto the thirds gridlines.
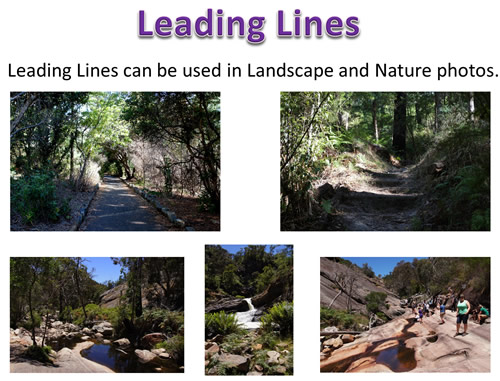
Leading Lines
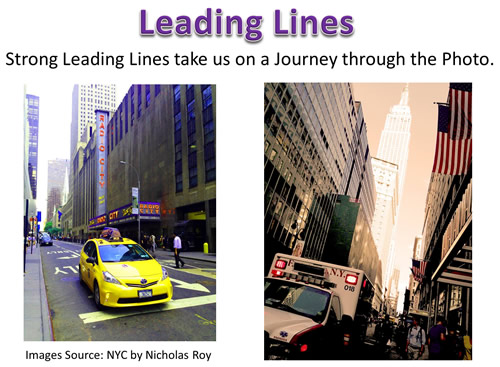
When we look at a photo our eye is naturally drawn along lines. These can be curved lines, zig zag lines, or diagonal lines which lead us into the picture.
This gives the picture a three dimensional story to it, and makes us go on a “Journey” through the scene.

Leading lines are often used in Landscape and Nature photos to add interest to the pictures.
Here are some great examples of Leading Lines in photos taken by Musician/Photographer: Nicholas Roy in New York City.
Depth and Scale
Photography is a two-dimensional medium, which can make it difficult for us to convey the sense of depth that was present in the original scene.
We can create depth in a photo by including objects in the foreground, middle ground and background.
It is also a good idea to include people in Landscape and Nature files to act as a scale reference for the Picture.
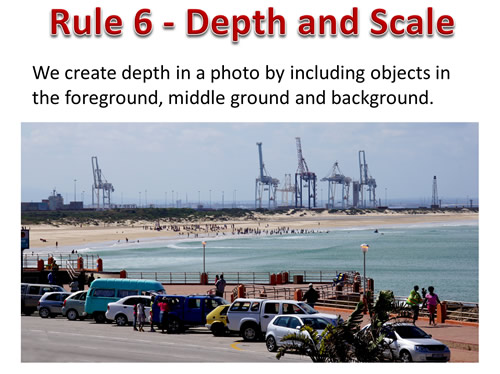
Depth is often combined with Leading Lines when we compose Landscape Photos.

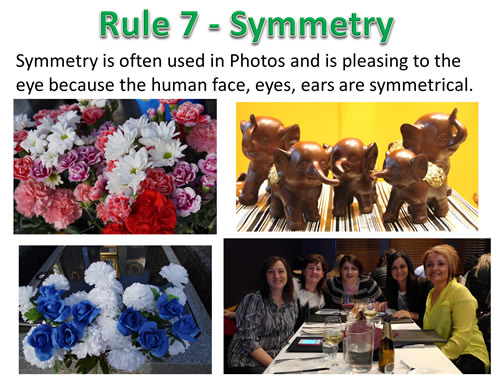
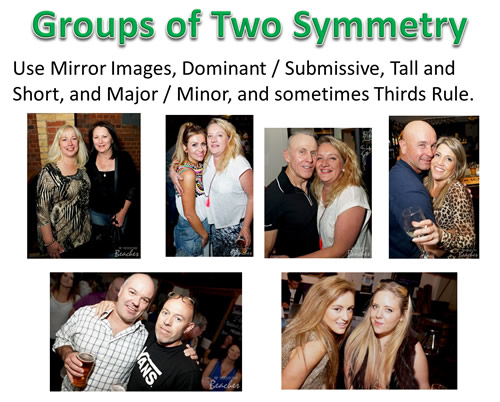
Symmetry and Patterns
Our eyes are trained from when we are babies to look for the face of our mother, which has a nose and eyes either side.
We are highly trained to look for symmetry, and for this reason we find it to be an attractive trait in photographs.
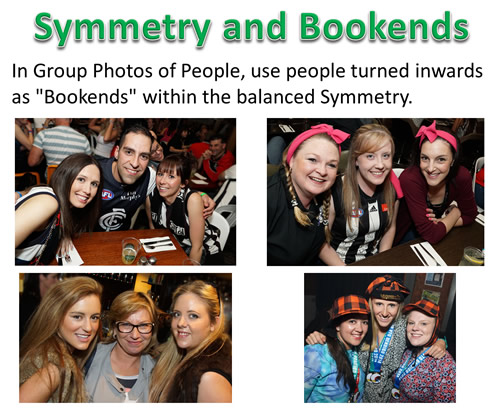
In Group Photos, especially Groups of Three, we can use people turned inwards as “Bookends” within the balanced Symmetry.
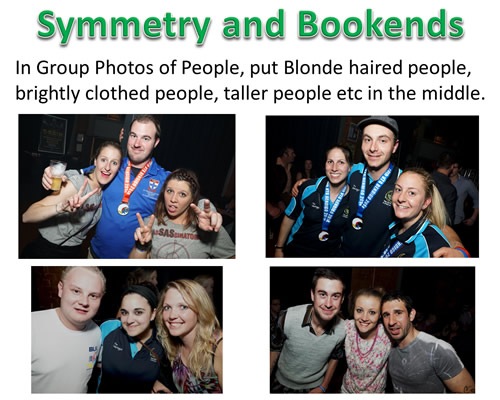
Also to preserve symmetry, put either the Tallest or Shortest person in the Middle, also place people with blonde or bright hair or bright clothes in the middle.
Use Symmetry and balance the left and right hand side of the Group, by placing brightly clothed, or blonde haired people in the middle of the photo.
We do this because blonde haired people reflect light more, and always come out much brighter in Flash Photos.
Finally for Groups of Two, we can make them mirror reflections, or make the man dominant and the woman submissive (even if this does sound sexist, it is classic portraiture composition – think of old style Hollywood Movie Posters like “Gone With The Wind”).
Also use Major / Minor with blonde brightly dressed person to the front and brunette or dark clothes slightly to the back.
Viewpoint and Shooting Angles
Different subjects look different if we shoot them from different angles rather than just straight on.
Shooting from above or below is one option, but we can also tilt the angle of the camera to create a different viewpoint.
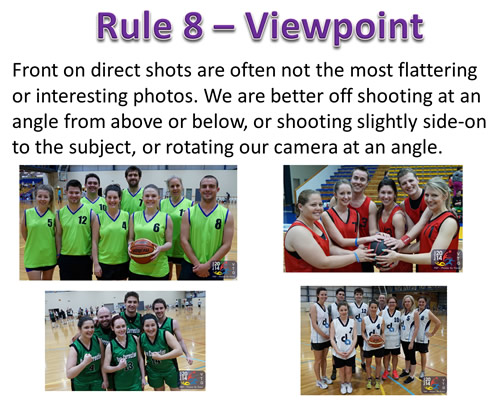
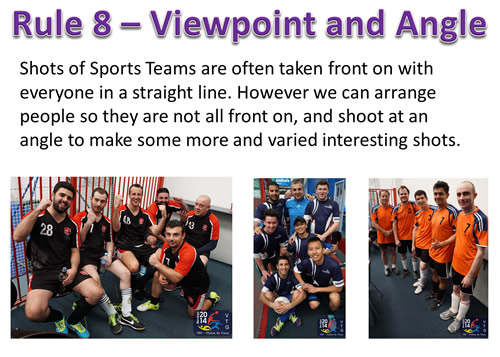
When you shoot Groups of People, such as sports teams, it will be boring of all the photos are the same front-on straight line composition.
We need to mix it up a bit by using Angles, Interesting People Arrangements, and sometimes taking one or two steps sideways so that we are not directly front-on to the group.
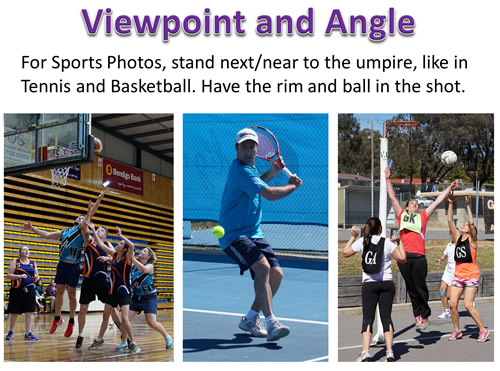
When shooting sports, often the best place to shoot from is where the umpire or referee stands most of the time. This gives us the best viewpoint.
Eg. For Basketball shoot from behind the rim to the right, and have the rim in the shot. For tennis shoot from the middle of the court at the net.
For certain sports it is good to shoot at a particular angle (up or down).
For Mountain bikes, it is generally a good idea to get down as low as you can on the ground and shoot upwards, especially on jumps.
However when riders are going up a long hill, it is better to get at a vantage point up high at the side of the track and shoot downwards.

For athletic events, get down as low as you can to shoot upwards for high jump and long jump so that the jump height is emphasized.
Getting down low kneeling on one knee, a few meters down from the start or finish line, is a good viewpoint for shooting running races.
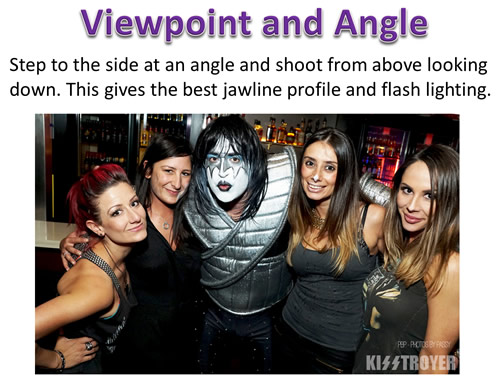
For People shots at parties, start front-on, then move one or two steps to the left or right, and then lift up your camera up and shoot from above looking down.
Shooting from above and off to the side gives great jawline emphasis which is a very flattering look.
Shooting with Flash from above also creates a shadow under the jawline, further enhancing this feature.
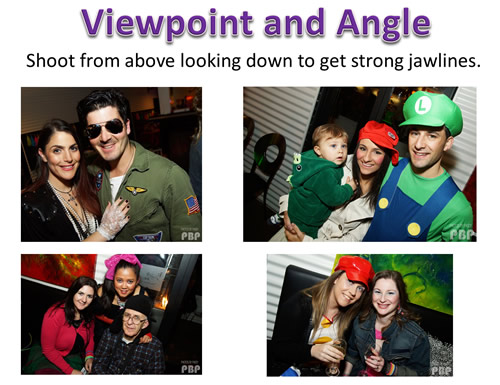
Here are some more photos where we have shot at a down angle, rather than front on.
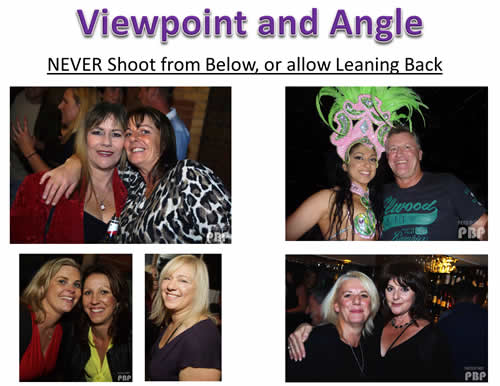
NEVER SHOOT PEOPLE FROM BELOW OR ALLOW THEM TO LEAN BACK.
Shooting too low emphasizes the neck in a bad way, and loses all that nice jawline profile.
Basically if you can see a person’s nostrils at all, then you are shooting from too low down.
Straight up and down shots of people can become boring, and so tilt the camera while taking pictures to add angles and interest.
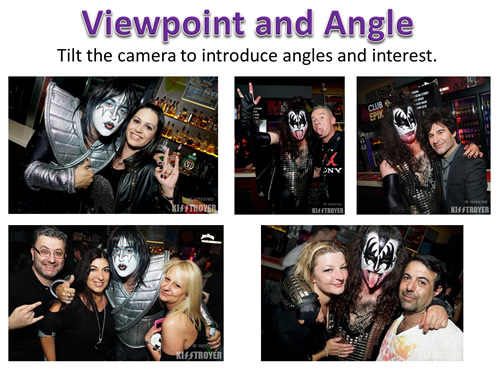
Camera Tilting is a good composition effect to use in music photos.
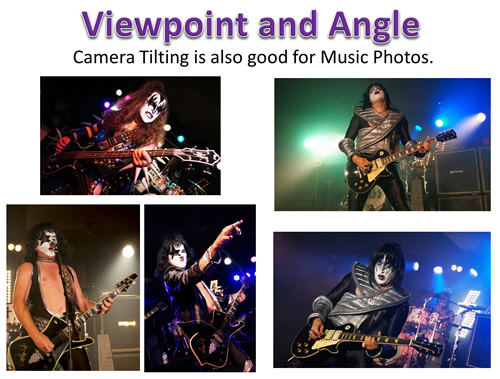
(The photos above are of “Kisstroyer” from Melbourne Australia. If you like Kiss music, then these guys will rock your socks off!)
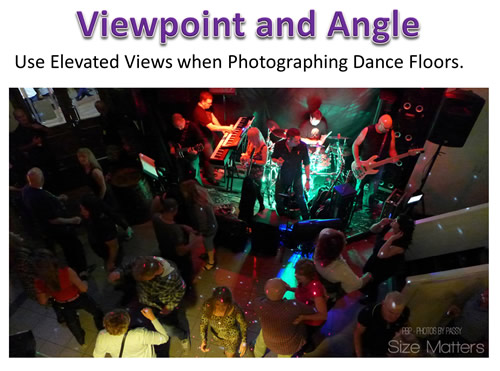
Another use of Viewpoint is to get up high by lifting the camera, or using any available upstairs area when doing Dance Floor or very large Group Photos.
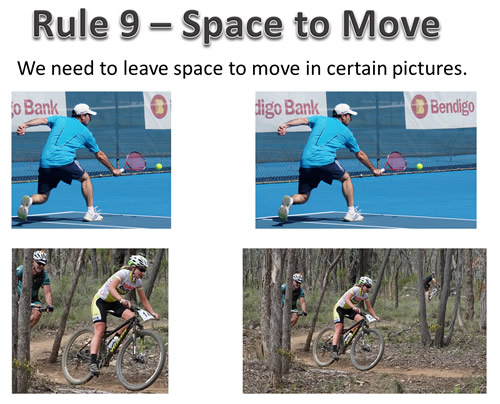
Space to Move
In certain types of Photos such as Music, Sports, Dance, and Theatre we do not “Fill the Frame”, and we do not follow “The Rule of Thirds”, because we need to leave space to move.
Having some space for the viewer to see where some action has come from, and where it is going to, is the main priority.
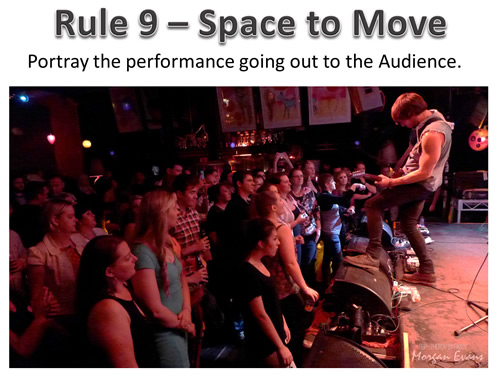
When we photograph performances it is a great idea to have some shots which include the audience, so we can see who the performance is going out to.
When photographing musicians we need to include all of their intruments, so we can imagine where their playing might be going to next on the instrument.

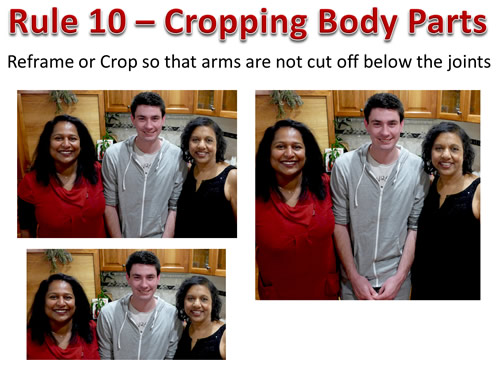
Cropping Body Parts
We often cannot include all of a person’s arms or legs, which is fine, as long as we do not cut off the arms or legs below the knees or elbows.
Eg. If we crop or frame a photo we must always “Cut Off” above the joints on the arms and legs.
It is best to take the shot wide and big enough to have the full body along with some space to move, and even have some extra background space we may not need.
There are plenty of Megapixels, and from a shot that is “too big”, we can easily crop out what we do not need from the background, and have all limbs fully intact.
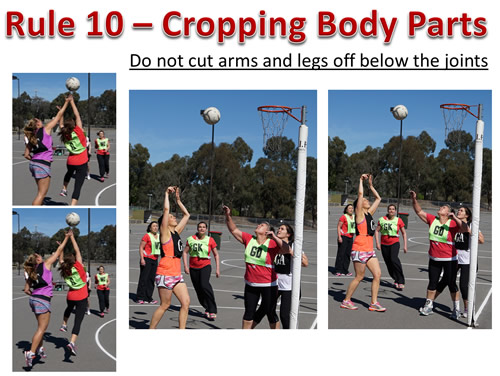
In the example below, the top left shpot has the guy’s arms cut off below gthe limbs. Aslo shown to the right and underneath ways we could shoot or crop this photo to solve this problem.
The Golden Ratio
We did say at the start of this article that we would only be covering ten rules; however there is one final rule which is above all others.
This final rule is the “Golden Ratio” or “Golden Spiral”.
This rule is believed to be the Penultimate Composition Rule for Art, Photography, Facial Corrective Plastic Surgery, and Architecture.
The following three minute video does a great job of explaining the Golden Ratio of 1.618 called “phi”.
The “Golden Ratio” is famous throughout history in Architecture, Art, and Photography as shown in the video.
Watch this video before reading the material below.
If key elements in a Photo fall onto the Golden Spiral containing rectangles and squares with side lengths in the “Golden Ratio”, then this should theoretically form the most pleasing picture possible.
The Golden Ratio Spiral is not easy to picture whenever I am busy taking a photo, so what I did was check some of my favorite photos in Photoshop by overlaying a Golden Spiral from Wikimedia.
I had originally composed each of these photos using only the general composition rules like symmetry, thirds rule, major/minor, and so on.
To my surprise I found that these photos did in fact contain elements of the Golden Ratio.
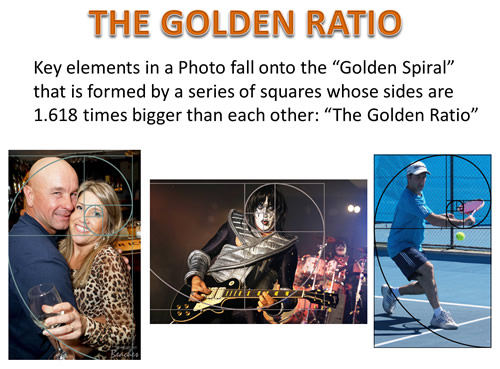
The Golden Ratio is used a lot in Portrait Photography, but can be applied to Landscape Photography, Sports Photography, and People Pictures.
The highly used “Rule of Thirds” is in fact an extremely simplified version of The Golden Spiral and Ratio.
The “Fibonacci Spiral” looks just like the Golden Spiral, and it is a very close approximation to the “Golden Spiral”.
The two spirals are very similar to each other, so either can be used for analysing the composition of a photograph.
In fact the two spirals are often confused with each other because they are so similar.
If you want to delve into the mathematical details of the two Spirals, then check out the following web page:
Wikipedia article about the Mathematics of Spirals
Here is three minute video about the Golden Ratio in Photographs:
Finally, here is a PinInterest Board where I have posted a number of interesting Golden Ratio Photos:
Photos by Passy Golden Ratio on PinInterest
Composition Quiz
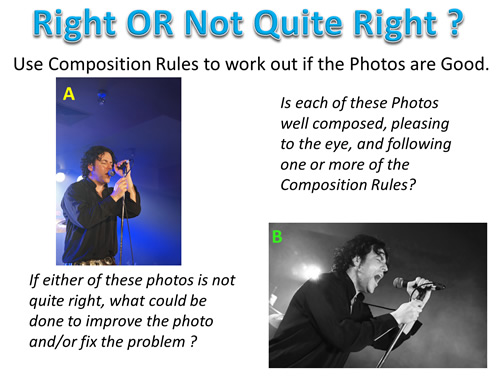
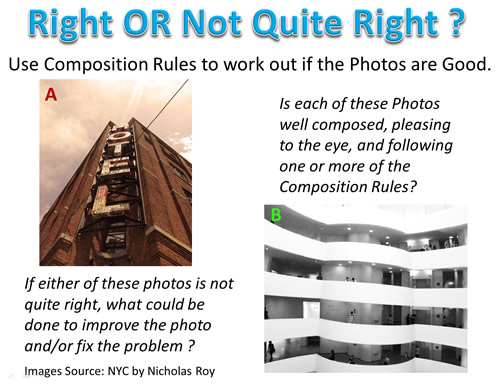
What follows are a series of Photos, and it is up to you to think about whether or not they follow any composition rules and look good.
If the photo does not look quite right, think about how it might be fixed to be a better looking photo.
Answers are provided immediately after each set of Photos, so scroll down slowly without looking ahead at the answer.
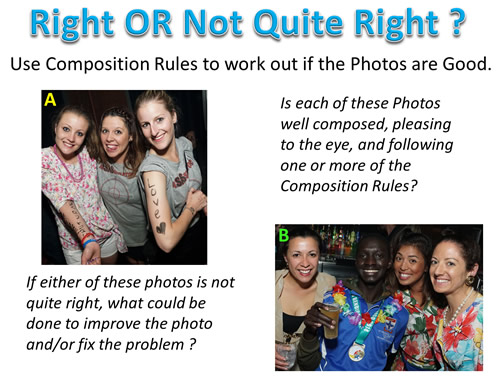
Have a look at these first two photos, and see what composition rules are present, or perhaps should be present to improve the photos.
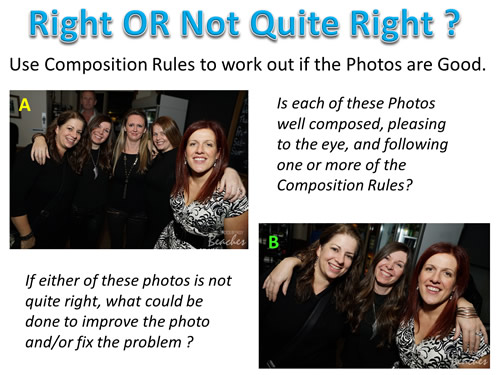
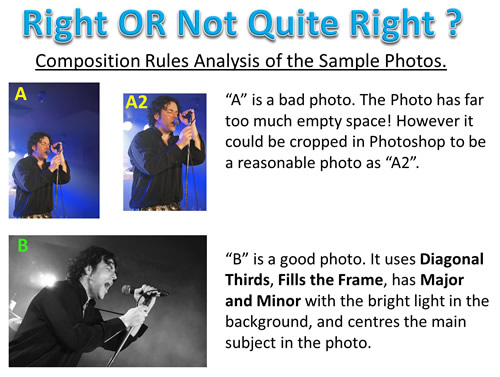
Here are the Answers to these first two photos.
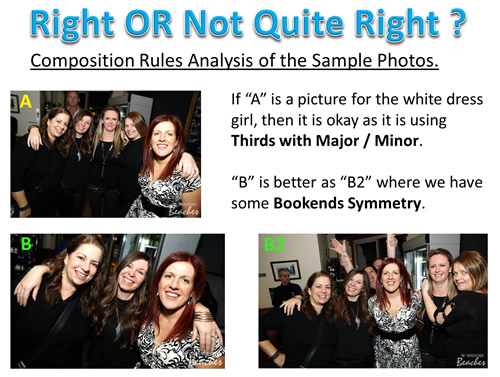
Picture A was actually a Birthday Party photo, and if the girl in the white dress was the “birthday girl” then it would be okay to have her as the dominant feature at the front.
However, it was not her birthday, and so she probably should have been arranged to be in the center of the group.
Here are the next photos in the Quiz which need to be considered, and their composition effectiveness assessed.
Here are the answers to the Photos.
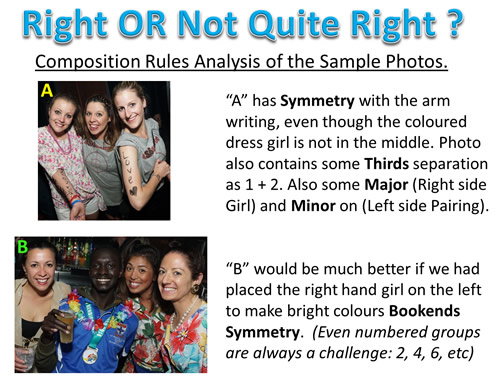
Photo B is not actually all bad, it does have the right two thirds containing the brightly colored people with flowers, and the left one third having the plainly dressed person.
However, my personal take on the photo is that it would be better with “Bookending”.
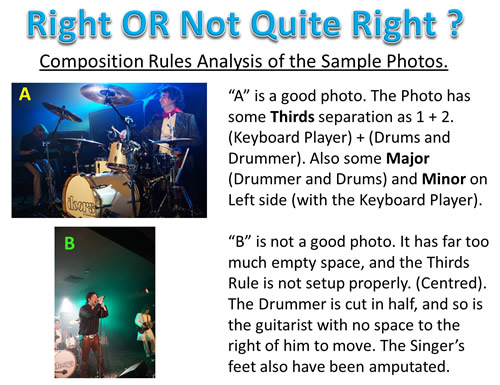
The next two photos in the Quiz are these ones.

Here are the answers to the Photos: Photo A was quite okay, but Photo B stands out as having some serious issues.
Two more photos for checking are from the same “Doors of Perception” band shoot album, and are shown below.
Here are the answers to the Photos.
“The Doors of Perception” Band from Melbourne Australia are highly recommended to see for anyone who loves all the The Doors classics played to perfection.
The next two photographs were taken by Photographer/Musician Nicholas Roy in New York City.
Nicholas has a great eye for photography, and his post processing of pictures using Photoshop is very artistic and creative.
Here are the answers to the Photos.
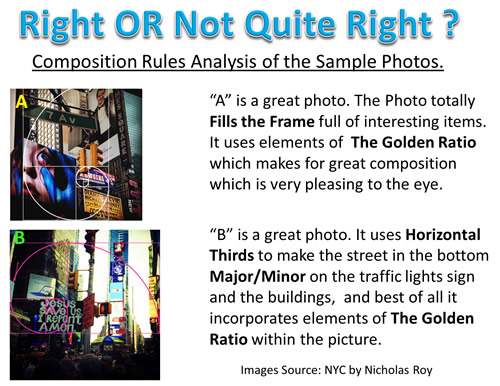
These last two photos are also of New York City by Nicholas Roy.
There is a lot going on in these photos, and it might not be easy to see which Composition Rule(s) are making these pictures look so good.

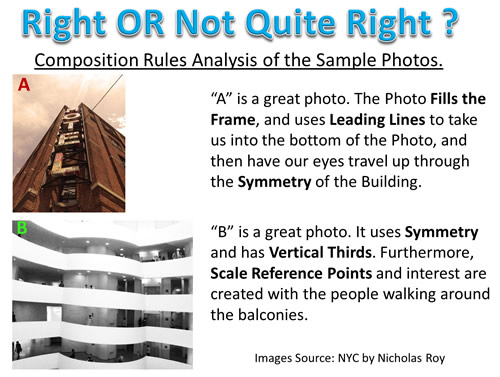
Here are the answers to the Photos. We saved the best till last; and these two photos are great examples of The Golden Ratio creating eye catching pictures.
Videos About Photo Composition
The following ten minute video goes through a lot of the Photo Composition Rules we have covered in this article.
One of the key rules covered fdor example is that in portraits the eyes are the most important feature, and so should ensure they are on a thirds boundary.
This next twenty minute video has some interesting ideas about composition, especially for Group Shots and Family Photos.
Finally, here is a three minute music video which shows some really well composed photographs.
There are many other Composition videos available on YouTube, especially for the area of doing Portrait Photos.
We recommend regulary searching YouTube and watching these one or two of these types of videos as part of ongoing learning and study of Photography.
Videos About Portrait Photography
Here is a good five minute video about six basic composition rules for doing female portraits
Here is a one hour extensive lesson about Poses for Portraits, including the “Triangle Rule” and several others which we have not covered in this basic composition article.
Additional Reading
Here are some good articles on Composition which we found on the web while researching this article.
The first article is a basic summary of composition rules, including several that we have covered in this article.
10 Top Photography Composition Rules Article
Another excellent article on Composition is the following one.
Digital Camera World Composition Article
This next article covers 18 rules of Composition.
18 Composition Rules For Photos Article
The next article includes composition using the Golden Ratio.
Composition Article including The Golden Ratio
Here is an article that gives five quick easy composition rules.
Five Quick Easy Composition Rules
The next article shows some tips for Portrait Photography.
Composition Rules for Portrait Photography
Here is a link to Nicholas Roy’s Website (The guy who did the great New York City Photos contained in this article)
Nicholas Roy : Musician/Photographer Website
The following is a short article on the Golden Ratio and Golden Spiral by Photographer Jake Garn.
Jake Garn Golden Spiral and Rule of Thirds Article
Related Items
How To Do Camera Settings
How To Do ISO Settings
How To Do Aperture Settings
How To Do Shutter Speed
Subscribe
If you enjoy visiting Photos By Passy, why not get a free subscription to the website.
You can then receive notifications of new items and updates directly to your email address.
Go to the subscribe area on the left hand sidebar, (or down the bottom of the page if using a mobile phone), fill in your email address and then click the “Subscribe” button.
Enjoy,
Passy