In this article we discuss Flash Photography and how the use of Light Diffusers can make Flash Photos so much better.
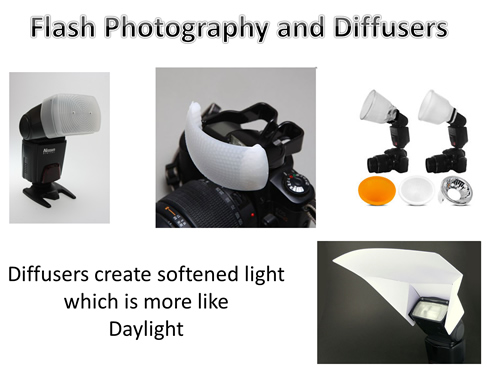
Diffusers come in all types of Geometric Shapes and Sizes and create softened light which is more like Daylight
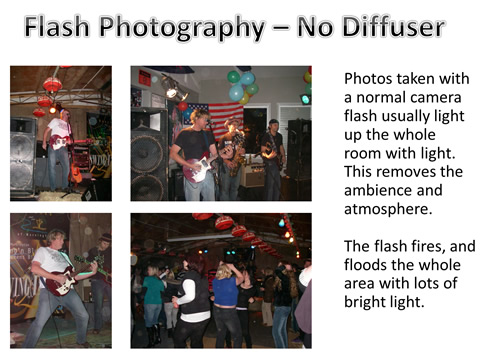
Most Digital and Pocket Cameras come with a built in electronic flash which provides an intensely bright light source so that photos can be taken indoors.
These flashes do a basic job, but often they light up too much of the scene and remove the natural ambience of the setting.
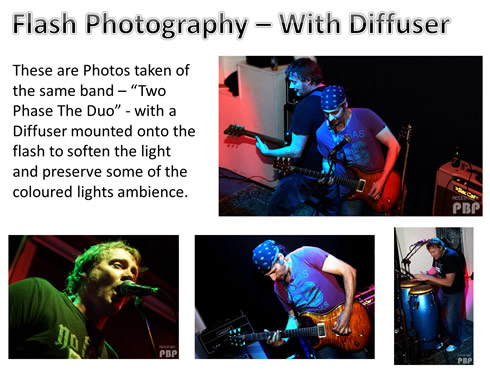
The band in the above photo are “Two Phase The Duo” who are a great Covers Band who play venues, parties, and functions.
For more information about this band check out their Facebook page at the following link:
Two Phase The Duo Facebook Page
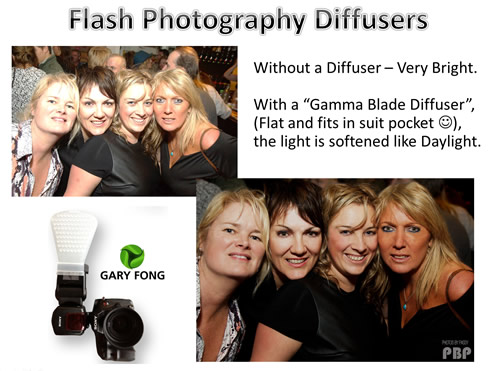
Here are some Photos of the Two Phase Duo taken using a mountable camera flash with a light softening Diffuser attached.
Light Softening Flash Diffusers
Diffusers are various semi transparent plastic devices attach over the face of an electronic flash and soften the light on the people in the photo.
The Diffuser which is our favorite is the Gary Fong Gamma Blade Diffuser, which was specially designed by Gary for use with the Sony A77 Digital camera.
One of its best features is that it is completely flat and can fit in a suit coat pocket, or the leg pocket on a pair of cargo pants.
It looks like a cheese grater and has elevated circular “bumps” on it (hemispeheres), which turn the flash into a simulated set of soft white LED lights.
There are several other types of Diffuser: the “Puffer”, the “Stofen”, the “Light Sphere”, the “Soft Box” and various others.
If you are ever stuck for a Diffuser, you can always fold up some white paper and cardboard and tape it onto your flash. You then tilt the flash upwards at 90 degrees and use the white as a reflective “bounce card”. The light from the Flash bounces off the white cardboard and this bounced light illuminates the subject with soft white light.
The Puffer Diffuser
If you have a pop up flash on your Digital SLR Camera, a “Puffer” Diffuser can be mounted onto the front of the Flash to soften the harsh burst of flash light and create a nicer photo.
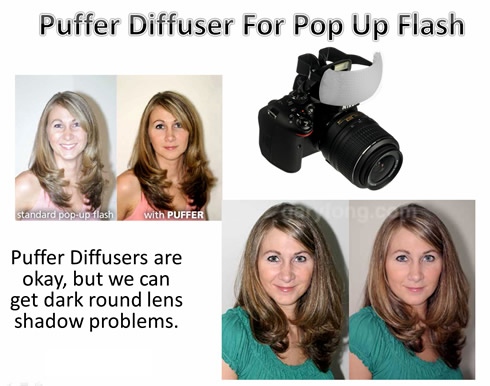
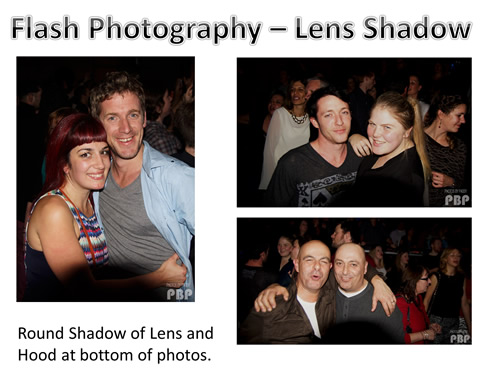
The only problem with Puffer Diffusers is that if you have a large zoom lens on your camera, and/or a Lens Shade Hood, there might be a round reflection shadow formed on the bottom of your photos.
This happens because the Flash pops up and is not high enough up in the air away from the lens.
The other problem with just using a “Puffer” on an onboard pop up flash is that we cannot adjust the power of the flash. The flash simply sends out a big burst of light which might actually be too bright for the scene being captured.
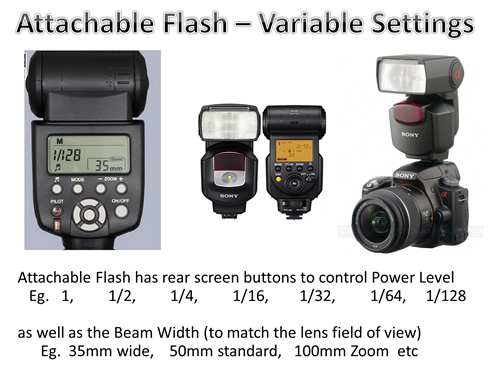
To overcome these problems of shadow and power most photographers invest in an attachable external flash for their digital camera.
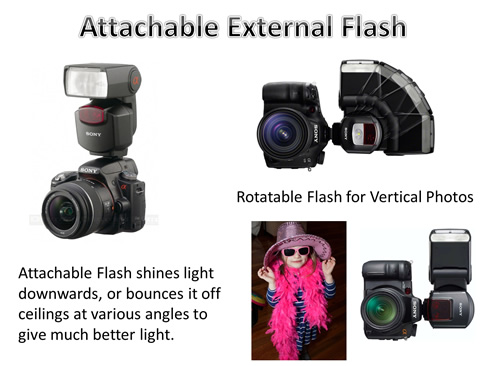
Attachable External Flash
When we attach an external flash it is designed to be as far as possible above the camera lens. This produces light which shines downwards at the person a bit like real sunlight does.
Attachable units can also be rotated through various angles, (such as 45 and 90 degrees), so that light can be bounced onto the subjects from the walls or roof.
This produces much better looking photos than the pop up onboard flash.
Another great thing about attachable flash units is that they can have their power and angle of dispersion adjusted to better focus the light on the main subject matter, and not aimlessly light up the whole room.
Light Intensity Mathematics
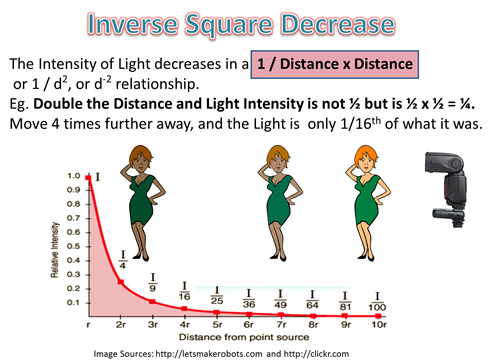
When using a Flash you might think that if you double the distance between yourself and the subject, that the intensity of the light on your subject will halve.
This is not actually the case, the instensity will actually be 1/2 x 1/2 = 1/4 of the original brightness.
This is known to anyone who has studied Physics as the “Inverse Square Law” and it also to both light and sound.
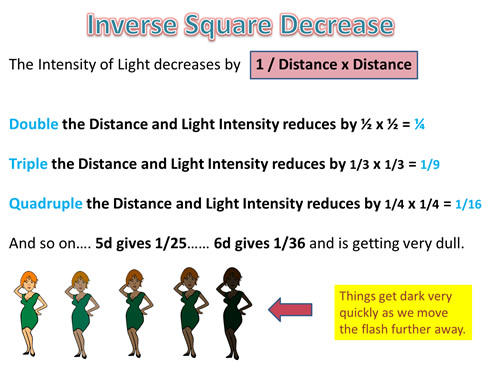
The “Inverse Square Law of Light Intensity” is not nearly as complicated as it sounds.
“Inverse” means that when we move further away, we only get a FRACTION of the light we used to have.
“Square” means that we do “Distance x Distance” to work out the bottom number in this 1/ fraction.
This makes things get very dark very quickly as we move the Flash further away from the subject.
The Inverse Law of Light Intensity Reduction from a Concentrated “Point Source” also applies to Projectors and Candles, (but not to fluorescents or light globes in rooms).
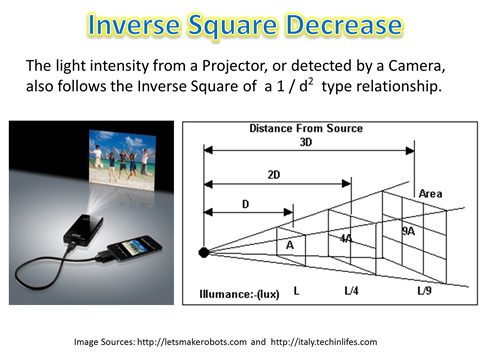
We do not need to make actual 1/d x 1/d calculations when doing Flash Photography, but we do need to be aware that illumination of subjects can decrease rapidly as we move ourselves further away from them.
Flash Power – Auto and TTL
Most attachable Flashes have three modes: Auto, TTL, and Manual.
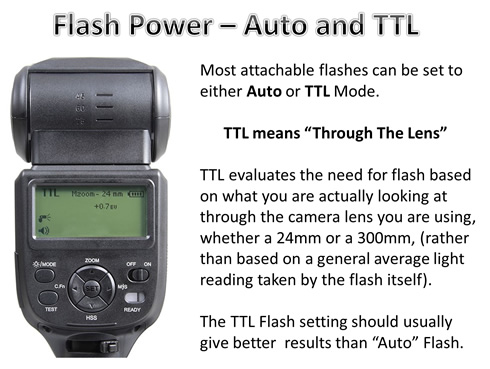
TTL mode is supposed to make the Flash and Camera do all of the thinking for you; however I have found for my particular setup, I get better results controlling everything myself in Manual Mode.
“TTL” stands for “Through The Lens” and the flash fires off some preliminary flashes to work out what it thinks should be the correct exposure power for the final shot it takes.
Quite a few articles and Videos on the Internet have mentioned that TTL is great when it works, but is often inconsistent.
At the end of this article are several videos about TTL if you are interested in trying it out.
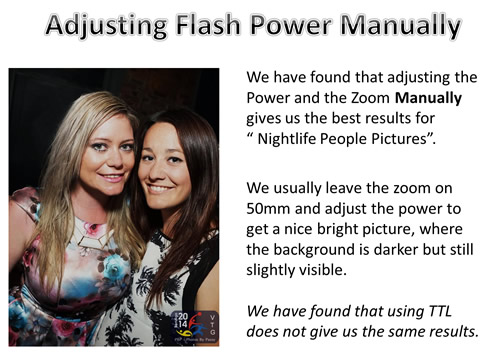
Flash Power – Manual Mode
Rather than using Automatic TTL mode on our external flash, we have found that the best results are obtained from our Sony A77 Camera by setting the Flash to Full Manual Mode.
We usually start off with the power around 1/16, and if this is too dark we increase it to 1/8.
For the angle of dispersion, we set it to a 50mm lens for Night Life People Pictures.
Shooting at ISO 1250, we find that this gives nice bright results, with the background containing ambient lighting rather than bright flash lighting.
We have also found that it is better to shoot photos slightly brighter than normal, rather than darker, as we can always tone down the brightness later in Photo Shop without losing crispness and detail.
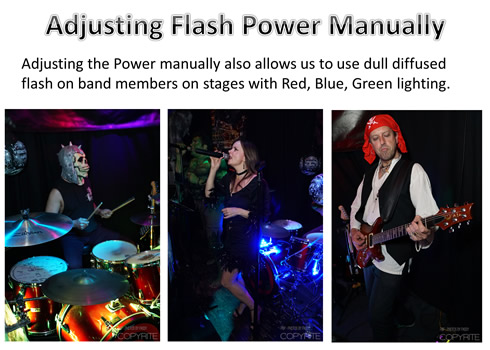
For night time venues with plain Red, Green, Blue, coloured lighting, we have found that as long as the Band does not mind a bit of soft diffused flash, we can get clear pictures of them at a power of 1/16, but still maintain some ambience.
Let’s now look at a few of the common types of diffusers for DSLR external Flash Units.
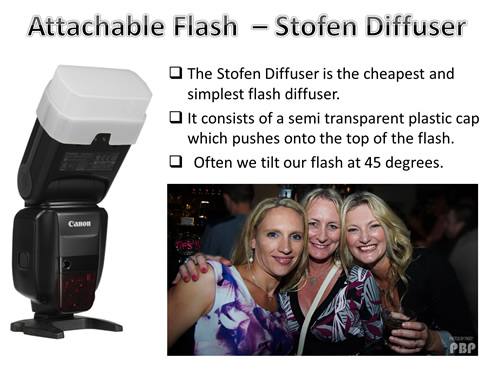
Stofen Diffuser
The Stofen Diffuser is a semitransparent rectangular cap which goes on top of an attachable flash.
I started off originally with a cheap $50 Chinese Yongnuo Flash and a Stofen diffuser, shooting all of my pictures in Manual Mode like the one shown in the image below.
It did a reasonable job, and angled up at 45 degrees it produced better results than just using the plain manual flash, or a white bounce card.
Light Sphere Diffuser
The next Flash setup I tried was a proper compatible Sony Speedlite Flash, with a Gary Fong Collapsible Lightsphere Diffuser.
This produced cleaner and better results than the Stofen Diffuser, but was a bit bulky on top of the camera in crowded nightclub situations.
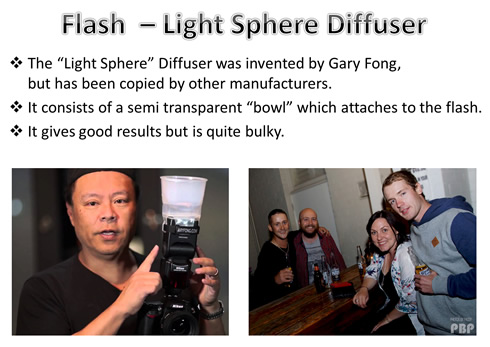
There is a video about this Diffuser in the videos section at the end of this article.
Blade Diffuser
The final Diffuser I have settled on as my permanent setup is the Gary Fong Lightblade Diffuser because it is flat and compact and gets great results.
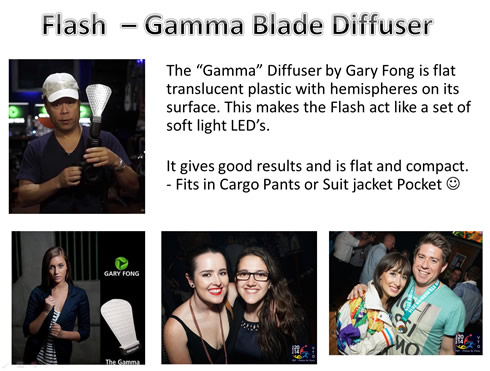
There is a video about this Diffuser in the videos section at the end of this article.
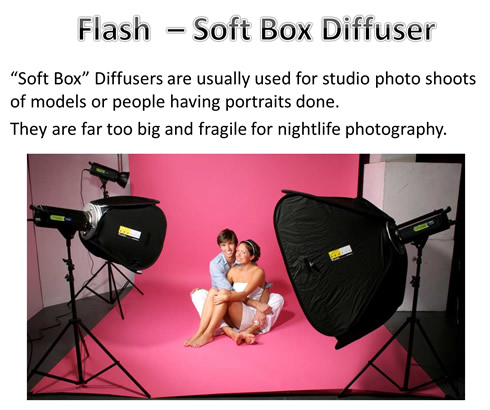
Soft Box Diffuser
These type of diffusers are too large and bulky to carry around for night life photo shoots, but are used for studio photography.
They are also called “Pillow Boxes” because they have soft white translucent material like a pillow case, which is formed as part of a box containing a special photography light bulb.
Effectively they create soft daylight for doing Portrait Photos indoors.
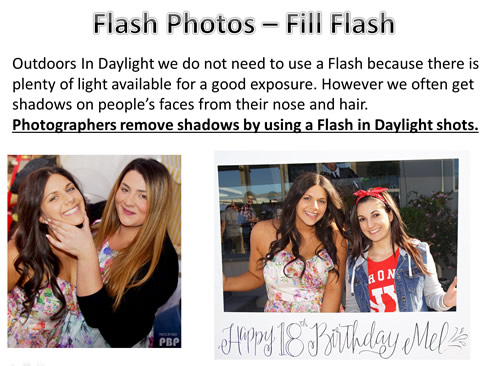
Fill Flash
When we use a Flash in bright sunlight it can blast away shadows off people’s faces and also illuminate the person with correct exposure when the surrounding background is very light.
Even just using the camera’s normal onboard flash with the camera set to “Fill Flash” mode can achieve this, as in the Birthday Party photos shown below.
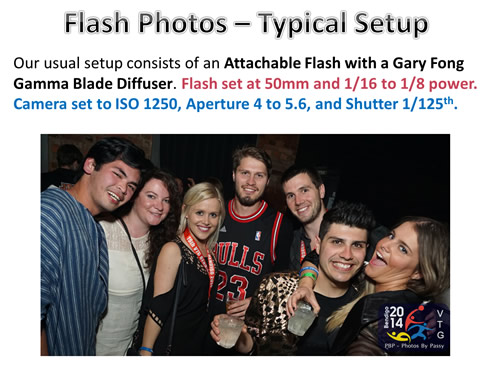
Typical Flash Set Up
For night life and party photos we use the following Flash setup for our Sony HVL-F43M Flash mounted on the Sony A77 DSLR camera.
We hope this article has enabled you to better understand Flash Photography using Diffusers, and there is lots of further information in the Videos which are embedded and lsited below.
Happy Snapping!
Videos About Flash Photography
First up we have a great 30 minute video with both Theory and Real World Examples of Flash Photography.
Here is a five minute video about the Flash I am currently using: The Sony HVL-F43M.
Here is a great video all about Diffusers from the excellent “Nightclub Photography TV” YouTube Channel.
Part 1
Here is Part 2 of the above video:
The following video is all about the Gary Fong Light Sphere Diffuser
This next video is also by Gary Fong and describes the excellent “Gamma Light Blade” Diffuser
This particular video is for the Sony Flash, but the “Light Blade” is also available for Canon and Nikon Speedlite Flash units.
The following video is an excellent six and a half minute video all about using “Fill Flash” for outdoor Portrait shots.
Here is a great twelve minute video all about using a Flash to do Outdoor Portaits.
This next sixteen minute video is all about using on camera flash, with an emphasis on Canon Camera Equipment.
This video is a one hour video about NOT using flash, but instead just using ambient light with light meters and reflector panels.
Videos About TTL
Here is quick two and a half minute video explaining what TTL Flash Mode is and how it works.
This next Video shows how to see the TTL Verify Light working on Canon, Nikon, and Sony Flashes.
This next Video discusses TTL Flash Mode versus Manual Mode.
The following video is a full one hour Webinar on TTL versus Manual for Flash Photography.
Related Items
For more great articles about How to Do Digital Photography, see our “How To” page at the following link:
How To Articles by Photos By Passy
Subscribe
If you enjoy visiting Photos By Passy, why not get a free subscription to the website.
You can then receive notifications of new items and updates directly to your email address.
Go to the subscribe area on the left hand sidebar, (or down the bottom of the page if using a mobile phone), fill in your email address and then click the “Subscribe” button.
Enjoy,
Passy