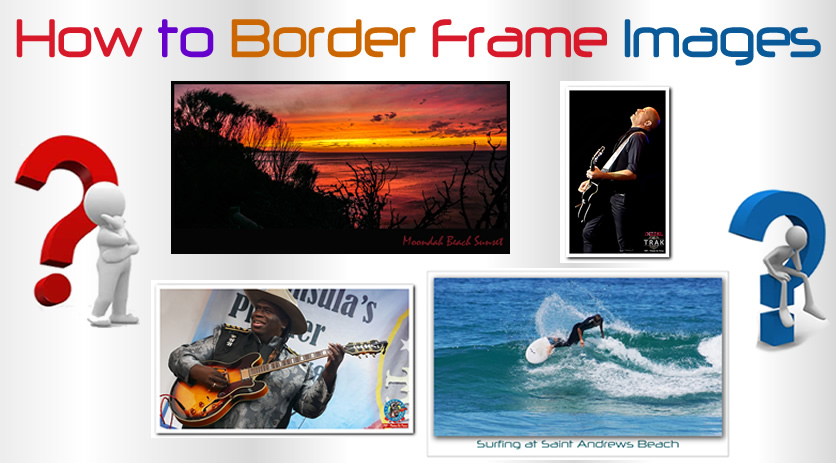
In this lesson we demonstrate in detail three different ways of adding frames and borders to your photos by using Adobe Photoshop.
Although we created this lesson using the Creative Cloud Photoshop CC, the steps should be exactly the same in Photoshop CS5 and CS6.
This lesson also lets you choose your prefered mode of learning, as we have both tutorial videos, and a PDF document of full written instructions.
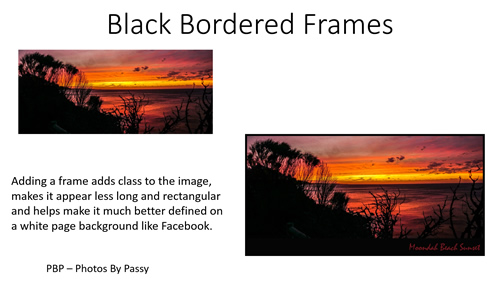
Black Border Frames
The first of our three lessons is about adding a black frame border, and this works great on Sunset and Forest Photos.
The following Video Tutorial shows how to do this step by step in Photoshop.
Down at the bottom right hand corner of the player, we suggest you click on the “HD” icon and choose full 1080p HD resolution if you are going to watch the video in full screen mode.
There are also full written instructions available which can be accessed by clicking the link below:
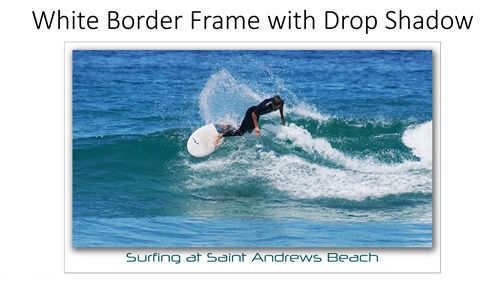
In this next tutorial we show how to make multiple frames and outlines around a photo, as well as how to add a Drop Shadow effect that makes the image appear elevated up onto the page.
This creates a great feature image for uploading to social media sites such as Facebook.
The following Video Tutorial shows how to do this step by step in Photoshop.
Down at the bottom right hand corner of the player, we suggest you click on the “HD” icon and choose full 1080p HD resolution if you are going to watch the video in full screen mode.
There are also full written instructions available which can be accessed by clicking the link below:
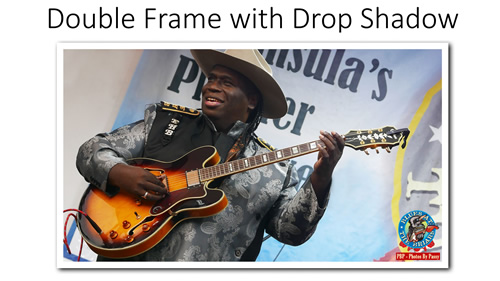
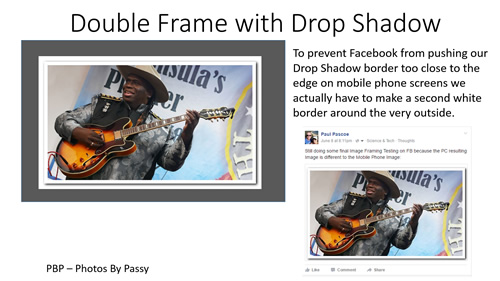
Melbourne Photographer “Ian Peter Smith” uses this type of frame a lot on the Photos he posts to Facebook and it is extremely effective.
It was from his images that we got the idea of creating one of these types of frames in Photoshop.
It is actually a double frame, as there is a White Frame around the outside to stop Facebook “edge cramming” it on Mobile screens.
The following Video Tutorial shows how to do this step by step in Photoshop.
Down at the bottom right hand corner of the player, we suggest you click on the “HD” icon and choose full 1080p HD resolution if you are going to watch the video in full screen mode.
There are also full written instructions available which can be accessed by clicking the link below:
In this “How To” lesson we show you how to download MP4 footage as well as MP3 sound files off YouTube, and then using Adobe Premiere cut out pieces of these downloads and make your own customised clip; which in the trade is often called doing a “Mashup”.
This is an activity I give to my students as their first step towards learning how to use Adobe Premiere CC.
Even if you do not use Adobe Premiere as your video editor, the concepts and techniques covered in this “How To” lesson should easily be transferable to “Windows Movie Maker”, “Filmora”, “Camtasia”, and most other movie making software.
If you cannot afford an Adobe Creative Cloud Subscription for Premiere, and want to look at using some “Free” Movie Making Software, then check out this article from Tech Radar:
Here is an example of a completed one and a half minute Mashup Video, called “The Simpson’s Top 5”:
Because I am a school teacher, and this video is for educational purposes, there is no Copyright Infringement involved here.
However, if you try to load your own MashUp to YouTube they will probably immediately red flag it as a copyright violation.
So by all means learn some Premiere using our tutorial about making a YouTube Mash Up, but do not load it up to the web anywhere.
The following PDF document takes you through step by step “How to Make a Mashup Compilation Video using Adobe Premiere Pro CS6”.
We have also made a 20 minute “How To” video about using Adobe Premiere CC to make a Mashup Video.
(This is the first time PBP has used Camtasia to make a How To Video, and we plan to do more of this in the future).
If you have trouble with the instructions in the PDF, or would prefer to learn by watching a video, then use the “How To” video below.
We recommend watching the video on a 1920×1080 computer screen, and clicking on the “HD” on the player bar to set the video to 1080p, and then click on the 4 way arrows icon next to HD, to watch the video full screen. If you are using a Tablet, then perhaps choose the 720P setting in the pop up “HD” menu.
Press the Esc key at any time to exit from full screen view.
Our Mashup Tutorial is a great fun way to start learning how to use Adobe Premiere CC for making videos, and you could use the skills shown here to make a video slideshow of some photos, or your own Highlights Video which includes Title and Commentary slides that you have made using Photoshop, PowerPoint, or other software.
It also should give you the technical skills to edit up a video recorded Interview and/or live footage into a Project Video that could be used for Business Marketing or a School or College Video Assignment.
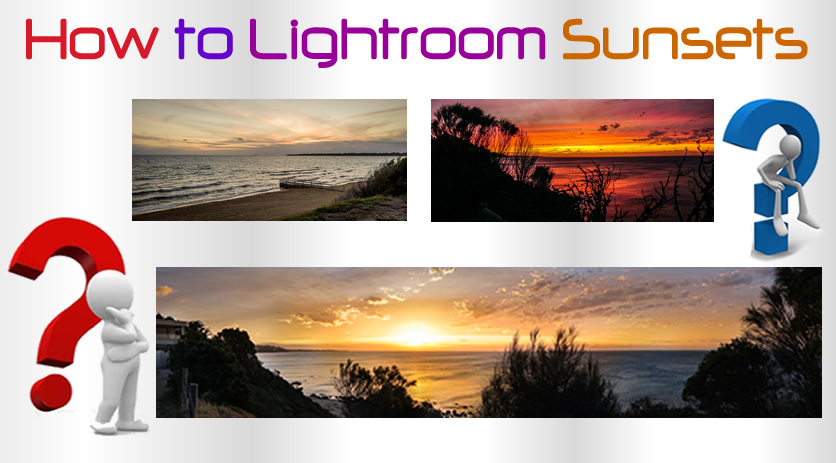
In this lesson we look at how to use Adobe Lightroom CC to improve Sunset Photos.
Getting great sunset images is a combination of manually setting your camera exposure for the sky (and then holding down the AEL Auto Exposure Lock button on the camera while framing and taking the shot, especially on Panoramic shots). Well this is what applies when using a Sony DSLR, which has a brilliant in camera Panoramic function setting, as well as an AEL button.
The next step is to take your photos into Adobe Lightroom (even if they are JPG images), and do the adjustments and touch ups outlined in this “How To” lesson.
Camera Settings for Sunsets
We do not discuss in detail Camera settings for Sunsets in this lesson, as the main focus is on using Adobe Lightroom.
But the number one rule is that the camera dial “Sunset Mode” needs to be avoided, and shooting done in full Manual Mode.
Recommended Manual Mode Settings:
– Exposure Mode: Manual
– Focus Mode: Manual
– Shutter speed: 1/30th sec or longer.
– Aperture: f/16
– ISO: 100 or lower
– Lens: wide at 18-24mm
– Drive Mode: Single-shot
– White Balance: Daylight
Perhaps use a Tripod with a remote control for shutter release if you can (but we have not done this with our photos).
If you need to know more about how to set your camera for Sunset Photos, then read these articles:
We could probably get even better results by shooting in Raw format and using Lightroom, however most of the photos we have processed in Lightroom in this lesson have been JPG images.
We have been using the Creative Cloud Lightroom CC, but from what we have seen in YouTube videos it seems pretty much the same as Adobe Lightroom 5.
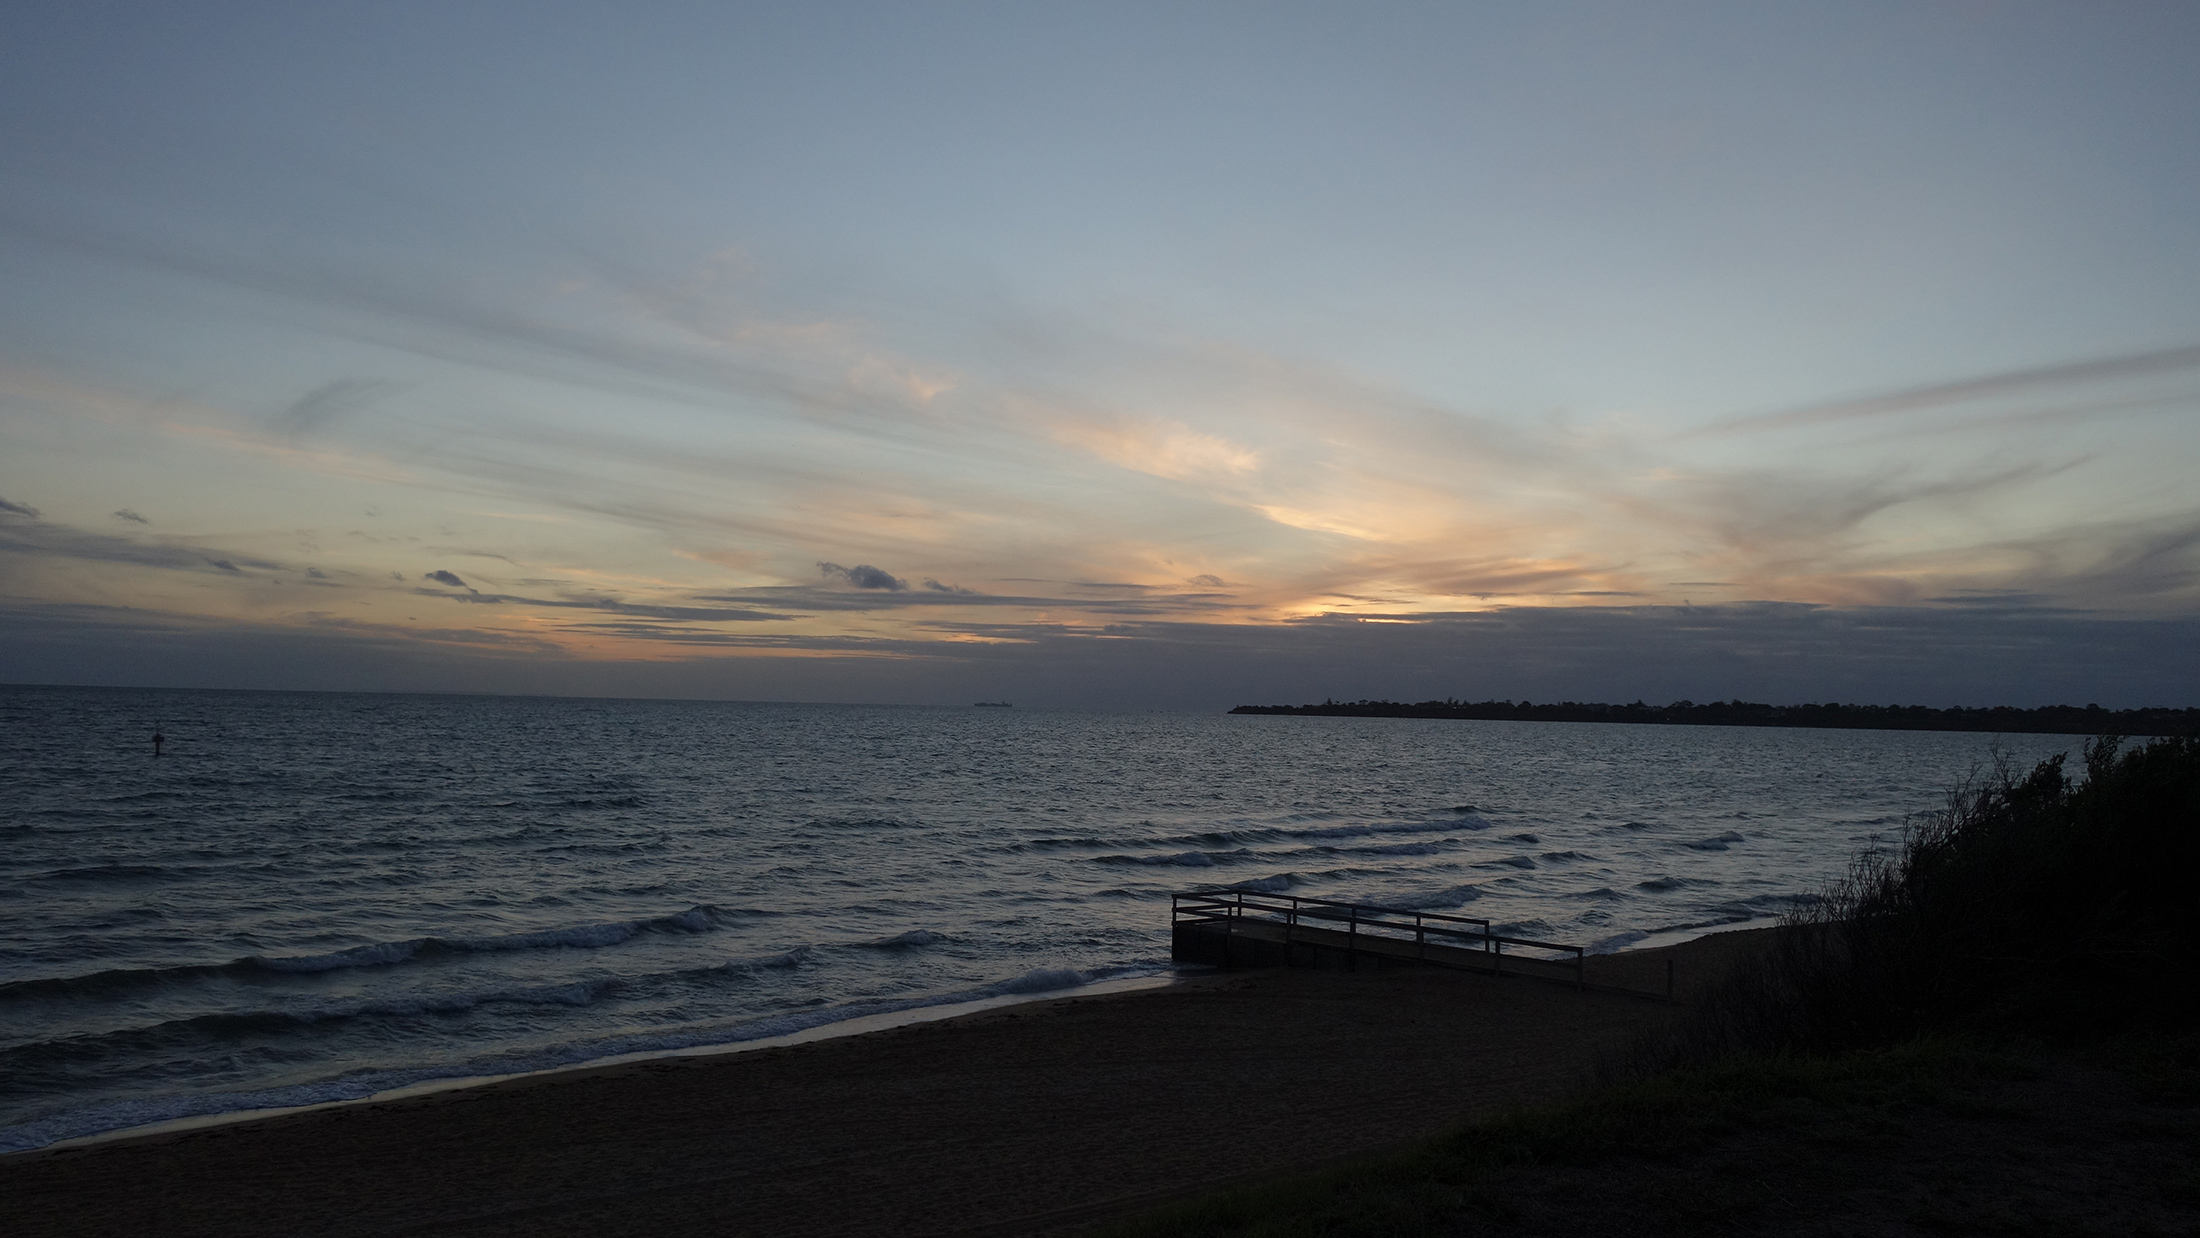
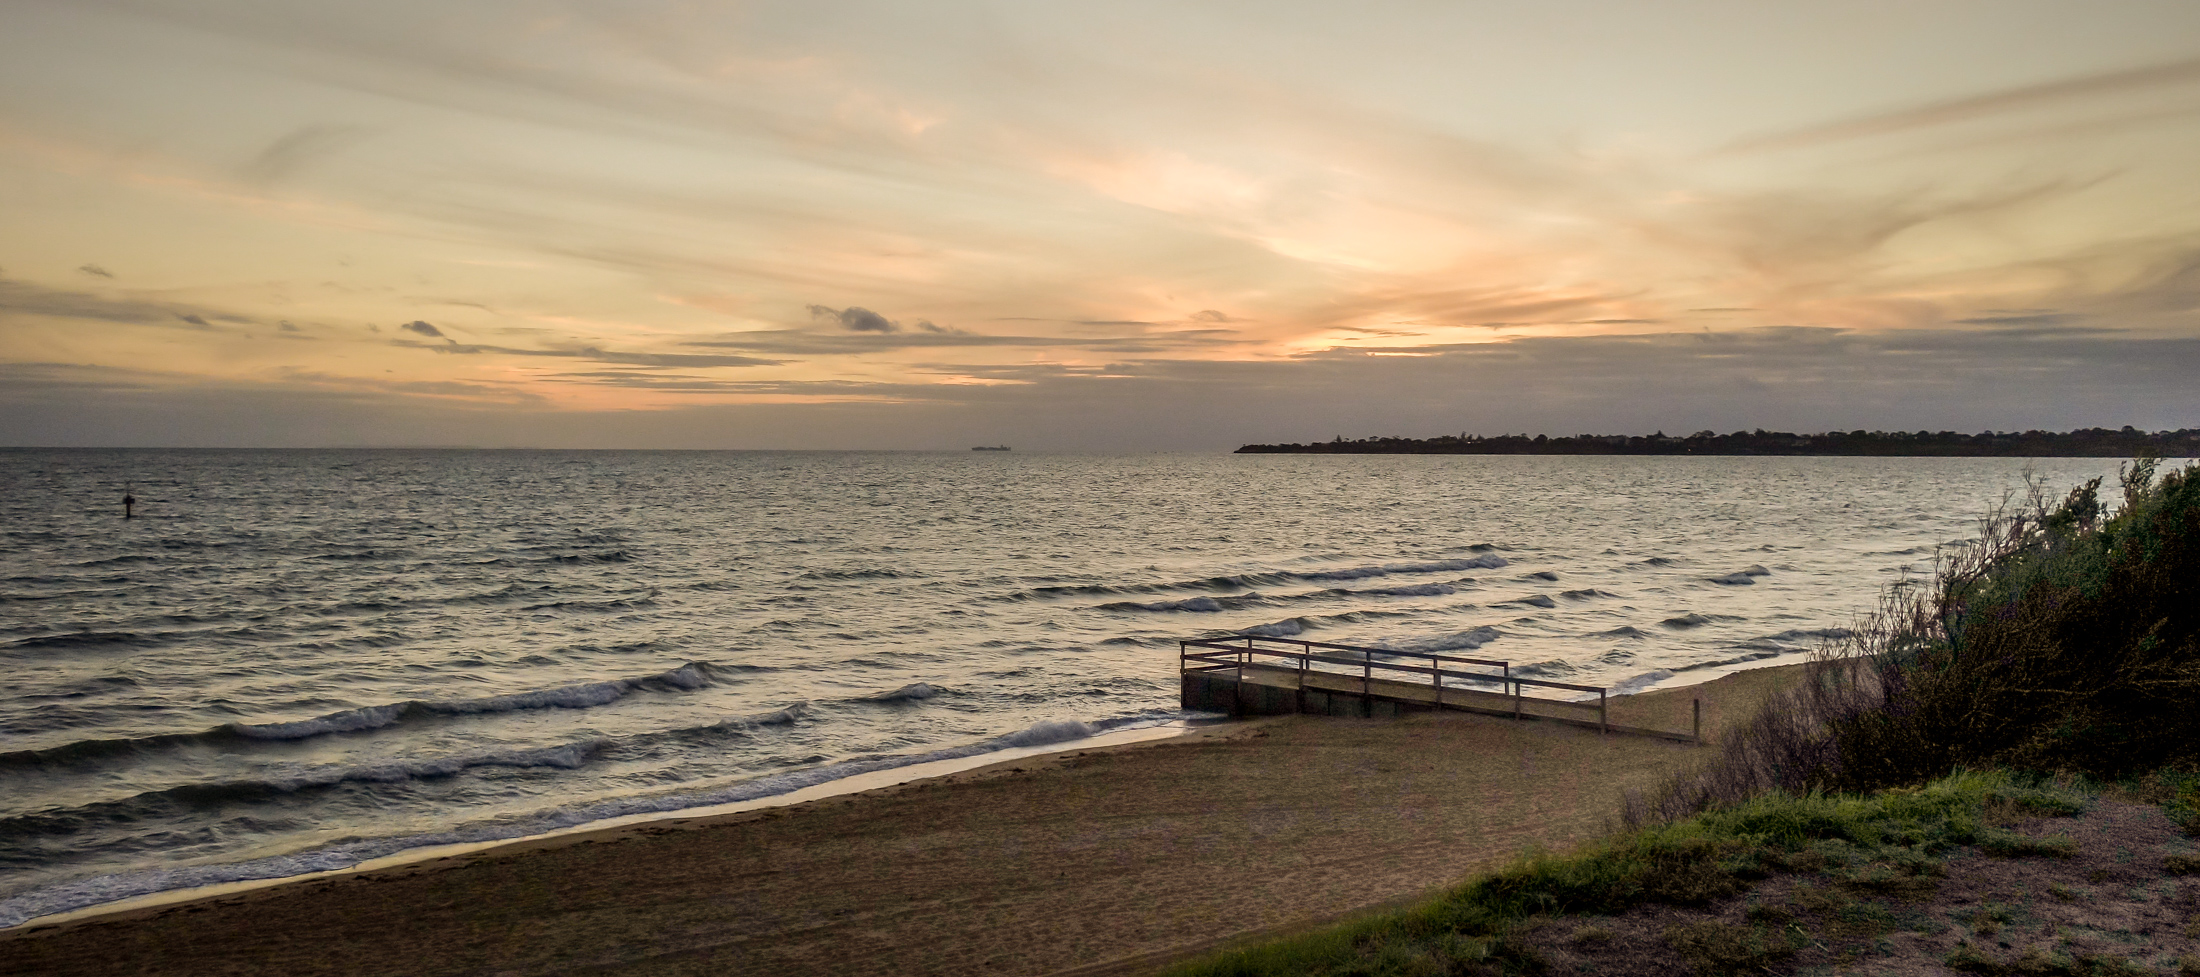
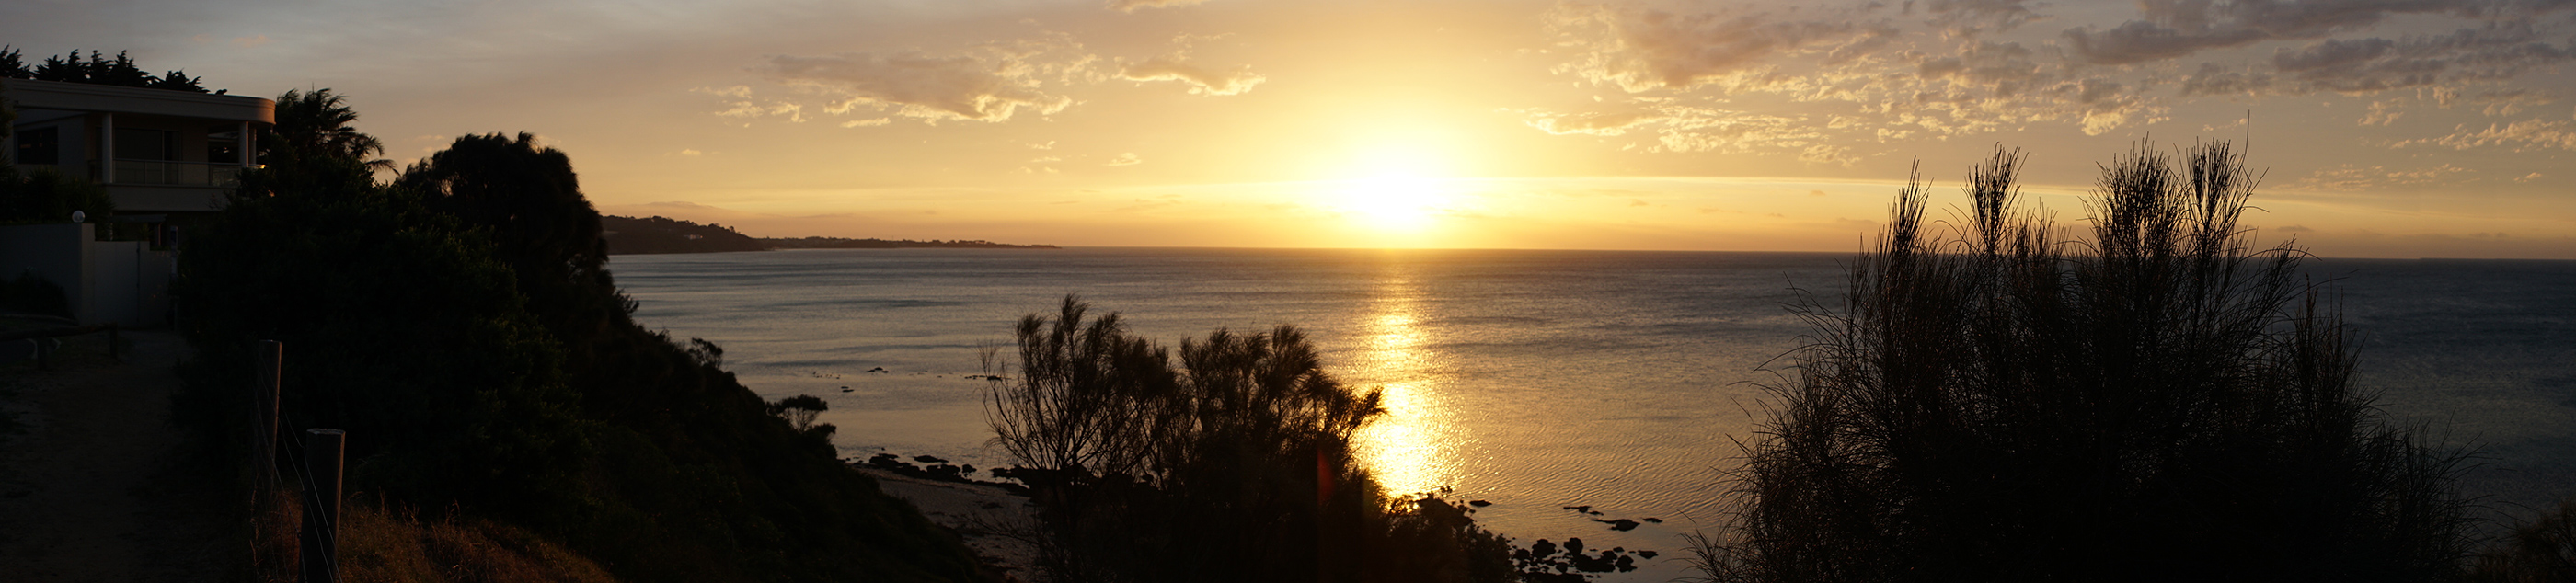
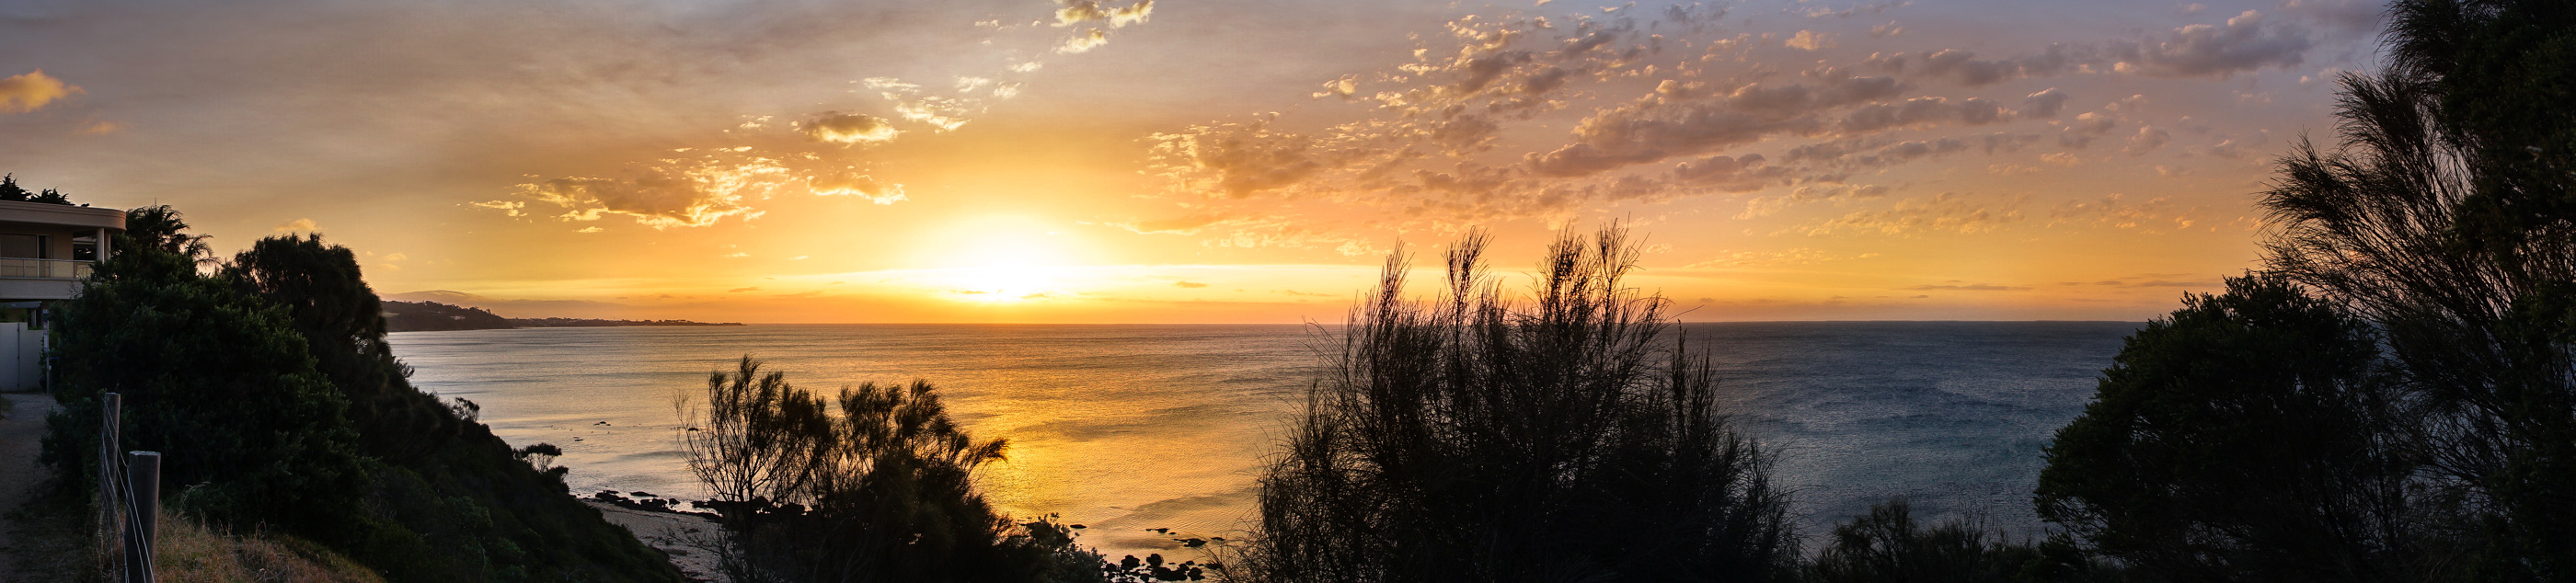
Here is one example of what can be done using Lightroom.
First of all is the Original Image (Click on it to view full size)
and here is the same Sunset Photo after applying Lightroom settings to it (Click Image to view full size)
The above changes were made by following along with the following YouTube Video, which is a great Video for complete beginners to Lightroom.
(Later in this lesson, there is a second video which covers some more advanced techniques).
Keep in mind that the changes we make in Lightroom are always small and subtle, and simply restore back in some of the Sunset splendour that the camera has lost by exposing a bright sky and then making a very dark foreground.
Lightroom Video One
This video has over 300,000 views on YouTube and first thing this guy does is setup a folder on his external hard drive
for output pictures to go to. This is very handy if you are using Lightroom on a Laptop, and also on a second main PC.
Another thing he stresses is to shoot raw to capture more colours and dynamic range, which we have not tried out yet.
We have shot Jpegs and will see how Lightroom goes on them, but in future we should shoot in raw + jpeg mode, as we have the
option on the camera to do this, and easily enough room on the SD card.
Basically we watched this video, pausing and following along and trying out the things he does in Lightroom.
This is how we made the before and after image effects shown previously.
Here is a summary of what Lightroom functions are carried out in the Video.
Importing Pictures
For the Importing process, LR at first could not find individual folders on the C drive, so it seemed you have to do something like copy your pictures into “My Pictures” Windows folder, but then we clicked somewhere near our C drive in the left hand panel and it did find all our own custom made Windows folders. A bit strange, but at least it works.
On the Import options, we chose “Add” to add photos to catalog without moving them.
We then change at the top from the Library Module to the Develop Module on the top of screen menu items.
Cropping Photos
In Develop Mode, the Crop Tool is the first tool. It has a great feature for straightening the horizon: just go to the corner of the photo
until the rotator arrow appears, then push down the mouse and rotate. A detailed grid temporarily appears while you do this.
There is also a Spirit Level that can be used in the Crop Tool options, but we had no luck with this level method.
Basic Adjustments
When we open this panel in the right hand column, the first thing to adjust is the white balance.
There is an eye dropper to dip into something in your photo that is white. On our sunset photo, the colour was too blue (cold) overall, and we had nothing white to dip into. So we moved the slider to the right, to warm up the photo, and remove the blue cast.
The next thing is to go to the adjustment sliders. First try clicking “Auto” like in the video, but this did not work well at all on Sunsets, and so we used Ctrl-Z to undo. If you use the bottom right hand corner “Reset” button like in his video, it will undo everything and take your picture right back to the start. If this happens, just go to the very top left hand buttons, and do Edit > Undo Reset.
Note in the video, around the twelve minute mark, he also shows the left hand side “History” panel, where you can click on each history item, and see what the image looked like at that stage of your editing.
In Basic adjustments, when you have exposed for the sky, (like in a sunset shot), we take the highlights all the way to the left, and the
shadows most of the way to the right. This seems to turn the sunset photo into daylight, which is kind of weird.
Too much of shadows set too far to the right seemed to introduce a lot of noise grain into our photos.
Perhaps we need to originally shoot them at ISO 100 or 200 with a longer exposure and use a tripod, to have clearer starting shots.
Next, we put the Clarity up which adjusts midtones, and adds a sharpness type effect to the image.
The video suggests not taking Clarity up past the 40% level as a maximum, and this seems to be a good idea.
Clarity does introduce some noise grain onto the image, and apparently also distorts peoples skin tone colours.
(Noise is adjusted later on, when we do the “Detail” panel settings).
Next we adjust Whites and Blacks.
We can hold down Shift where it says “Whites” and double click to get an automatic adjustment done by lightroom.
We can do the same with Blacks. To undo and set the sliders back to the middle, we hold down no keys, and just double click on “Whites”.
We do the same and double click on “Blacks” to reset them.
I guess using the standard Ctrl-Z undo process would do the same thing.
We found that the Shift Double Click let Lightroom do the settings method did not work well on Sunsets, and the Hold down Alt key method described below did a much better job.
The other method is to hold down Alt, and the whites screen goes black, then we add whites until only the first set of highlights show through.
We can also use Alt to adjust the blacks, and go a little stronger to the left on these.
The last two Basic settings are Vibrance and Saturation.
Vibrance adjusts every colour that is not already saturated, while Saturation will adjust every colour, even if it already saturated.
Vibrance is more subtle than Saturation, and so we often add a little Vibrance, but do not add any saturation.
Once all the Basic Adjustments are done, you can press the “Y” key to see the Before and After side by side, and press Y again to turn it off.
The back slash \ key performs a similar before and after function, (on most but not all keyboards).
HSL Adjustments
With the HSL panel, we can intensify the saturation of certain colours; specifically we can adjust Hue, Saturation, and Luminance (HSL).
First we do Saturation and then we do Liminance to adjust the brightness and contrast of the colour.
Detail Adjustments
The next panel we use it the Detail Panel for doing Sharpening and Noise Reduction.
It is suggested in the video to simply do Sharpening to 70, and Noise Reduction to 40.
Effects Adjustments
Using this panel we can create vignettes. A slight black vignette can draw attention to the middle of the photo.
A Black vignette (slider to the left -10 to -20) seems to work well on a Sunset Photo.
Exporting the Image
If your image is a raw image (or a Jpeg) we need to export it to put it onto FB or Instagram.
We do File > Export and then have an extensive panel to do settings on.
To find out what to do, watch the 23 minute mark of the video, Export to a specific folder, and do not add to the catalog.
Note that you can export to a PSD Photoshop file and then take it into Photoshop later on, but we are doing a JPG, SJPG, Quality 100,
and do not limit the size.
Resolution is 72 for FB and online, and 300 for Printing.
When you export, a status bar goes on the top left hand corner until it is finished.
The resize option is strange, because if you use Width and Height, it does not adjust height automatically when you change the width.
So we used the “Long Edge” option, and then set it to 2048, or 2200 to 2800 for Panoramic images, to make a suitably sized JPG for Facebook.
Another slightly annoying feature, it that unlike Photoshop, it does not show you the estimated size in Megapixels for the final image when you resize or change the quality.
When we used full quality and around 2048 to 2800 wide, we ended up with a 1.45 MB image which is quite large to load up to the Web.
When we exported to 85 percent quality the file size went down to only 1.11 MB with no difference in quality visible.
However we did find on other photos we resized using the “Long Edge” option, that the file size came down to between 700K and 1.4MB which was fine for uploading online to Flickr and Facebook.
Using Lightroom for Sunsets
We found another great video for beginners about doing Sunset Photos in Lightroom.
This Video includes using FILTERS and the PAINT BRUSH, as well as the SPOT HEALING TOOL for removing any spots caused by dust on your lens.
The YouTube video shows how to use filters to mask off areas like the sky and work on them, as well as using colored gradient type paint brushing. Although he does it a little bit quickly, it is easy enough to follow along with and figure out the techniques.
He also shows some other great tricks for getting a really good sunset photo out of a very drab grey sky photo to start off with.
On the video the guy goes on and on a bit about a few other things at the start, and does not really start on the lightroom processing until the 5 minute mark or so.
Here is a Before and After Panoramic Photo we made by appying the effects shown in the video, (particularly the Paint Brush).
Click each Photo to View it Full Size.
The effect I was going after was to make the sun look like a nuclear bomb explosion, as its energy does come from Nuclear reactions on its surface. It is perhaps not to everyone’s liking, but I like it, and it was exactly the look that I wanted.
Lightroom allows for all types of artistic creativity with its range of awesome tools!
Using the Brush Tool on Sunset Areas
When you use the brush tool, always have feather at 100, then adjust the Density and Flow starting at 50 each with a big brush, and some red or yellow colours.
Then click New for a new brush, and make it smaller, and set Flow and Density to 80 and go over the area where the sun is again.
Then click New, double click each of the sliders to set them back to zero, then up the exposure to the right and brush with that to lighten up areas like whites on wave caps, green bushes and trees, etc.
The whole time you do this, little white round movable adjustment dots start appearing, and the “H” key is a toggle to make these dots visible and not visible.
See the previous YouTube video around the 10 to 12 mins part to see the Paint Brush in action.
Using Lightroom Filters
Filters can be tricky to manipulate when using Lightroom for the first time as a complete beginner.
It is not immediately obvious how to move the three lines and the dot on the graduated (gradient) filter, or how to adjust them.
The thing to remember is that the Filter is making a dark to light see through gradient on your image, and the set of three lines are the graduated (or fade in and fade out) edges of the dark to light change. (Light to Dark happens when you move the Exposure slider).
The filter does not have to be a dark to light change, as there are sliders to make all sorts of Gradients in the Lightroom Options. For example a Filter on the sky portion can make a Saturation change to make the faint and whispy top parts of sunset clouds far more intensely coloured.
The other great thing is that once the filter is placed onto the image, the sliders can be adjusted to create all sorts of graduated effects, including sharpness and blurring using clarity.
The following Video gives a great demonstration of how to use the Rectangular shaped Graduated Filter:
We have not used the Radial Filter on sunsets at all, but probably could do so around the sun perhaps, and here is a video about how it works:
And finally another interesting video about using Radial and Graduated Filters:
The H and Y Keys
The letter H is the Hide and Unhide key in Lightroom.
Pressing the letter H on the keyboard toggles between hiding Paint Brush or Filter settings on the image and unhiding them.
However we found that if you hide settings on a filter, then the next time you set another filter, you cannot see any settings to adjust this latest filter. It seems that the H key hide stays turned on forever, until you hit “H” again.
so when working with Filters or paint brush, you may need to press the H key to make the settings appear.
This is kind of annoying, because any new filter should really have the settings lines shown immediately so they can be adjusted.
Other useful keys are the “Y” key to show before and after images, (Y to see them, Y again not to see them), as well as the backslash key \ which does a similar before and after view of the image.
Lightroom Sunsets Summary
The basic workflow when doing a Sunset Photo in Lightroom is as follows:
1) White Balance – just usually give it a slight Temperature Change to the right, from blueish cold to a bit warmer.
2) Highlights all the way to the left, and Shadows most of the way to the right
3) Clarity up to around 40% as a maximum, which adjusts midtones, and adds a sharpness type effect to the image
4) Whites and Blacks – Hold down Alt, and the whites screen goes black, then we add whites until only the first set of highlights show through.
Also hold down Alt to adjust the blacks on its all white screen, and go a little stronger to the left on these.
5) Saturation and Vibrance – Saturation does all the colours, Vibrance only adjusts the colours that are not already saturated.
6) The HSL Adjustments
With the HSL panel, we can intensify the saturation of certain colours.
We can do Hue, Saturation, and Luminance.
First we do Saturation and then we do Luminance to adjust the brightness and contrast of particular colours.
These need to be subtle for each colour, try to only go within plus or minus 20% on the sliders.
Some colours do not require any adjustment, usually we are doing Red, Orange, Yellow, Blue and Green.
7) Detail Panel for doing Sharpening and Noise Reduction.
Whatever we do the Noise reduction for, do 100-this for the Sharpness.
Eg. NR = 20 then Sharpening = 80.
8) Paintbrush Tool – make sure feathering is 100 and add yellows and reds as well as exposure changes. Do New button for new brush each time.
9) Filters – the vertical rectangle symbol between crop and paintbrush on the top row of the right hand column.
We can move the filter up and down, change its width, and tilt it using the middle line in it.
Filters are great for laying diagonally across the Sunset and brightening it up.
10) Effects Adjustments – A Black vignette (slider to the left -10 to -20) seems to work well on a Sunset Photo.
There you have it, the ten steps for processing a sunset image in Lightroom.
That’s it for now, we will add some more to this lesson, as we work more with Sunset Photos in Adobe Lightroom.
A Flickr Gallery of our Sunset Photos can be viewed by clicking the following link:
Note that only the first nine or so images (at the time of writing) have been adjusted in Lightroom.
The other images are all either straight out of the camera, or adjusted in Photoshop which does not work nearly as well as Lightroom.
In this “How To” article we look at some basic Photoshopping which can be used to improve photos of animals taken outdoors
in bright sunlight. We also look at enhancing Photos that have been taken of Animals in Glass Cages.
If you do not have Photoshop, then the same enhancements can easily be made in either Photoshop Elements, or the great
free image editor called “GIMP” which is available for download here:
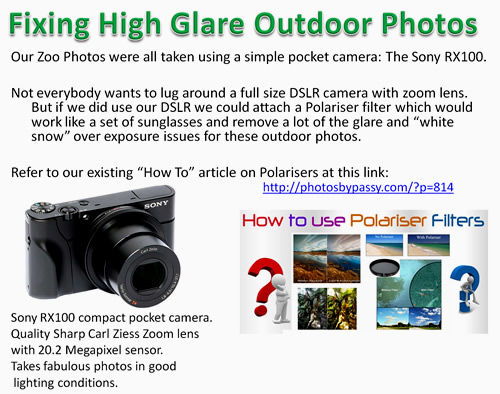
Recently we did a day trip to the Melbourne Zoo in Australia, and not wanting to lug around a lot of camera equipment, we took
along a small powerful pocket camera made by Sony: the RX100 Mark 2.
The Sony RX100 series is currently up to the RX100 M4 for around $1000 in Australia, but the camera we used for our Zoo photos
was the RX100 M2 which can be purchased new off eBay for around $500.
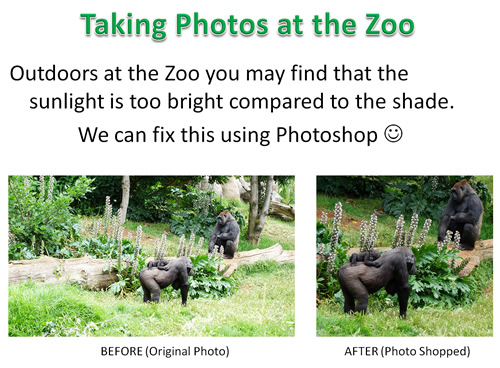
It was a cloudy day, with the sun occassionally breaking through very brightly, and so we had issues with over exposure
where the pictures came out too bright, with a white snow effect on grass and animals backs.
Also many of the photos were taken from a distance using the superb Carl Zeiss zoom lens, and due to this great lens, and because we have 20.2 Megapixels to play with on the RX100, we could easily crop the photos to make them look a lot closer, and still have plenty of quality pixels remaining when we resized the pictures to 2048 pixels wide for Facebook.
In this article we look at using Basic Photo Editing Techniques to enhance Photos of Animals.
It is basically a beginner’s lesson in Photoshop.
Photos can always greatly benefit from some simple Photoshopping.
Advanced Methods
If you want to try something a bit more advanced to enhance the example photos, then use “Colour Curves” to reduce the
high tones as shown in the following tutorial for Gimp, (but works equally well in Photoshop):
If you want to download the starting versions of the Photos shown in this article, then bring up the following folder in a web browser, click to display the images, and then Save each photo using your Browser right click on photo Mouse options.
You can then try out the techniques we show in this article.
Over Exposure can easily be dealt with using basic photo editing tools.
If we had used a full size DSLR camera, we could have fitted an Adjustable Polariser Filter, which works like a pair of sunglasses,
and reduces glare and brightness.
See our previous “How To” article about Polariser Filters at this link:
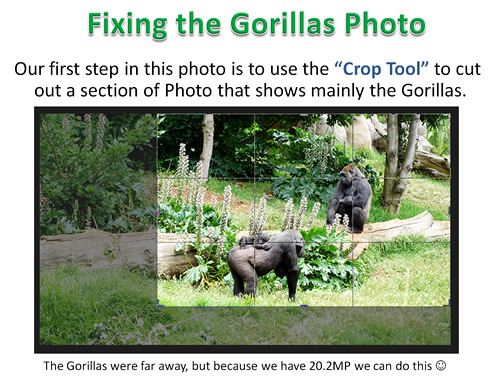
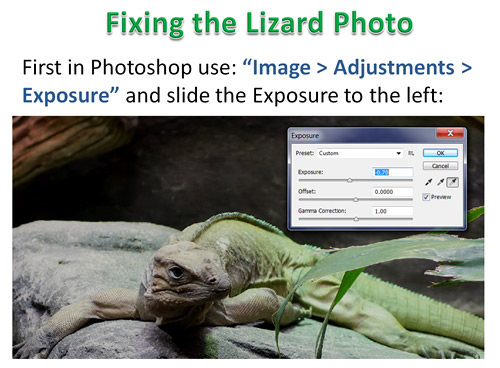
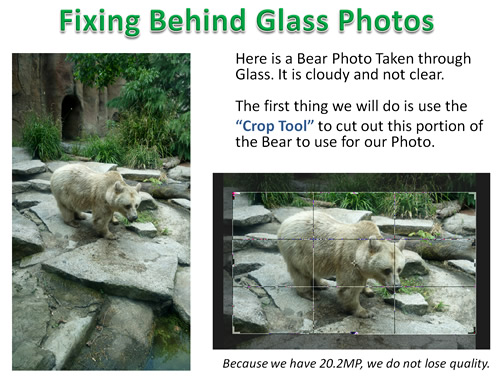
The first thing we do is crop our Photo to better frame the action, and make the animals appear closer.
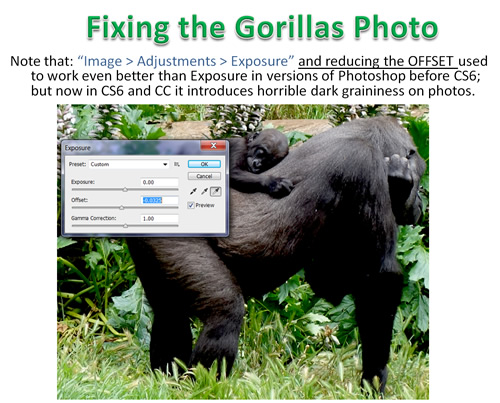
Next we adjust the Exposure down a small amount to darken the picture slightly:
Note that if you have Used Photoshop CS5 or earlier, the “Offset” adjustment used to be brilliant for fixing overexposed bright and washed out Photos.
However in CS6 and the Creative Cloud versions of Photoshop, “Offset” has been changed to be very harsh, and appears to be virtually unusable:
So do NOT use Image > Adjustments > Exposure and Offset.
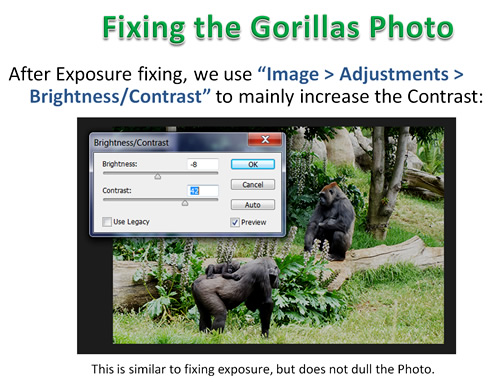
We now use Brightness/Contrast to introduce some “punch” into the photo:
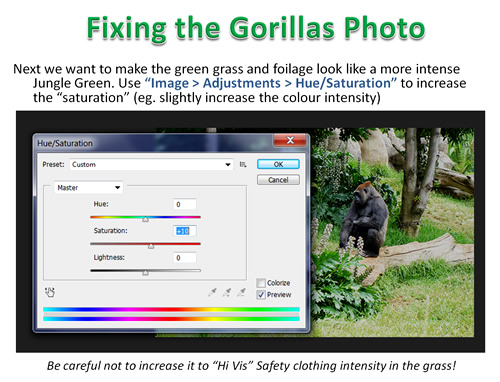
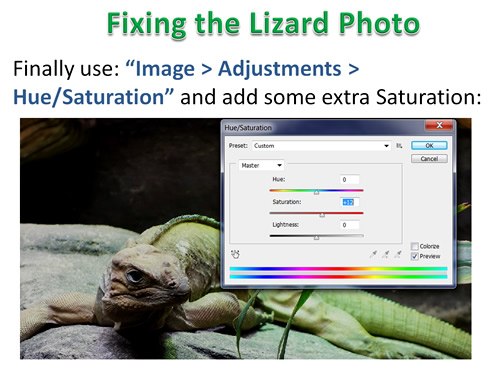
The next thing is to make the colours more intense using Saturation:
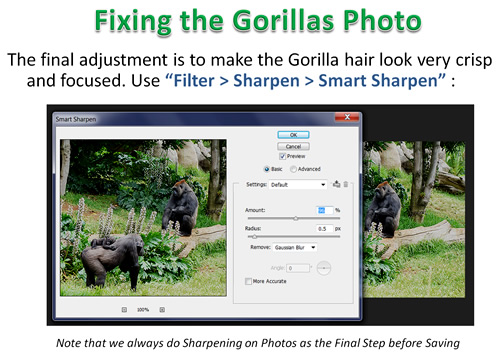
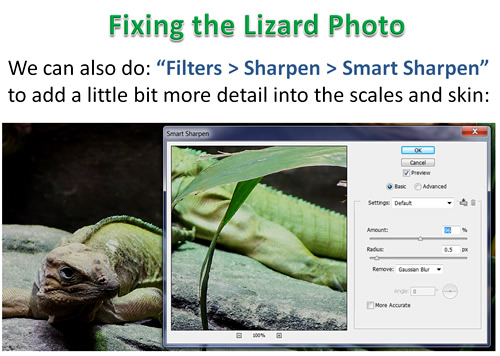
The last thing to do is to “Sharpen” the picture, to make the fur look its very best.
Note that Sharpening should always be done as the last step when enhancing photos.
Note that the settings used on the above Sharpening are percent values between 90% and 98%, and a Radius Value between 0.2 and 0.7 (we used 0.5).
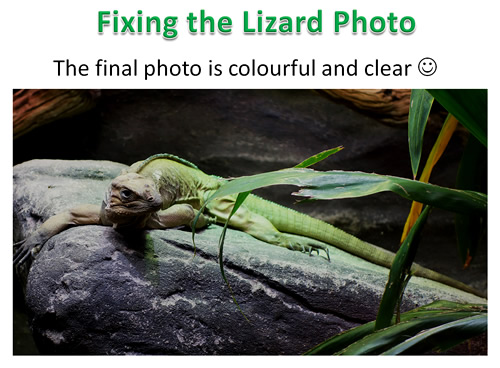
Our Photo is now finished and ready to Resize and Save.
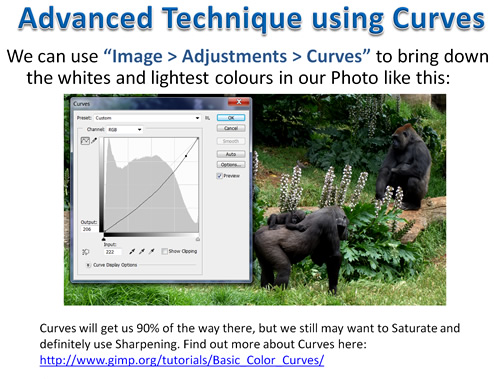
Advanced Technique – Curves
A Quicker way to fix our Original overexposed Photo with “white snow” on the green grass, is to use “Curves”.
Using Curves we can fix our Photo in one go, without having to do Exposure then Contrast then Saturation.
We need to understand that the brightest parts and the whites form part of the top section of our colour line.
If we click to make a dot on this top part of the line, and hold our mouse button and pull the line down to make a curve, we can remove the bright whites.
Find out more about using Curves in the following Web Tutorial:
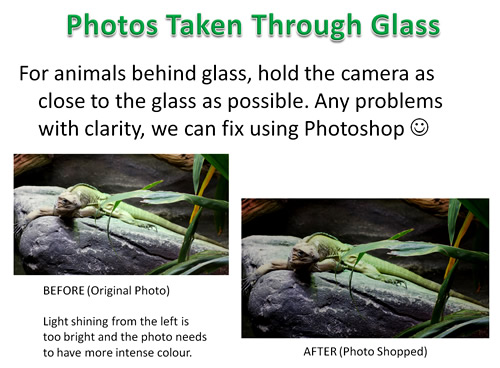
For taking photos through glass, hold the camera as close as possible to the glass, and check there are not any people reflections visible and take the photo.
The resulting photo might look too bright, grey and a little foggy, but we can easily fix this in Photoshop as follows:
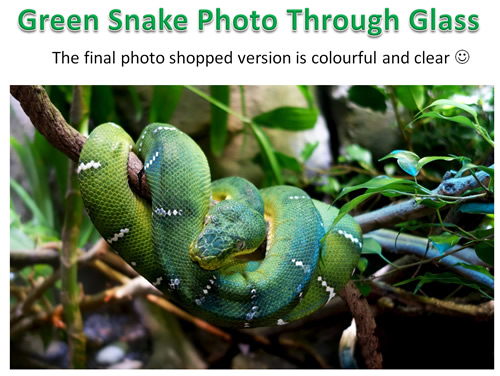
This produces the final photoshooped image, which is crisp and clear with nice colour.
Here is a photo taken of a green jungle snake in a glass cage that now looks like a photo taken in the Amazon Jungle.
Finally here is a photo we took of a bear through Glass in vertical Portrait mode.
But because we have 20.2 Megapixels to work with we can easily crop it to be a Landscape Horizontal image.
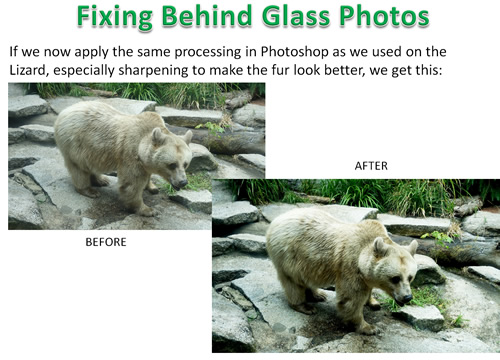
Working through the usual steps, we can transform the photo into the final enhanced image.
Summary
Animal Photos and Photos through glass can be greatly enhanced using a photo editor like Photoshop or Gimp.
Our Zoo Photos
You can check out all of our photoshopped Zoo Animal pictures at the following link:
If you want to download the starting versions of the Photos shown in this article, then bring up the following folder in a web browser, click to display the images, and then Save each photo using your Browser right click on photo Mouse options.
You can then try out the techniques we show in this article.
If you liked this article, then go Like our “PBP Photos By Passy” Facebook page.
Subscribe
If you enjoy visiting Photos By Passy, why not get a free subscription to the website.
You can then receive notifications of new items and updates directly to your email address.
Go to the subscribe area on the left hand sidebar, (or down the bottom of the page if using a mobile phone), fill in your email address and then click the “Subscribe” button.
Enjoy,
Passy
If you found this article useful, then make sure you give our
“PBP Photos By Passy” Facebook Page a Like.
WARNING: This article contains quite a few embedded how to videos, and may take a while to load in.
Recently we built a powerful Windows computer for Video Rendering, and learned how to use Adobe Premiere to combine a series of DSLR Camera video clips into a short movie.
These were the first two videos we ever made using Adobe Premiere. Since then we have made several more videos which you can view on our Portfolio page at the following link:
The Takin Cover Video is also available on YouTube:
The filming for the Takin Cover Video was done completely hand held, and some up and down wobbling is visible in places.
For wide angle shots it is far better to do this type of filming with a Monopod, like was done for the Appetite for Destruction Video.
However close up shots really need to be done hand held, but I am investigating getting some kind of gimble rig to do this in the future. For now it is hand held for all close ups.
For the Monopod setup I had to make my own safety strap for the camera that was long enough to raise up the Monopod, but short enough so the camera would not hit the ground if dropped! Customising a standard sling strap did the trick.
Obviously a $3000 powered zoom lens would help too, but we just do not have that sort of money around at the moment.
Getting a proper Video DSLR setup (eg. Sony A7s II when it comes out, with a power zoom lens) is possibly further down the track in one or two years time. (Estimated Cost: $6000 to $7000 !) For now it is a matter of developing solid skills with our current equipment.
How to Use Adobe Premiere CC Document
Rather than write a very lengthy post here, we have written all about how to use Adobe Premiere Pro CC in a PDF document which can be downloaded at the following link:
In the document there is a step by step journal of how we learned Adobe Premiere and made a Live Music Video.
There are also links in the document to many YouTube videos and useful tutorials that we found on the Internet.
Getting Started in Premiere CC
Probably the most useful video for getting started in Adobe Premiere, for complete beginners, was this one by Gary Fong:
The following video shows how to use the effect controls panel to modify Video transitions:
For Audio transitions, watch this video:
Creating Black and White Video
For Colour Correction of Clips, including making clips Black and White or Sepia, watch these videos:
and
High Contrast Black and White
The standard B&W conversions in Adobe Premiere using Desaturation or B&W effects can sometimes produce very ordinary grey looking videos.
HOWEVER
Hidden away in Effects: Video > Channels > Calculations
is a two layer blending technique where we can set one up as say green, and the other as red (blue is very noisy), and then on this same panel set up the blending mode as
Multiply, or Hard Light, or Color Burn and we get great high contrast B&W effects.
This following YouTube “How To” video shows how to do this:
Here is a short video we made trying out these techniques.
Our objective was to make a grungey black and white video in bad lighting conditions and test out the Sony A57 DSLR for run and gun video. The final result is a bit “rough and ready” but we think it captures the essence of live rock in a small venue.
This video had focusing issues, and the lighting in the venue was awful, but we believe we could use these Premiere techniques to make some better quality High Contrast Black and White clips in the future.
Creating Selective Colouring
For Selective Colouring (also known as Pleasantville and Sin City Movie Effect), watch these videos:
and
Speeding Up and Slowing Down Video Clips
Sometimes we have scenes like walking along a street, or riding a bike along the road, a crowd filling up a venue, a band setting up the stage, etc where having the footage play at normal speed will be a bit long and boring in a Video we are making.
What people usually do is make this footage run in high speed, almost like a time lapse sequence.
Speeding up a Video like this using Adobe Premiere is very easy.
We may also have some footage that we want to make into slow motion, by decreasing the speed, and we can use the same tools in Adobe Premiere to do this as well.
Here is the first video we ever made trying out these effects:
There are two ways of changing the speed of clips in Premiere.
The following Tutorial video shows both ways, and in both of them click on your clip to have it selected.
To Summarise:
First Method is Window > Tools > then in the pop up tools use the 5th one down: “Rate Stretch Tool” or press the letter “X”
Then on timeline shorten back the clip and it does not lose any footage but just speeds it up to fill the shorter length.
Stretch the clip if you want to make slow mo.
Second Method is click onto the clip to have it active and then right click on the clip and pick “Speed/Duration”
or up on the top menu click “Clip” and then Speed/Duration
If you make speed in pop up box 200% it plays twice as fast, 50% makes half speed, 400% = 4X faster etc.
For our Bike Riding Video we found that the ultra fast speed for boring riding segments to use is 800% (or 8x normal speed).
For the slower section near the boats we used 200%, but as it is a long segment riding past all the boats, maybe we should have used 400%.
The Right Click Speed/Duration % method for speeding up video in Premiere seems to work really well.
We have not investigated “Speed Ramping”, because if you have a clip that is going faster, and then the next clip is normal speed, Premiere seemed to automatically do the gradient slowing down okay.
If you want to do very smooth fast then sudden slow motion, then try out “Speed Ramping” with Keyframes, as in this Tutorial:
Watermarking Your Video
For making a Watermark on your video, from a transparent PNG file that you have made previously, watch this video:
Multi-Camera Shoots
Using one Camera on a Monopod to do the wide angle view and capture the main soundtrack (eg. A Sony A77 with ECM-ALST1 stereo microphone), and then having other people operating basic handheld fully automatic cameras (like the Sony RX100 or the Lumix LX100), enables much more sophisticated Videos to be produced in Adobe Premiere.
This was the approach we used for making our “Appetite for Destruction” Guns and Roses show band Video Montage.
The following YouTube video has good suggestions about doing multi-camera shooting:
This is an example of a finished product, which shows to change the cuts on either a beat, or the end of a phrase or verse:
This is another good music video shooting type video how to tutorial:
Synchronizing Multi-Camera Clips
For our multi-camera “Appetite for Destruction” Video we used a wide angle camera and a close up camera.
Basically the wide angle shot was laid down as Video/Audio 1, and then the close up shots were pre-trimmed and laid down as Video/Audio 2.
Then comes the challenge of getting all the pairs of clips in sync, one at a time, using Premiere’s audio track matching function.
Unfortunately, on our main wide angle video, and the close ups videos, Premiere’s automated matching on Audio track wave forms only worked about 50% of the time.
When it did work it was pure magic, but when it did not work it was very long and tedious getting the close up cut in video manually shifted along the timeline to sync up with the main wide angle video.
Once the two clips are synched, we then unlinked the audio on the Video 2 cut in clip, and muted it in Premiere. We successfully rendered the final video without removing the muted clips at all. We also found for Audio transitions that using keyframes and our own custom fade in and outs was extremely useful.
It ended up taking about 12 hours of work, from camera unloads all the way to final uploaded web video. With experience this time could be reduced, but we reckon it would take at best 8 hours to make a 10 minute video featuring between 3 and 4 songs. Therefore Video is far more costly to produce in terms of labour time compared to a set of around 50 still images.
The following six minute YouTube video shows the basics of editing multiple Audio tracks in Premiere Pro CC:
Here is another video which also shows how to sync multicam clips:
This next video is rather long and is all about editing people dancing to Dance Beats:
This next video covers doing multicam editing for a music video.
The guy who did this video has quite a few other videos on YouTube that are worth watching.
Rendering Output for YouTube and Vimeo
And finally, to get to grips with all of the intricacies of Exporting Video to YouTube and Vimeo, this video is the one to watch:
So if you are interested in making movies with Adobe Premiere, using DSLR footage, then read our PDF document, and watch all the Tutorial Videos that are in it.
Enjoy,
Passy
If you found this article useful, then make sure you give our
“PBP Photos By Passy” Facebook Page a Like.