Selective Coloring

For people interested in the Technical side of Photography, here is the latest of our “How To” articles which is all about How To Do Selective Coloring Using Photoshop.

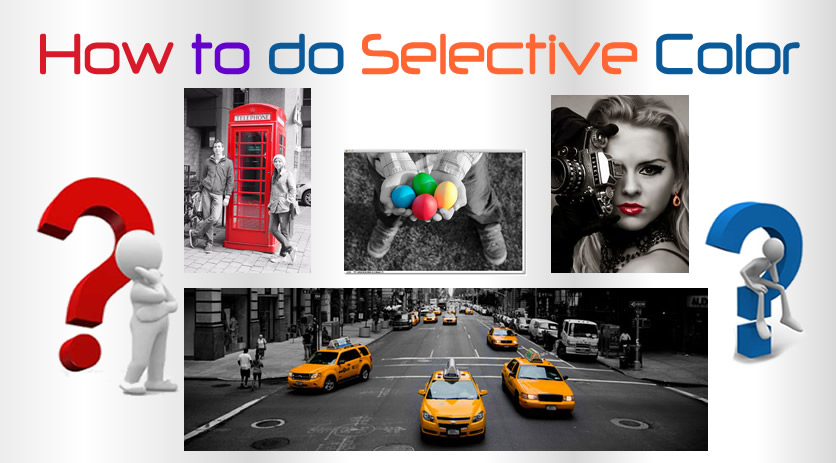
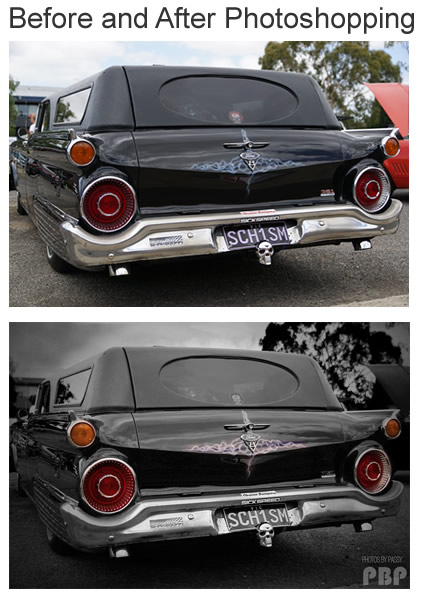
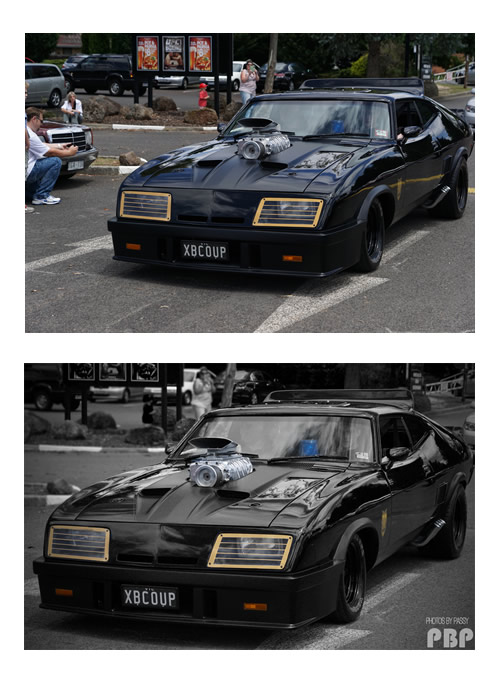
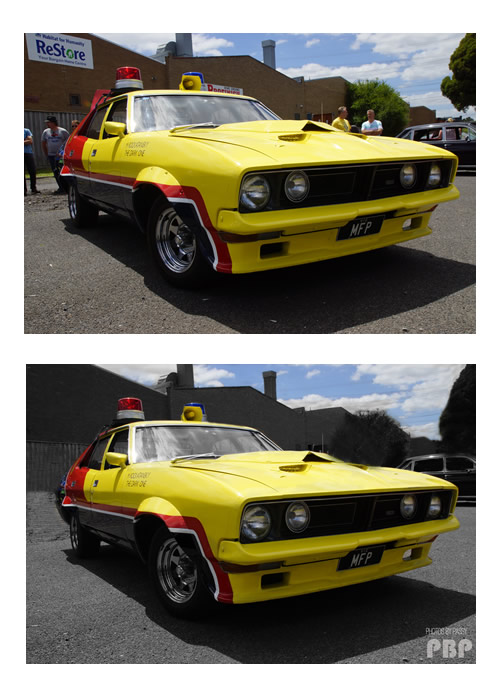
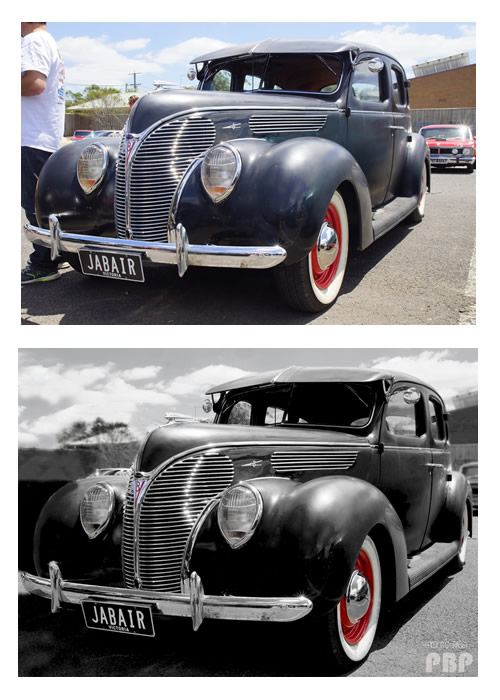
In this article we show you how can make a color photo into Black and White, and then select colors from the Original Photo to show through into the picture.


At Photos By Passy, we love using Photoshop Selective Coloring for Car Photos.

Here are some “Before and After” Examples of Selective Coloring.

Photos by Passy How To Do Selective Color 01


Photos by Passy How To Do Selective Color 02


Photos by Passy How To Do Selective Color 03


Photos by Passy How To Do Selective Color 04


Selective Coloring Methods

There are two methods for doing Selective Coloring:

Method 1- Make a Duplicate Layer and Selectively Desaturate the Photo

Method 2- Make a Black and White Adjustment Layer and then Paint a Mask onto it.

We have found that the second method is the much better way of doing this.

The following six minute YouTube Video goes through the steps of doing Selective Coloring in Photoshop.


Summary of Selective Coloring

Basically we mask out a Black and White Version of our image, and then paint it to allow color to show through.

– Make a Black and White Adjustment layer and use the sliders to make it look nice

– Set the brushes panel to a soft round brush where pressure affects the opacity

– Set the foreground color square to black and background color as white

– Paint with this black brush on the B&W mask layer to reveal color

– Because it is a “Pressure Brush”, with a mouse the more you stop and go back over it, the more color shows through

– If you make a mistake, simply change the brush foreground color to white, and paint back over the problem area to fill in the mask hole and put it back to B&W


Adding a Vignette

As well as Color Selection on our car pictures we also added an Oval Darkening “Vignette” around the outside to finish off.

This is very easy in Photoshop and simply involves being on the layer witth the original picture (not the B&W mask) and doing:

Filter > Lens Correction and then pick the “Custom” tab and use the Vignette Sliders.

The following video shows how to do this, as well as another method involing the Oval Marquee tool and Inverse Selecting.

(Note that the Filter > Lens Correction Method is shown in the second half of the video)


Selective Colouring Photo Album

Our Photoshop Students at the High School Day Job have done some very creative work with Selective Colouring using images from Google Images.

Use the link below to view a Photo Album of their work.
Some of them used Selective De-Coloring to make existing highlights stronger, and others used pattern based selective coloring.

(I actually learned some new ideas about Selective Colouring by watching what they were doing. Together we all do better!)

Click Here to View Photo Album


That’s it for this Photoshop Tutorial.

Use your own photos, or find some in Google Images, and play around with Selective Coloring in Photoshop.


Like Us On Facebook

If you enjoy like Photos By Passy, then you owe it to yourself to like our Facebook Page.

Click Here to Like our Facebook Page


Subscribe

If you enjoy visiting Photos By Passy, why not get a free subscription to the website.

You can then receive notifications of new items and updates directly to your email address.

Go to the subscribe area on the left hand sidebar, (or down the bottom of the page if using a mobile phone), fill in your email address and then click the “Subscribe” button.

Enjoy,
Passy

DIY Photography Course

Welcome to our Free Online Digital Photography Course!

Music and Photography are my passions.

Teaching Mathematics, Photography, MultiMedia, and ICT is my “Day Job”, but I manage to get out and about most weekends working as a Photographer.

Modern Digital Photography actually involves quite a bit of behind the scenes Mathematics.

An understanding of this Mathematics can definitely make you a better Photographer, even if it just means you know the best Viewpoints, Angles, and Geometric Composition to use when taking pictures with a Mobile Phone.

I have found that understanding the Mathematics of a DSLR Camera really helps me do fast effective problem solving on Photoshoots.

But don’t let a bit of simple mathematics put you off doing Digital Photography. There are lots of proactical examples and explanations to get you through.

Digital Cameras have preset Auto Modes which work well in about 80% of situations, but there are other times when a Camera needs to be put into full Manual Mode and some Mathematical Problem Solving invoked.


Here at Photos By Passy we have produced a comprehensive series of articles on Digital Photography, including plenty of real life examples as well as selected Videos which can be viewed.

We recommend working through these articles in the order in which they appear in the Overview Below.

The eight Digital Photography articles are as follows:

– Photo Composition Rules

– Digital Camera Settings

– ISO Light Sensitivity

– Aperture Settings

– Shutter Speed Settings

– White Balance Settings

– Combining Settings for Correct Exposure

– Flash Photograpy and Diffusers

Contained below is an outline of each article followed by a clickable link to the full article.

It is important to work through the articles in the order they are given here.


Mathematics of Photography 02

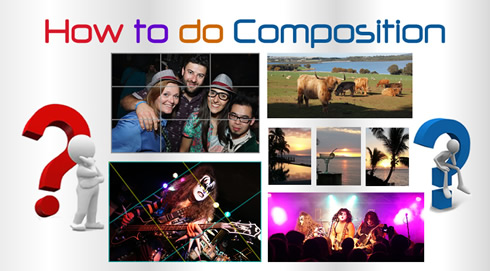
Like great Works of Art, the elements in a Photograph need to be arranged in a manner which is interesting and pleasing to the eye.

In addition, Photography is a two dimensional medium. Therefore we need to make use of the elements which are present in the photo to create a sense of depth and three dimensions.

Photos also need a main focal point, as well as leading our eyes on a journey through the picture.

Having these things makes for great photos, which are pleasing to the eye, and we call this “Composition”.
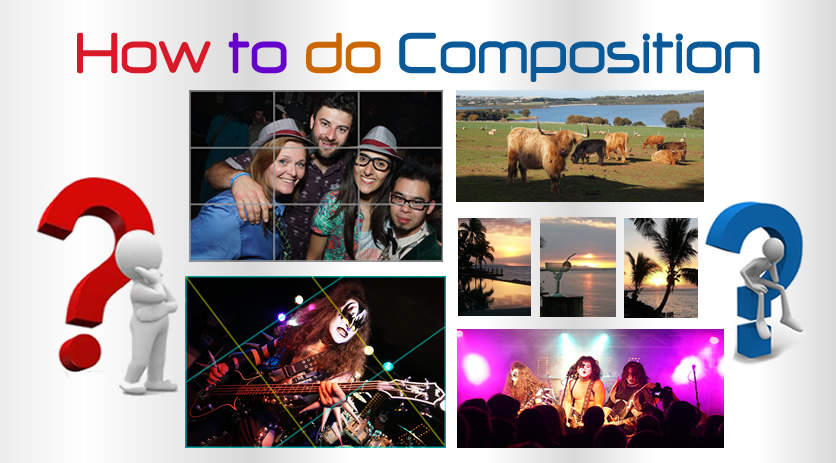
There are a Number of Composition Rules involving Percentage, Geometry, Symmetry, a Grid of Thirds, and even the “Golden Ratio” and its spiral.

To find out about these rules and their Mathematics, click the link below:

Photo Composition Rules


Mathematics of Photography 03

Most people use their camera on “Auto” mode, and get plenty of good pictures.

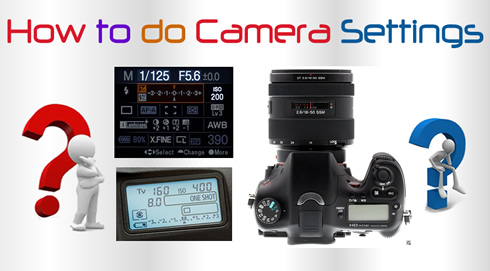
However, there are many items on a camera which can be adjusted manually to get even better pictures!

In this “How To” article we introduce several of these camera settings, and show how they can be used to create quality photos.

An overview of the three main Variables: “ISO Light Sensitivity”, “Aperture”, and “Shutter Speed” is provided.

This provides the preliminary background to more detailed articles on each of these three key items.

It is therefore vitally important to read this article before proceeding forward to the specific detailed articles.

To read the Introductory Article about Camera Settings, click the link below.

Digital Camera Settings


Mathematics of Photography 04

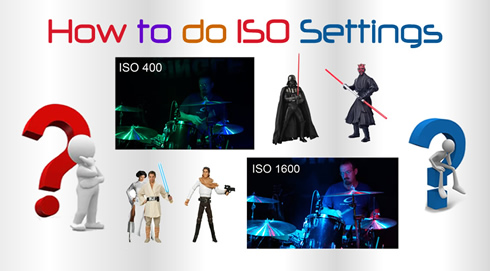
ISO sets a Camera’s sensitivity to light

Effectively it works like a Brightness Control on your camera, and you can turn it up higher if you are in a dark room, or in a shady forest.

If you are in Bright Sunlight, then you need to turn the ISO down to a low value or else your photo will come out all white and washed out with too much brightness.

Camera ISO is one of the three key Variables of Photography, the other two being Aperture and Shutter Speed.

Every photographer needs to understand ISO in order to get bright and clear pictures from their equipment.

The ISO sequence is: 100, 200, 400, 800, 1600, 3200, 6400 and etc. For every step up in this scale, the brightness of your picture doubles.

To get the full story on ISO and how to set it correctly on Digital Cameras for a variety of lighting conditions, click the link below.

How to Do ISO


Mathematics of Photography 05

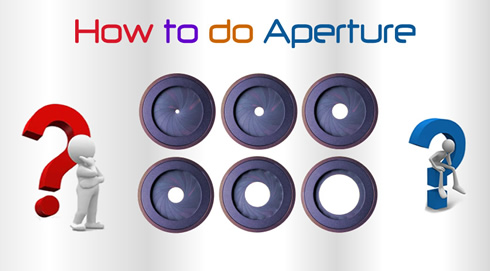
Aperture is one of the key variables in Digital Photography. The other two are ISO Light Sensitivity and Shutter Speed.

An understanding of Aperture is critically important to isolate subjects in portraits and get full detail in Landscape pictures.

The Aperture Scale consists of a seemingly odd set of decimal and whole numbers, and getting your head around these values is not at all easy for Beginner Photographers.

In this article we examine Aperture in detail, and mathematically explain where the Aperture “f-numbers” come from.

Click the following link to read the full article.

How To Do Aperture


Mathematics of Photography 06

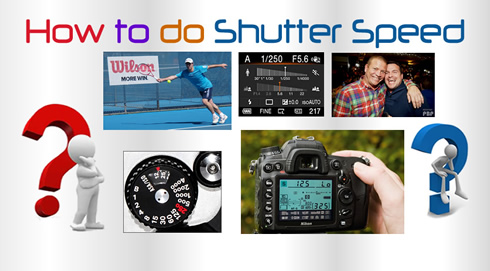
Shutter Speed is mainly used for creating dramatic effects by either freezing action or blurring motion.

The Speed is expressed in a fraction of a second, and is how long we let light in through the camera lens to the sensor.

Think of the Shutter as like opening and closing a set of venetian blinds quickly to let a burst of light into a darkened room.

Shutter Speed, (also called “Exposure Time”), becomes critically important in situations outside of the norm, such as the following:

1) Fast Moving Sports Action

2) Dimly lit indoor areas such as Bars and Clubs

3) Night Time Photography

4) Theatre and Musical Performances

5) Indoor Photos using Flash

6) Indoors Photos where we do not use Flash

7) Photos where we want motion blur for fast moving objects

8) Bird and Wildlife Photography

9) Photographing Young Children and Animals

In this article we will show you what Shutter Speed is, what the speed numbers mean, and how to set shutter speeds to values which should produce great photos.

Click the following link to read our article on Shutter Speed.

How To Do Shutter Speed


Mathematics of Photography 07

Different light sources produce light with slightly different colour tints, but our eyes do a great job correcting these variations.

Humans do not see a shift in colour as we move from a sunny garden into a shaded area, or go into a room and turn a light on.

Generally wherever we are, a piece of plain white paper always looks white.

However Digital Cameras DO detect light source differences, and sometimes create pictures with incorrect looking colours in them.

We need to know how to perform “white balance” adjustments, so that we can obtain pictures with realistic colours in them.

White Balance involves the Primary Colours of the Spectrum forming a Kelvin Temperature Scale from “cool” blue/violet through to warm “red” candle light.

What we have is a Mathematical Scale of color, and White Balance blends various colours together so that a white sheet of paper will look white, no matter what coloured lighting we are in.

You can read the full article on White Balance at the following link:

How To Do White Balance


Mathematics of Photography 08

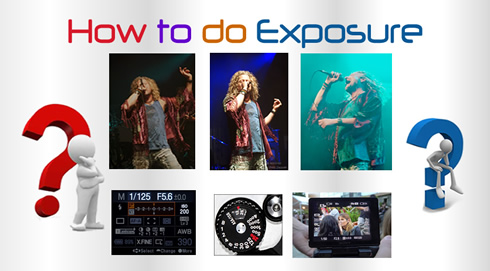
In this article we look at Combining Variables for Correct “Exposure”.

We tie together the three key Digital Camera Variables: ISO, Shutter Speed, and Aperture, and discuss how to set these up to get good exposures in Camera Manual Mode.

When these three variables are optimised and unified together, we get a nice clear picture with great contrast and highlights. We say that the photo is correctly “Exposed”.

You can read the full article on Getting Correct Exposure Using Key Variables at the following link:

Combining Variables for Correct Exposure


Mathematics of Photography 09

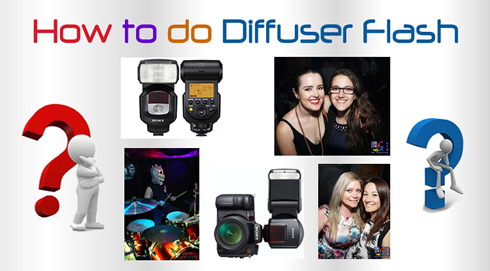
In this article we discuss Flash Photography and how to use Light Diffusers to make Flash Photos look so much better.

Diffusers come in all types of Geometric Shapes and Sizes and create softened light which is more like Daylight.

The Intensity of Light from a point source like an on camera Flash follows an Inverse Square Law with the Distance the Flash is from the subject.

This is very important to have an intuitive idea about Inverse Square Law when changing the Power on a Flash, or when we move further away from the subject being photographed.

The full article about Flash and Diffusers can be read at the following link:

Flash Photograpy and Diffusers


Working through this series of articles will definitely make you a better photographer.

Keep in mind that I spent a couple of years working with Digital Photography to reach this level of understanding to a point where I could write about it to share my knowledge with others.

So if you are a complete beginner and feel a bit overwhelmed, then that is okay, these things just take practice and time.

It is best to work through all of our eight articles a bit at a time, try things out, and then come back to the articles to pick up a bit more of the finer detail.

The Maths is helpful, but the main thing about being a Photographer is to get out there taking lots of pictures!

Life is short and there can never be too many photos of its little magic moments!

Enjoy,
Passy

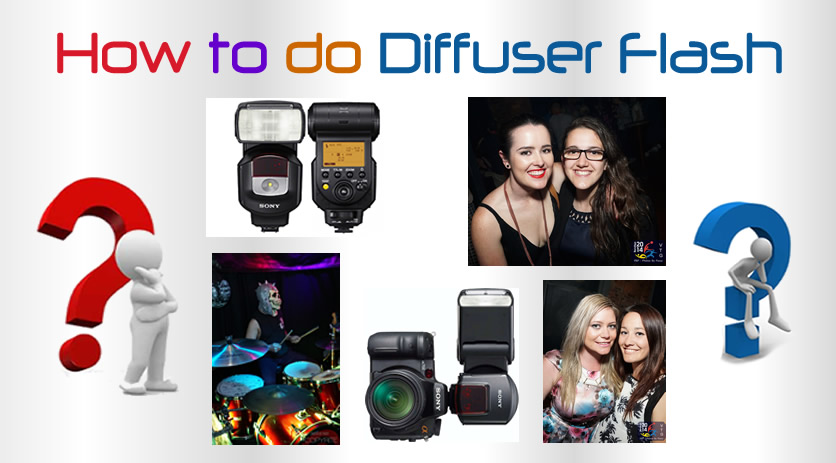
How to Do Flash

In this article we discuss Flash Photography and how the use of Light Diffusers can make Flash Photos so much better.

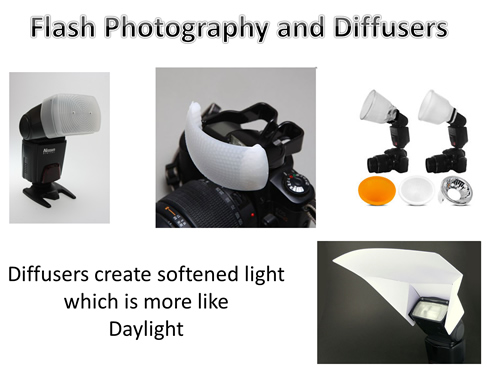
Diffusers come in all types of Geometric Shapes and Sizes and create softened light which is more like Daylight

Photos by Passy Flash Photography 01


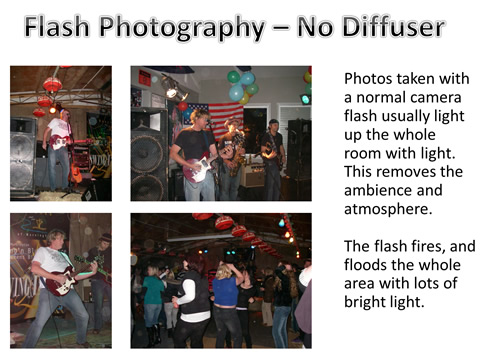
Most Digital and Pocket Cameras come with a built in electronic flash which provides an intensely bright light source so that photos can be taken indoors.

These flashes do a basic job, but often they light up too much of the scene and remove the natural ambience of the setting.

Photos by Passy Flash Photography 02

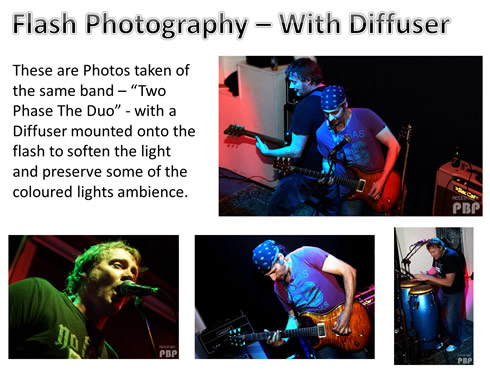
The band in the above photo are “Two Phase The Duo” who are a great Covers Band who play venues, parties, and functions.

For more information about this band check out their Facebook page at the following link:

Two Phase The Duo Facebook Page

Here are some Photos of the Two Phase Duo taken using a mountable camera flash with a light softening Diffuser attached.

Photos by Passy Flash Photography 03


Light Softening Flash Diffusers

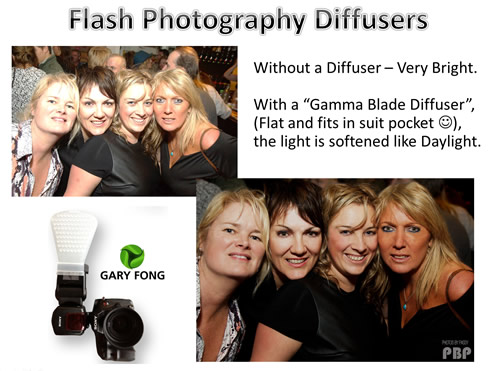
Diffusers are various semi transparent plastic devices attach over the face of an electronic flash and soften the light on the people in the photo.

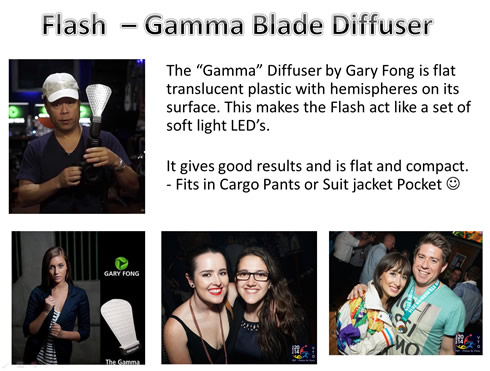
The Diffuser which is our favorite is the Gary Fong Gamma Blade Diffuser, which was specially designed by Gary for use with the Sony A77 Digital camera.

One of its best features is that it is completely flat and can fit in a suit coat pocket, or the leg pocket on a pair of cargo pants.

It looks like a cheese grater and has elevated circular “bumps” on it (hemispeheres), which turn the flash into a simulated set of soft white LED lights.

Photos by Passy Flash Photography 04

There are several other types of Diffuser: the “Puffer”, the “Stofen”, the “Light Sphere”, the “Soft Box” and various others.

If you are ever stuck for a Diffuser, you can always fold up some white paper and cardboard and tape it onto your flash. You then tilt the flash upwards at 90 degrees and use the white as a reflective “bounce card”. The light from the Flash bounces off the white cardboard and this bounced light illuminates the subject with soft white light.


The Puffer Diffuser

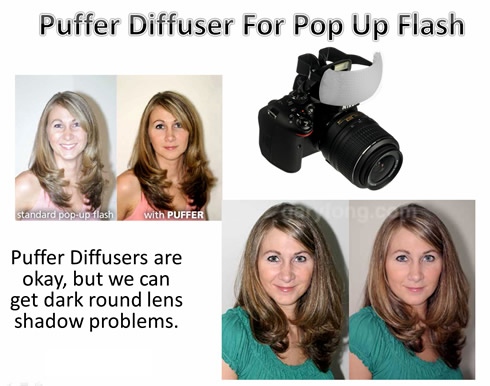
If you have a pop up flash on your Digital SLR Camera, a “Puffer” Diffuser can be mounted onto the front of the Flash to soften the harsh burst of flash light and create a nicer photo.

Photos by Passy Flash Photography 05

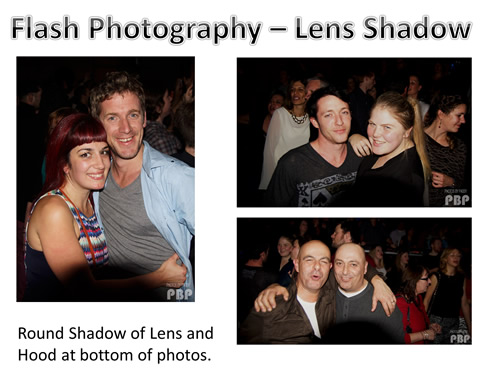
The only problem with Puffer Diffusers is that if you have a large zoom lens on your camera, and/or a Lens Shade Hood, there might be a round reflection shadow formed on the bottom of your photos.

This happens because the Flash pops up and is not high enough up in the air away from the lens.

Photos by Passy Flash Photography 06

The other problem with just using a “Puffer” on an onboard pop up flash is that we cannot adjust the power of the flash. The flash simply sends out a big burst of light which might actually be too bright for the scene being captured.

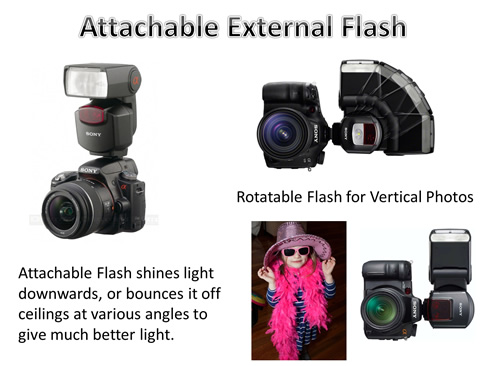
To overcome these problems of shadow and power most photographers invest in an attachable external flash for their digital camera.


Attachable External Flash

When we attach an external flash it is designed to be as far as possible above the camera lens. This produces light which shines downwards at the person a bit like real sunlight does.

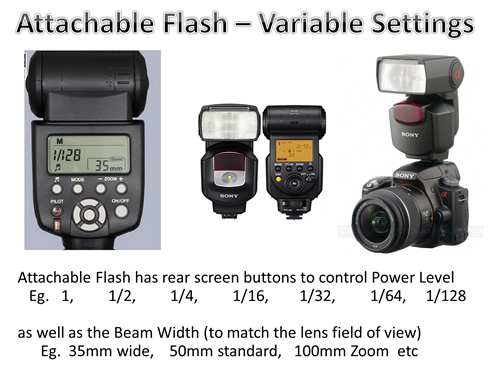
Attachable units can also be rotated through various angles, (such as 45 and 90 degrees), so that light can be bounced onto the subjects from the walls or roof.

This produces much better looking photos than the pop up onboard flash.

Photos by Passy Flash Photography 07

Another great thing about attachable flash units is that they can have their power and angle of dispersion adjusted to better focus the light on the main subject matter, and not aimlessly light up the whole room.

Photos by Passy Flash Photography 08


Light Intensity Mathematics

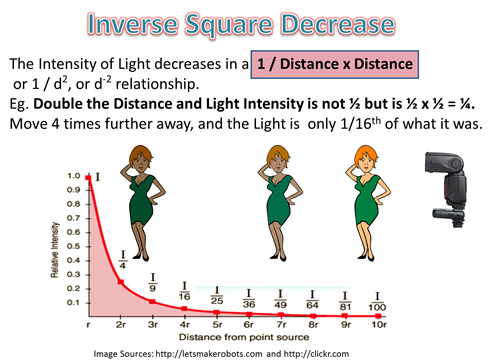
When using a Flash you might think that if you double the distance between yourself and the subject, that the intensity of the light on your subject will halve.

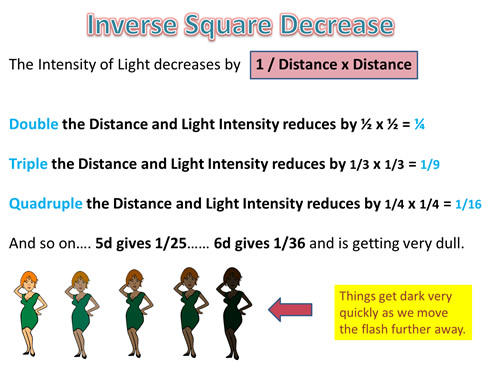
This is not actually the case, the instensity will actually be 1/2 x 1/2 = 1/4 of the original brightness.

This is known to anyone who has studied Physics as the “Inverse Square Law” and it also to both light and sound.

Photos by Passy Flash Photography 09

The “Inverse Square Law of Light Intensity” is not nearly as complicated as it sounds.

“Inverse” means that when we move further away, we only get a FRACTION of the light we used to have.

“Square” means that we do “Distance x Distance” to work out the bottom number in this 1/ fraction.

This makes things get very dark very quickly as we move the Flash further away from the subject.

Photos by Passy Flash Photography 10

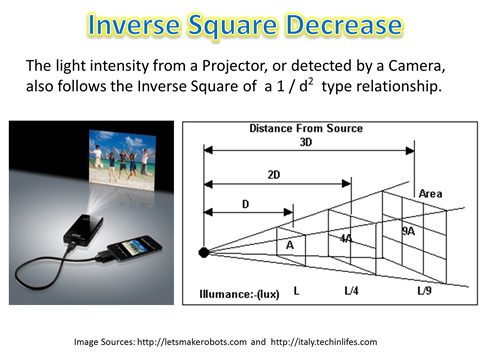
The Inverse Law of Light Intensity Reduction from a Concentrated “Point Source” also applies to Projectors and Candles, (but not to fluorescents or light globes in rooms).

Photos by Passy Flash Photography 11

We do not need to make actual 1/d x 1/d calculations when doing Flash Photography, but we do need to be aware that illumination of subjects can decrease rapidly as we move ourselves further away from them.


Flash Power – Auto and TTL

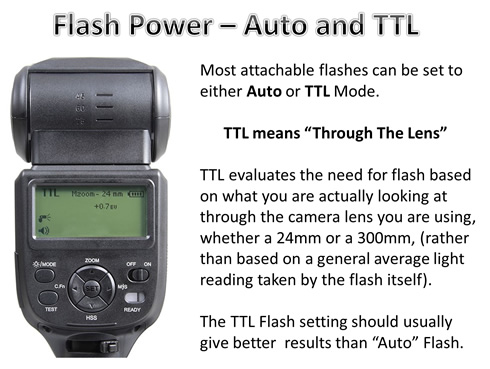
Most attachable Flashes have three modes: Auto, TTL, and Manual.

Photos by Passy Flash Photography 12

TTL mode is supposed to make the Flash and Camera do all of the thinking for you; however I have found for my particular setup, I get better results controlling everything myself in Manual Mode.

“TTL” stands for “Through The Lens” and the flash fires off some preliminary flashes to work out what it thinks should be the correct exposure power for the final shot it takes.

Quite a few articles and Videos on the Internet have mentioned that TTL is great when it works, but is often inconsistent.

At the end of this article are several videos about TTL if you are interested in trying it out.


Flash Power – Manual Mode

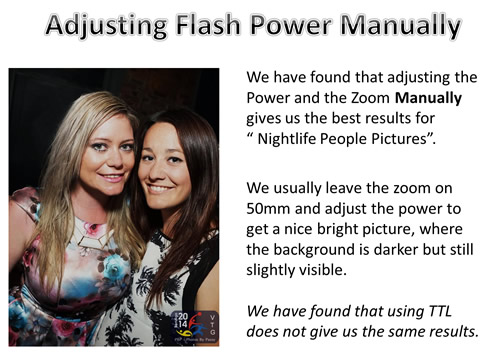
Rather than using Automatic TTL mode on our external flash, we have found that the best results are obtained from our Sony A77 Camera by setting the Flash to Full Manual Mode.

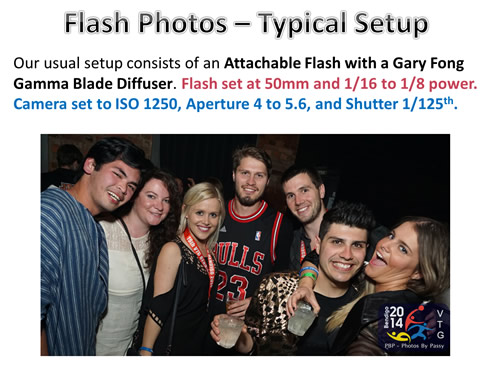
We usually start off with the power around 1/16, and if this is too dark we increase it to 1/8.

For the angle of dispersion, we set it to a 50mm lens for Night Life People Pictures.

Shooting at ISO 1250, we find that this gives nice bright results, with the background containing ambient lighting rather than bright flash lighting.

We have also found that it is better to shoot photos slightly brighter than normal, rather than darker, as we can always tone down the brightness later in Photo Shop without losing crispness and detail.

Photos by Passy Flash Photography 13

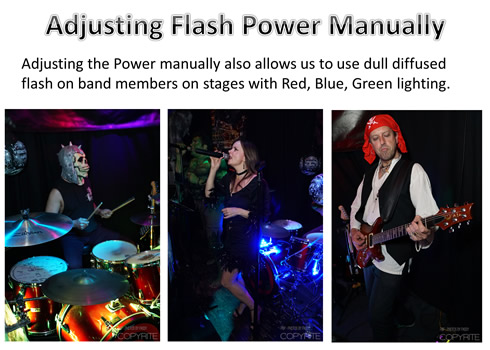
For night time venues with plain Red, Green, Blue, coloured lighting, we have found that as long as the Band does not mind a bit of soft diffused flash, we can get clear pictures of them at a power of 1/16, but still maintain some ambience.

Photos by Passy Flash Photography 14

Let’s now look at a few of the common types of diffusers for DSLR external Flash Units.


Stofen Diffuser

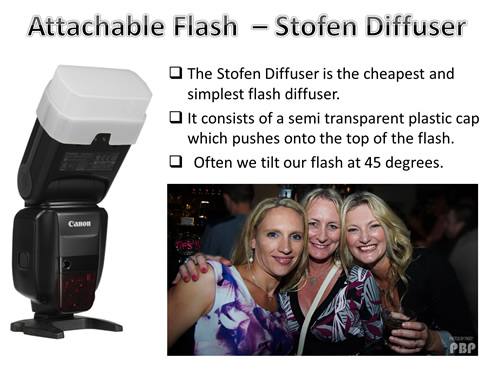
The Stofen Diffuser is a semitransparent rectangular cap which goes on top of an attachable flash.

I started off originally with a cheap $50 Chinese Yongnuo Flash and a Stofen diffuser, shooting all of my pictures in Manual Mode like the one shown in the image below.

It did a reasonable job, and angled up at 45 degrees it produced better results than just using the plain manual flash, or a white bounce card.

Photos by Passy Flash Photography 15


Light Sphere Diffuser

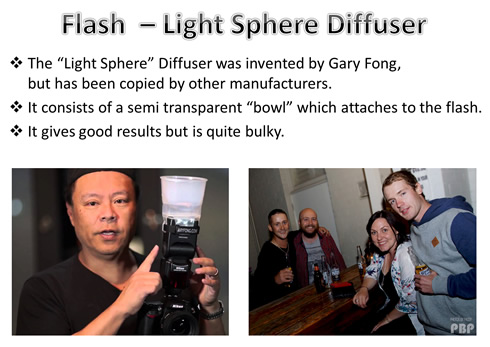
The next Flash setup I tried was a proper compatible Sony Speedlite Flash, with a Gary Fong Collapsible Lightsphere Diffuser.

This produced cleaner and better results than the Stofen Diffuser, but was a bit bulky on top of the camera in crowded nightclub situations.

Photos by Passy Flash Photography 16

There is a video about this Diffuser in the videos section at the end of this article.


Blade Diffuser

The final Diffuser I have settled on as my permanent setup is the Gary Fong Lightblade Diffuser because it is flat and compact and gets great results.

Photos by Passy Flash Photography 17

There is a video about this Diffuser in the videos section at the end of this article.


Soft Box Diffuser

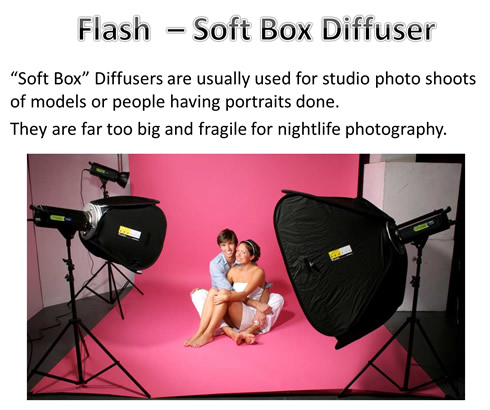
These type of diffusers are too large and bulky to carry around for night life photo shoots, but are used for studio photography.

They are also called “Pillow Boxes” because they have soft white translucent material like a pillow case, which is formed as part of a box containing a special photography light bulb.

Effectively they create soft daylight for doing Portrait Photos indoors.

Photos by Passy Flash Photography 18


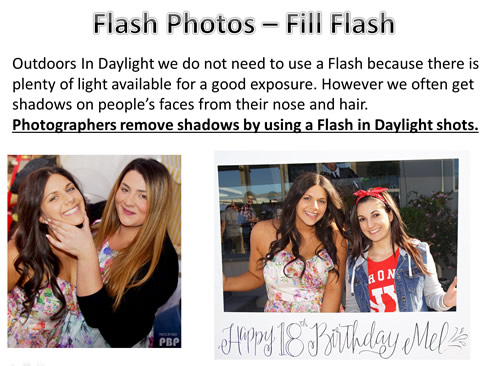
Fill Flash

When we use a Flash in bright sunlight it can blast away shadows off people’s faces and also illuminate the person with correct exposure when the surrounding background is very light.

Even just using the camera’s normal onboard flash with the camera set to “Fill Flash” mode can achieve this, as in the Birthday Party photos shown below.

Photos by Passy Flash Photography 19


Typical Flash Set Up

For night life and party photos we use the following Flash setup for our Sony HVL-F43M Flash mounted on the Sony A77 DSLR camera.

Photos by Passy Flash Photography 20

We hope this article has enabled you to better understand Flash Photography using Diffusers, and there is lots of further information in the Videos which are embedded and lsited below.

Happy Snapping!


Videos About Flash Photography

First up we have a great 30 minute video with both Theory and Real World Examples of Flash Photography.


Here is a five minute video about the Flash I am currently using: The Sony HVL-F43M.


Here is a great video all about Diffusers from the excellent “Nightclub Photography TV” YouTube Channel.

Part 1

Here is Part 2 of the above video:


The following video is all about the Gary Fong Light Sphere Diffuser


This next video is also by Gary Fong and describes the excellent “Gamma Light Blade” Diffuser

This particular video is for the Sony Flash, but the “Light Blade” is also available for Canon and Nikon Speedlite Flash units.


The following video is an excellent six and a half minute video all about using “Fill Flash” for outdoor Portrait shots.


Here is a great twelve minute video all about using a Flash to do Outdoor Portaits.


This next sixteen minute video is all about using on camera flash, with an emphasis on Canon Camera Equipment.


This video is a one hour video about NOT using flash, but instead just using ambient light with light meters and reflector panels.


Videos About TTL

Here is quick two and a half minute video explaining what TTL Flash Mode is and how it works.


This next Video shows how to see the TTL Verify Light working on Canon, Nikon, and Sony Flashes.


This next Video discusses TTL Flash Mode versus Manual Mode.


The following video is a full one hour Webinar on TTL versus Manual for Flash Photography.


Related Items

For more great articles about How to Do Digital Photography, see our “How To” page at the following link:

How To Articles by Photos By Passy


Subscribe

If you enjoy visiting Photos By Passy, why not get a free subscription to the website.

You can then receive notifications of new items and updates directly to your email address.

Go to the subscribe area on the left hand sidebar, (or down the bottom of the page if using a mobile phone), fill in your email address and then click the “Subscribe” button.

Enjoy,
Passy

How To Do Exposure

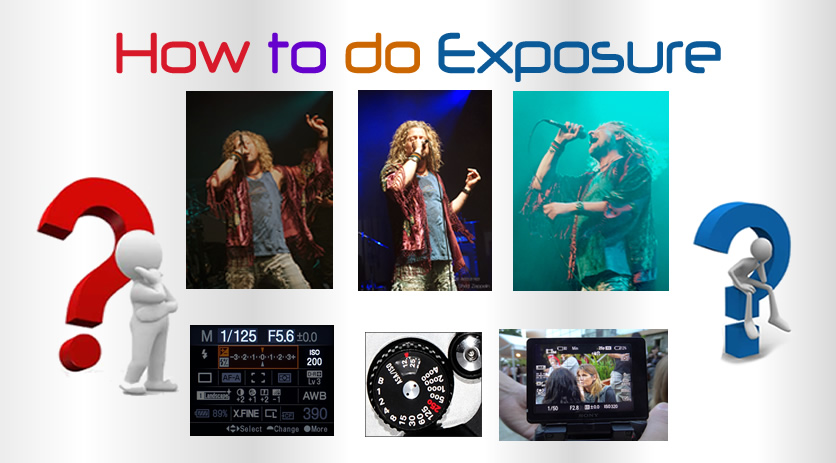
In this article we look at “Exposure”. We also tie together the three key Digital Camera Variables: ISO, Shutter Speed, and Aperture, and discuss how to set these up to get good exposures in Camera Manual Mode.

When these three variables are optimised and unified together, we get a nice clear picture with great contrast and highlights. We say that the photo is correctly “Exposed”.

It is essential that you have been through the following previous articles, before reading through this “How To Do Exposure” article.

Here are the links to this essential background reading:

How To Do Camera Settings

How To Do ISO Settings

How To Do Aperture Settings

How To Do Shutter Speed

Let’s start off by quickly going through the definitions of “Exposure”, “Underexposure”, and “Overexposure”.


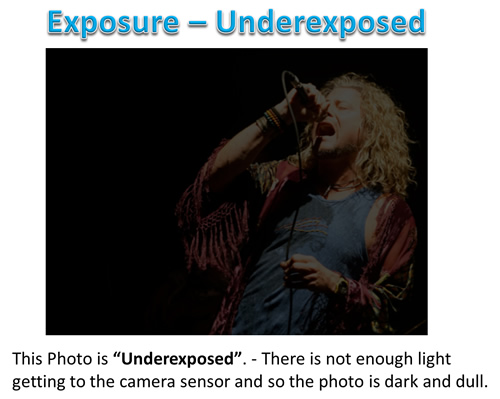
Underexposure in Photographs

Underexposure results in a dark and dull image because too little light was recorded by the digital sensor.

Underexposure often makes an image too dark for subjects to be seen clearly.

The amount of underexposure will determine how dark a photo is.

Photos by Passy Camera Exposure 2


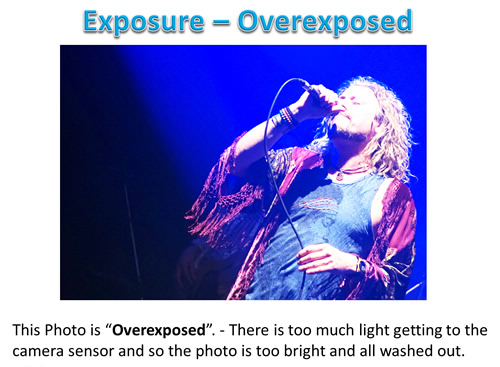
Overexposure in Photographs

Overexposure refers to a white-looking or washed-out image.

This is caused by having too much light reaching the digital sensor which makes the photo come out way too bright.

Photos by Passy Camera Exposure 3


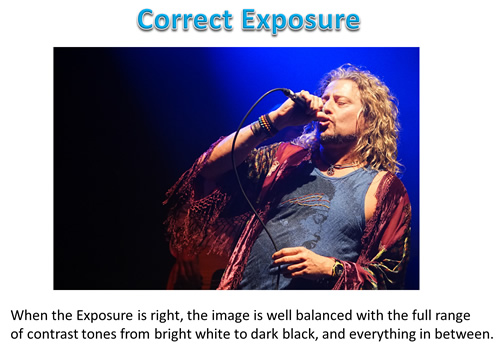
Correct Exposure

When we have correct exposure the tone in the image will range from white all the way though to black.

The picture will also contains all the tones in between black and white, resulting in crisp bright clear image.

Eg. We have a contrast in our image with a little dark and a little light, as well as a lot of inbetween.

Photos by Passy Camera Exposure 4

The example photos shown here are photos of “Simmeau” from the fabulous Australian Led Zeppelin tribute band: “Shed Zeppelin”.

For more information about Shed Zeppelin, check out their Facebook Page here:

Shed Zeppelin Band Facebook Page


Camera Exposure

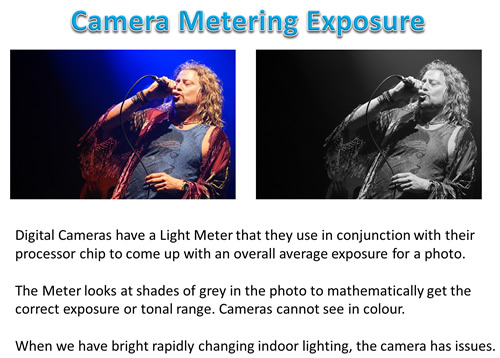
The camera uses an exposure meter which looks at shades of grey in the photo to mathematically get the correct exposure or tonal range.

(Basically Cameras see in Black and White, rather than in colour).

The light meter and processor decide what ISO, Shutter, and Aperture to use when the camera is in Auto Mode.

When we have bright rapidly changing indoor lighting, the camera has issues. It might expose for bright light, making the rest of the photo way too dark and underexposed.

We are often better off changing to manual mode and setting the camera variables manually ourselves.

Photos by Passy Camera Exposure 5

There are some great videos all about Camera Light Metering in the Videos section near the end of this article.

Watching these Metering Videos will help you understand how cameras determine exposures, and what mistakes the camera can make when doing this under certain lighting situations.


Video About Exposure and Variables

The following is an excellent fifteen minute video about the Mathematics of Exposure.

Watch this video all the way though before reading the rest of this article.


Camera Variables and Exposure

Sometimes the camera’s auto mode metering does not give us the exposure we want.

Auto Modes usually work well outdoors in bright sunlight, when the sun is behind the camera.

But if it is overcast, or we move into the shade, or we are facing into the sun, or we go indoors, the exposure can often be Overexposed or Underexposed, and far from ideal.

In cases like this we need to shift our camera into Manual Mode, and Adjust some, or all, of the three key variables.

Photos by Passy Camera Exposure 6

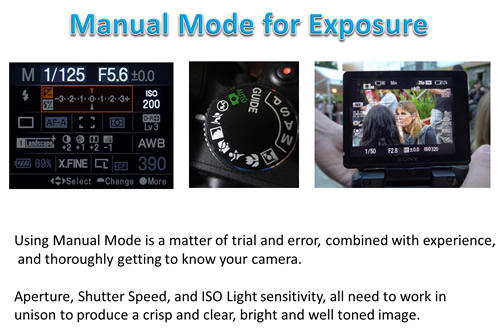
Manual Mode is basically a mathematical problem solving exercise, and it can be tricky to get all three variables at their optimum values.

When we get ISO, Aperture, and Shutter Speed all at just the right settings, we can get a really well exposed photo in full Manual Mode.

Sometimes we may have to adjust a fourth variable of “White Balance” as well; eg. Change over to incandescent lighting if we are taking a photo indoors at night time.


We need to know the effects of changing each of the variables: ISO, Aperture, and Shutter Speed.

Exposure is all about getting the right amount of light to reach the sensor, and so we often need to adjust the variable settings to get more or less light coming through.

For example, if we shoot a picture and which is too dark and underexposed, then we need more light.

However, if we shoot a picture which is too bright and washed out, we need to change things so that less light comes to the sensor.

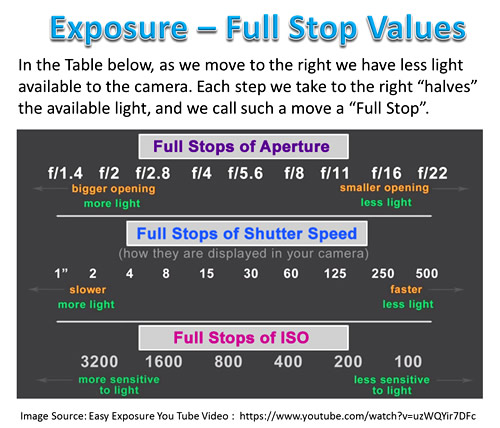
The following “Table of Full Stops” needs to be understood, so that we can make the necessary changes in the amount of light in a mathematical manner, and not just be randomly guessing at what might work.

Photos by Passy Camera Exposure 7


Limiting Factors

The additional complication is that each Variable has some limiting factors:

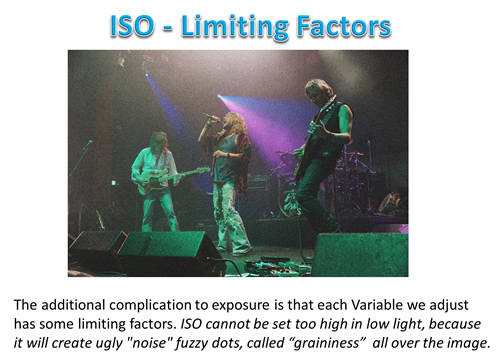
– ISO cannot be set too high in low light, because we may get ugly “noise” fuzzy dots all over the photo

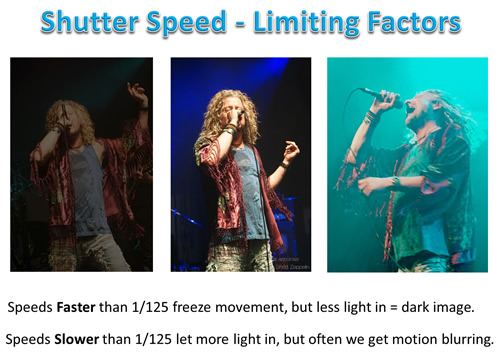
– Shutter Speed cannot be set too slow in low light, because we will get blurring of moving objects, and/or camera shake blurring

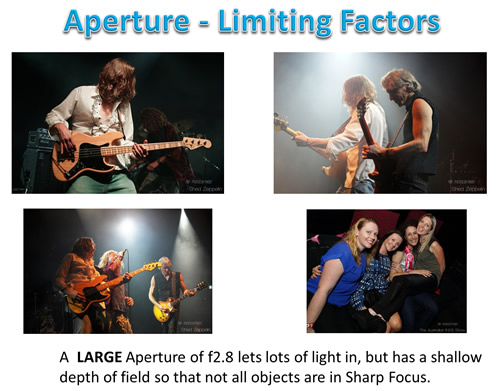
– Aperture cannot be set too open at f2.8, or people slightly in the background may become out of focus.

Photos by Passy Camera Exposure 8


Photos by Passy Camera Exposure 9


Photos by Passy Camera Exposure 10

Aperture determines how much of a photo is clearly in focus.

Often we are forced to use f2.8 when taking band photos, just to get enough light for a good exposure. However this makes people and items in the background out of focus, but this is often not such a bad thing.

When taking a Group Photo, it is important that everyone in the picture is in focus, even though some people are nearby and others are far away. In this situation we need to use an Aperture of f4.0 to f5.6 so that we have enough depth to capture everybody clearly.

It is therefore a delicate operation to find the settings for each of these variables so that they will all work in unison to create a well exposed photo.


Scene Mode Exposure

For certain situations, we do not need to change to full Manual Mode to get good quality pictures.

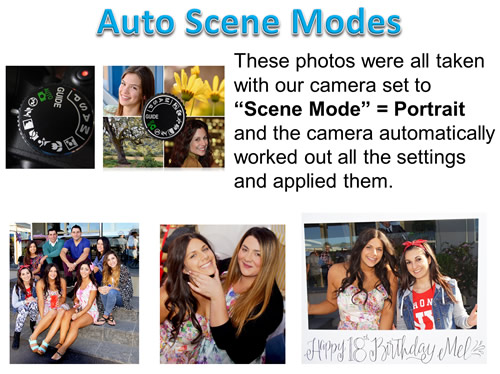
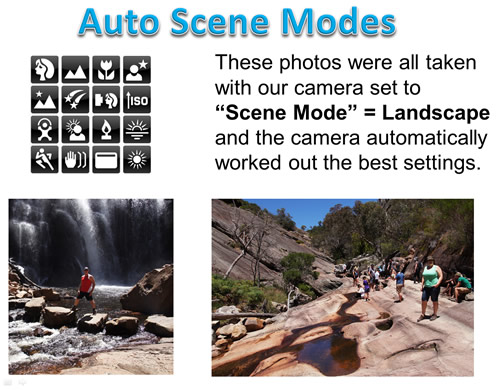
Modern Digital Cameras have Preset “Scene” Modes which can be used for situations such as : Outdoor Portraits, Landscape, Sunsets, Action Sports, and several other common environments.

These Scene Modes, with their Preset values of ISO, Aperture, and Shutter Speed work extremely well, as long as the lighting conditions are what is typical for that particular Scene Mode.

Some typical Scene Modes, and their limitations are discussed in the next two sections.


Preset Scene Modes on Cameras

Photos by Passy Camera Settings 08

Modern Digital Cameras have one or more fully “Automatic” modes, as well as special preset or “Scene” modes.

These generally do a great job of setting up the Aperture, Speed, and ISO variable values for us.

All we have to do is “shoot” or “snap” the picture, and the results look fantastic.

For example, if we set our camera to “Portrait” and take a picture of a person outdoors, it will turn out nicely with “bokei” (Background Blurring).

The Birthday Party pictures shown above were all taken using daylight portrait mode, which set our variables well, and also softened skin tones to make nice looking people photos.


However, if we set our camera to “Landscape”, the camera will make a nice bright picture where things both near and far from us are all in detailed focus.

Photos by Passy Camera Settings 09


Here is a great three minute video all about using Preset “Scene” Modes.


Auto and Scene Mode Limitations

Photos by Passy Camera Settings 10

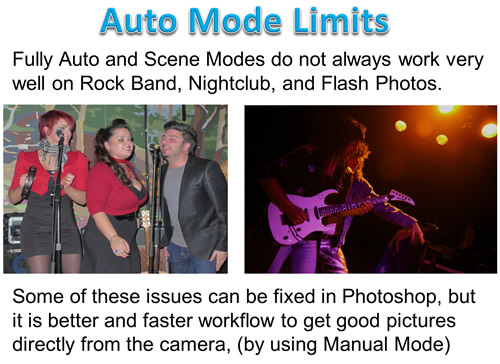
Problems arise when we venture outside of normal daylight conditions, and attempt taking indoor shots without Flash, or we take portrait or party pictures with flash.

These “low light” and “Flash” photos often do not turn out as nicely as we would like them to.

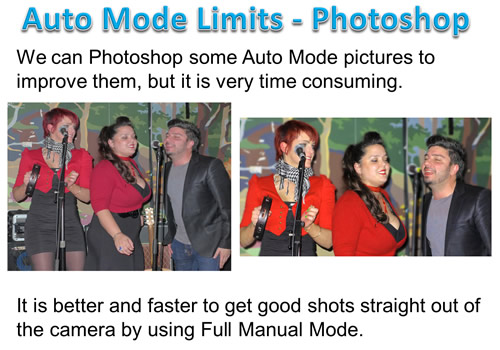
We can Photoshop some of these pictures to improve them, but it is very time consuming.

It is better and faster to get good shots straight out of the camera by using Full Manual Mode, which will be discussed shortly.

Photos by Passy Camera Settings 11

Special areas of difficulty are photographing Rock Bands, Indoor Sports events, and Night Clubs, where there is not full daylight, and people are moving around.

On some Sony cameras, using “Sports” mode will sometimes produce reasonable shots in these conditions, and Canon cameras have a “Television” mode which sometimes works.

However, the best results for “low light” photography can be obtained by setting your camera to full “Manual” mode, and adjusting the variables yourself – fast enough shutter speeds to freeze action, wide open apertures to let as much light in as possible, and high ISO sensitivity so the camera sensor will work like “night vision” to pick up as much light as possible.


Manual Mode Exposure

Using Full Manual mode “M” is a matter of trial and error, combined with experience, and thoroughly getting to know your camera.

For example, for my Sony A77 camera, I know from experience that I cannot put the ISO higher than 1600 or there ugly noise dots and graininess begin to appear.

Even at ISO 1600 there can sometimes be a small amount of noise on the A77.

So rather than use ISO 1600 as a default for low light, I always check to see if I can slow down shutter speed, and use f2.8 Aperture, which might then allow me to shoot at ISO 1250 or ISO 800 which then gives negligible noise.

For Aperture, I know that if I am doing a Group Photo with some people further back or behind others, I have to use F4.0 to f5.6, or else the further away people will be out of focus.

For Shutter Speed, I know from experience that when photographing people or rock bands, that the minimum shutter speed for no blurring is 1/100. I have also discovered that the minimum shutter speed for action sports photos is 1/250 but it is much better to use 1/1000 if possible,

The point is that an experienced photographer is not blindly setting some variable and hoping for the best.

What they usually do is set one of the variables at a particular value, and then manipulate the other two to get the best exposure.

This is done by taking test shots, seeing what they look like, and then progressively making smaller and smaller adjustments until the resulting image looks good.

From my experience of taking lots of photos, I usually have an idea of what the approximate settings are for a given lighting situation, and then work on fine tuning these values to get the best possible exposure for the particular camera I am using – Sony A77, Sony A55, or Panasonic Lumix LX-7.


I know when I first started using Manual I had no idea of what to set things at, and I was totally frustrated.

So if this is your first experience when using Manual Mode do not be concerned. The path to mastery of exposure is usually not an easy one.

It is important not to give up, because being able to shoot in manual gets great photos in low light situations that people in Auto Mode will never be able to match.

Think of all those whited out Flash shots people take at parties, or those blurry noisey dark photos without the Flash.

Manual Mode is well worth learning so that you can be the person who gets the “Wow” factor photos, while others are floundering.


As I said, when I first tried Manual Mode I was totally lost as to how to begin to change the variable settings.

What I found though was that if I set the camera on auto and looked at the live view to see what settings the camera was choosing, I could then flick to manual and use these variable settings as my starting point.

There is only one way to master variables, and that is by going out and shooting a lot of photos and trying out different settings until you know the ones which give good results for your camera.

It is time consuming and frustrating at times, but it is well worth the effort in the end, when you have the great photos that nobody else can get!

What follows are some Exposure Settings examples. Read through these, and then watch all of the videos in the video section.

This will help you start getting your head around Manual Mode, and show you what effect changing each of the three variables has on the final photo.

After that it is all down to getting out and shooting lots of photos in Manual Mode and seeing the results. Then one day it should suddenly all start to “click”, and you will be able to problem solve exposure settings for difficult shooting conditions such as low light indoors without the use of flash.

Good Luck! It is a difficult path, but one well worth travelling.


Exposure Settings Examples

“A picture is worth a thousand words” so let’s take a look at some examples of variable adjustments made in Manual Mode.

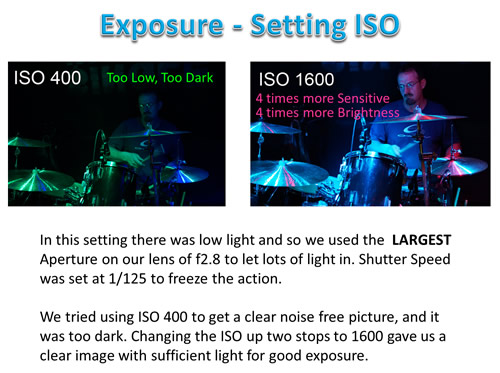
Our first example below involves ISO light sensitivity.

Photos by Passy Camera Exposure 11

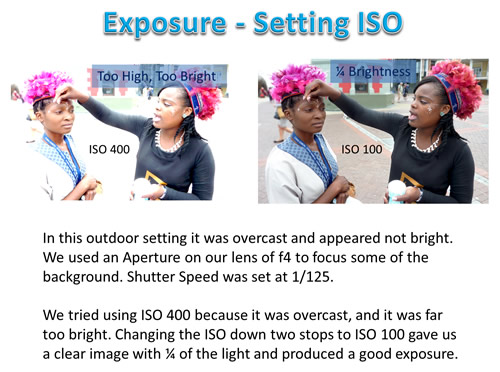
In this second ISO example, the original settings produced an overexposed picture.

We did not want to change the Aperture, and could have increased shutter speed or lowered the ISO.

The shutter speed was already fast enough to freeze the action, and so it was better to lower the ISO to get a clearer more detailed image.

Generally, if the shutter speed is freezing the action well on an Overexposure, leave it as it is, and Reduce the ISO.

Photos by Passy Camera Exposure 12


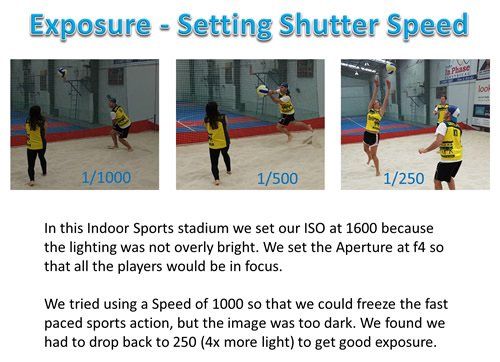
Our third example involves Shutter Speed for Indoor Sports.

As discussed in our “Shutter Speed” article, using the Auto “Sports Scene” mode on digital cameras works great outdoors in bright sunlight, but often has severe limitations for Indoor Sports.

Photos by Passy Camera Exposure 13

Note that we cannot shoot Sports Action without motion blurring at speeds less than 1/250, and we should aim to use speeds of 1/500, 1/1000, or even 1/2000 if possible.


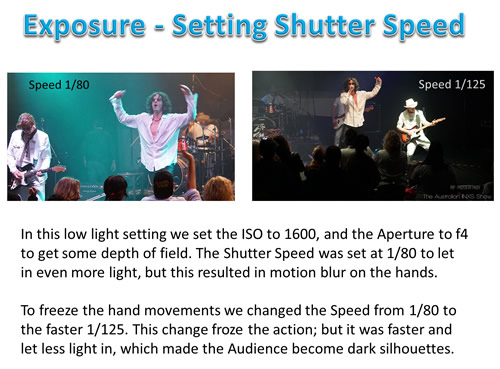
Another example of Shutter Speed involves Motion Blurring.

In the first photo below, we had a low shutter speed of 1/80 which gave plenty of light, but resulted in blurring of the singer’s moving hands. This blurring is a bit difficult to see in the small sized photo below, but it is there and it did make the photo unusable.

Moving to a higher speed of 1/125 stopped the blurring, but did create a darker picture. Sometimes we are faced with these types of compromises, and it is impossible for the camera we are using to get the penultimate perfect exposure. That’s Life – we can only strive to achieve perfection as much as humanly possible, and there are always some ultimate limitations.

Photos by Passy Camera Exposure 14


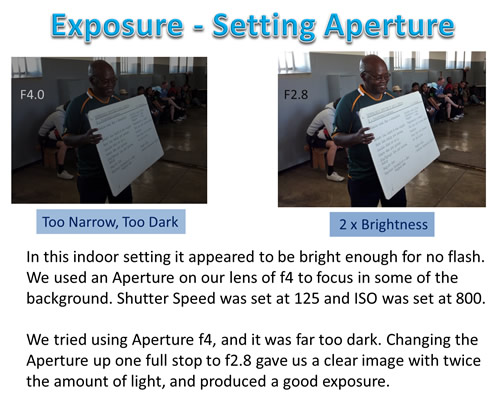
Our final example is another one involving Aperture.

Photos by Passy Camera Exposure 15

The original image was underexposed, and we could have increased the ISO up one stop from 800 to 1600, (and get twice as much light), but this might have also introduced a small amount of graininess.

We therefore made an Aperture adjustment instead, and were able to get 2 times more light by going down to the wider f2.8 value, which made some background blurring, but gave us sufficent light correct exposure.

By moving from f4 to f2.8 we changed the Aperture by “one full stop”.


Videos About Exposure

The following video is useful for Canon and Nikon Camera users and shows how to change the ISO, Aperture, and Shutter Speed settings.

The presenter goes through where all the dials and buttons are on the camera are to do this.

Watching this video made me realise how much easier my Sony A77 is to use, where I have a wheel on the front grip, and a wheel on the back to do this.


Here are some excellent videos about Aperture and Shutter Speed on Sony Alpha Cameras.

Sony Aperture Video


Sony Shutter Speed Video


This next fifteen minute video is about the effects the variable settings have on photos and gives plenty of practical examples.

It is essential viewing for learning about how to use your camera in Manual Mode, and get great exposure.

Here is Part 2 of the above video:


Here is a 10 minute Video about the three key variables: ISO, Shutter Speed, and Aperture.

The effects and side effects of altering these variables is also discussed.


The following is a fifteen minute video with practical examples which shows how to adjust camera variables for various lighting conditions.


Here are is a video lesson in two parts from NightClub Photography TV about setting camera variables.

And here is Part 2 of the above video.


In this next video the guy talks for 23 minutes about all of the variables and how they work.

It is worth watching after the other videos, but does not contain any practical examples.


Videos About Metering and Exposure

Cameras have Metering Modes for fine tuning the light reading. Here is a good five minute video about these Metering Modes.


This next twenty minute video is an excellent explanation of camera light metering with practical examples.


Related Items

How To Do Camera Settings

How To Do ISO Settings

How To Do Aperture Settings

How To Do Shutter Speed

How To Do Photo Composition


Subscribe

If you enjoy visiting Photos By Passy, why not get a free subscription to the website.

You can then receive notifications of new items and updates directly to your email address.

Go to the subscribe area on the left hand sidebar, (or down the bottom of the page if using a mobile phone), fill in your email address and then click the “Subscribe” button.

Enjoy,
Passy

Photo Composition Rules

Subject: Photo Composition

Like great Works of Art, the elements in a Photograph need to be arranged in a manner which is interesting and pleasing to the eye.

In addition, Photography is a two dimensional medium. Therefore we need to make use of the elements which are present in the photo to create a sense of depth and three dimensions.

Photos also need a main focal point, as well as leading our eyes on a journey through the picture.

Having these things makes for great photos, which are pleasing to the eye, and we call this “Composition”.

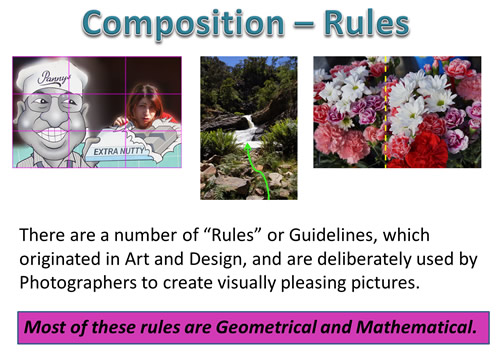
Photos by Passy Photo Composition 02

In this article we look at a set of rules which pertain to good composition.

These “Rules” are as follows:

1) Fill the Frame
2) Beware the Background
3) Avoid the Middle
4) The Thirds Rule
5) Leading Lines
6) Depth and Scale
7) Symmetry and Patterns
8) Viewpoint and Angles
9) Space to Move
10) Cropping Body Parts

These rules are not exhaustive, and there are other additional ways of making photos look great. These are discussed in the Videos and Reference Items at the end of this article.

The material which follows covers the main general rules of composition, and shows lots of practical photo examples.

Portrait Photography is a whole other world involving poses, background blurring, lighting angles, and using off camera flash. This material is not covered in our article.

Landscape Photography is another separate genre of work, involving the use of filters and long exposure times. This level of detail is not part of our article, but we hope to do a separate article on this another time.

Even with the above exclusions, the article which follows is still a very long one, and so take your time working through it.

At the end of the article there is a Quiz that contains several example photos for you to work through and make composition assessments on.

So let’s get started with our Top 10 Rules of Composition.


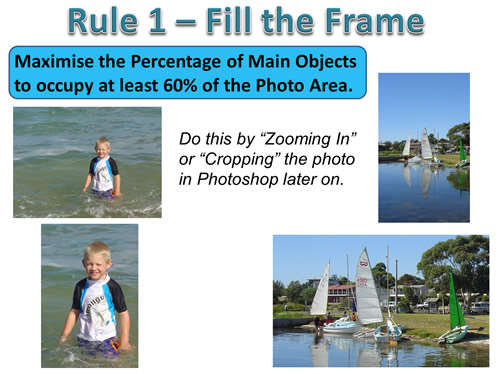
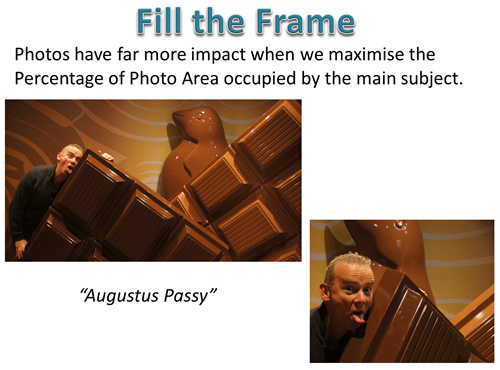
Fill the Frame

It is easy to take a picture which has lots of “empty” or non-important space in it.

With the high number of Megapixels on many digital cameras, this is not a problem, and we can “Crop” or Reframe the picture in Photoshop later on so that at least 60% of pour photo is filled with the main subject.
Photos by Passy Photo Composition 03

However, it is a good idea at the time of shooting, to zoom in if we can, and fill up the frame with the important subject material we want to capture.
Photos by Passy Photo Composition 04


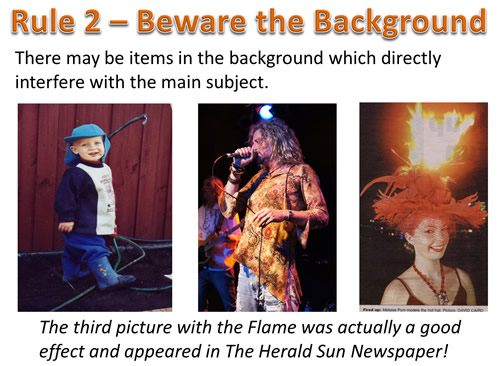
Beware the Background

Sometimes a great picture is ruined by having a busy distracting background in it.

Other times there may be strange items in the background, which directly interfere with the main subject.
Photos by Passy Photo Composition 05

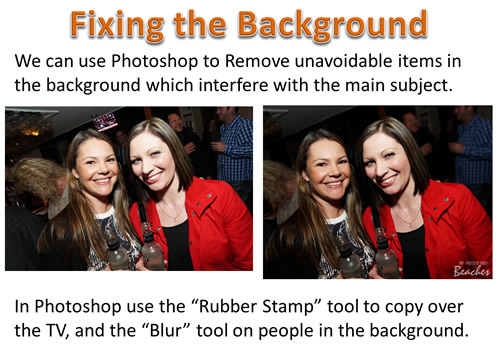
Often there are distractions in the background which are unavoidable.

We can use Photoshop to “Crop” (or Reframe) the picture, and then use additional tools to fix or even totally remove all distractions.
Photos by Passy Photo Composition 06

Remember: The background behind our subject can sometimes dramatically interfere with the final result.

Usually this is not good, so be careful!


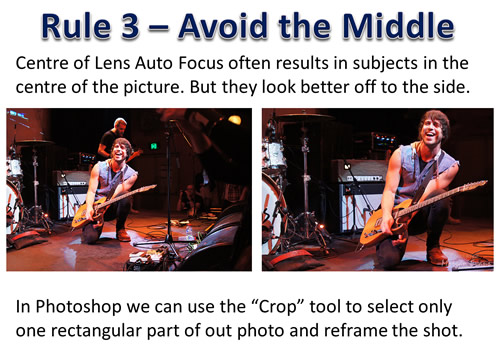
Avoid the Middle

For beginner photographers, especially when using Auto Focus, the main subject of the photo ends up directly in the middle of the picture.

This creates a rather boring photo, and a better composition effect is to place the main subject off to the side in the photo.
Photos by Passy Photo Composition 07

Here is another example of an original shot being too centred in the Middle.

Because this was a large 24 megapixel photo, we were able to use cropping in Photoshop to change the composition and make a “new” improved picture.
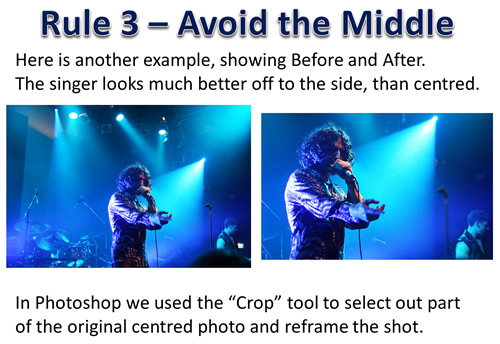
Photos by Passy Photo Composition 08

In the “Thirds Rule”, (which we look at in detail in the next few sections), there are ways to compose our pictures which avoid having the main subject in the very centre.

There are always exceptions to every rule, and we often have a single person pose in a Landscape photo to supply a reference point for us to visualise the actual size of the vista.
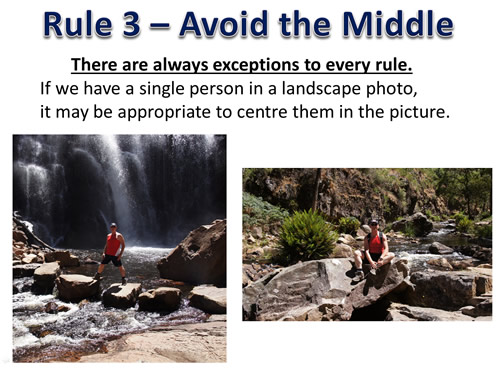
Photos by Passy Photo Composition 09

We can also make somebody in a Group Photo the “centre of attention” by placing them directly in the middle of the picture.
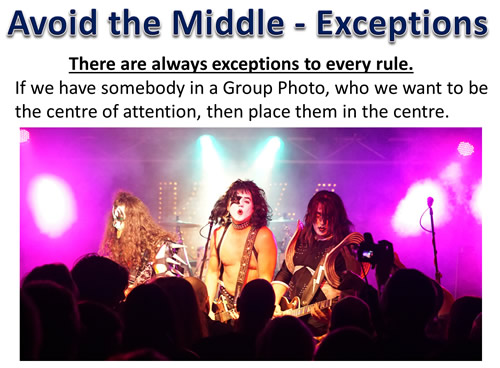
Photos by Passy Photo Composition 10

Here are some more exceptions in some photos taken in New York City by Musician/Photographer: Nicholas Roy.
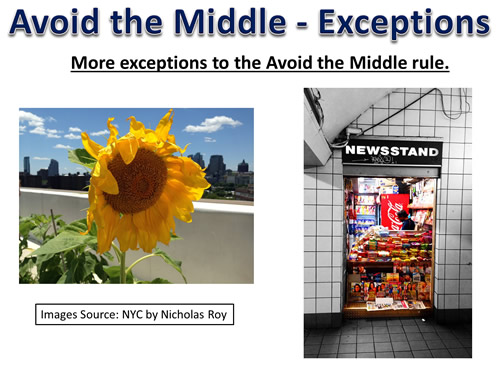
Photos by Passy Photo Composition 11

The Sunflower and the Newsagency are “Framed” by the rest of the picture, and well placed to be the centre of attention.

“Framing” is another Composition technique which works really well in photos like these.


The Thirds Rule

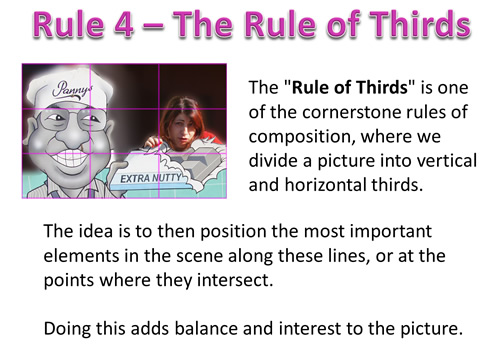
The “Rule of Thirds” is one of the cornerstone rules of composition, where we divide a picture into vertical and horizontal thirds.

This creates 9 rectangular areas divided by 2 vertical and 2 horizontal lines.

Because there are nine reactangular areas created, it is sometimes also called the “Rule of Nines”.

The idea is to position the most important elements in your scene along these lines, or at the points where they intersect.

Doing this adds balance and interest to the picture. Some cameras even have an option to superimpose a rule of thirds grid over the LCD screen, so it can be referenced while setting up your picture.
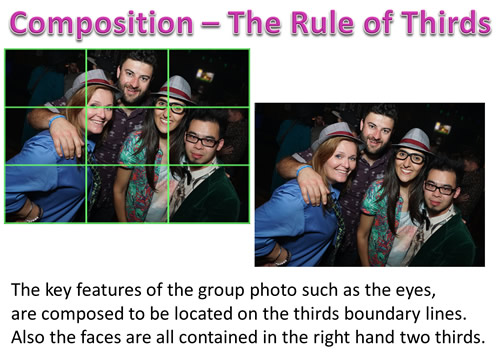
Photos by Passy Photo Composition 12

In this first example, the Rule of Thirds has been followed “Religiously”, and we have placed key features so that they sit right on the thirds grid lines.
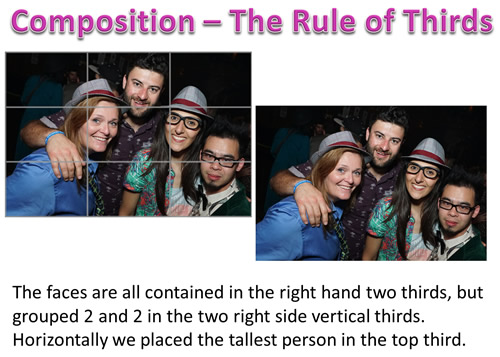
Photos by Passy Photo Composition 13

However, in the next example of cropping the same original photo, we have placed key items inside the boxes formed by the thirds grid.

Sometimes a better image is obtained by not placing key features directly onto the grid lines, but instead placing them inside the thirds boxes.
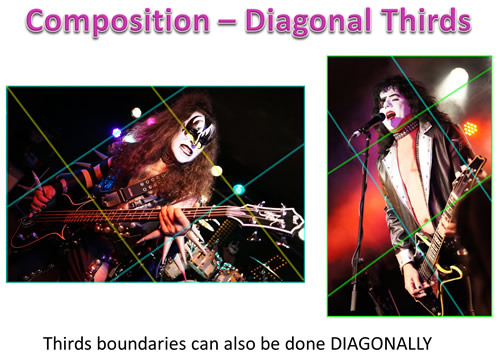
Photos by Passy Photo Composition 14

We can also use Diagonal Thirds for placing key features onto the grid lines.
Photos by Passy Photo Composition 15

Another aspect of the Thirds Rule is to place land/sea, sea / sky, and other key boundaries onto one of the horizontal thirds lines.
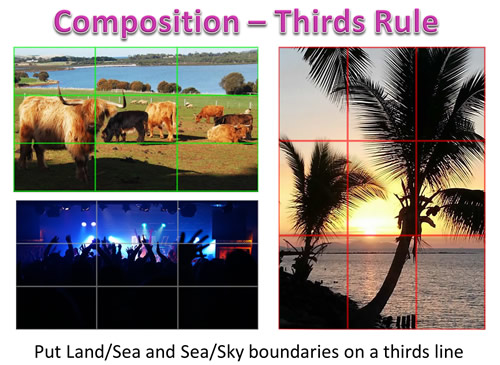
Photos by Passy Photo Composition 16

Here are some New York City Photos from Musician/Photographer: Nicholas Roy which use the thirds rule very well.
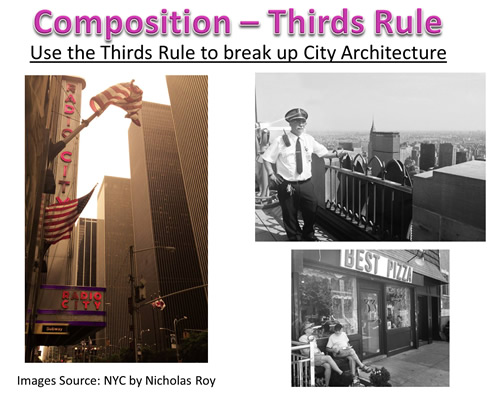
Photos by Passy Photo Composition 17

It is often important to have a balancing element, and not empty space, when we position our main subject off center into the left hand one third of a picture.

This is covered in the next section “Thirds Rule – Major and Minor”


Thirds Rule – Major and Minor

When we have a main subject, and other items around them, it is a good idea to use the Thirds Rule and place key minor objects on the thirds crossover points.
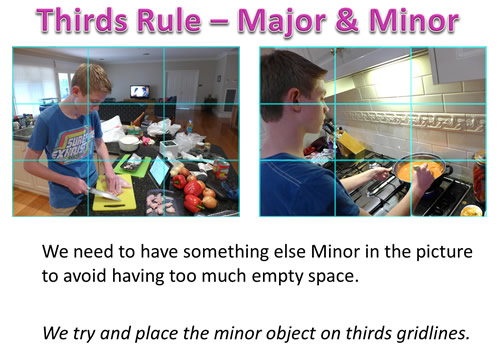
Photos by Passy Photo Composition 18

Here is another example of using Major and Minor within the Thirds Rule.
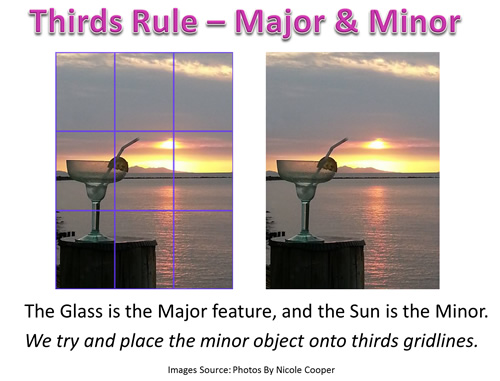
Photos by Passy Photo Composition 19

The Major and Minor items do not have to be directly on thirds Gridlines; they can be contained within thirds boxes.
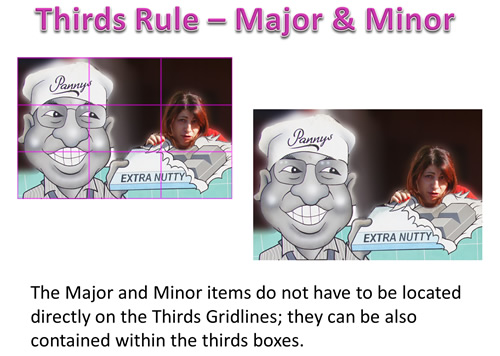
Photos by Passy Photo Composition 20

In some cases we can apply this rule the other way around, and place the Major object onto the thirds gridlines.
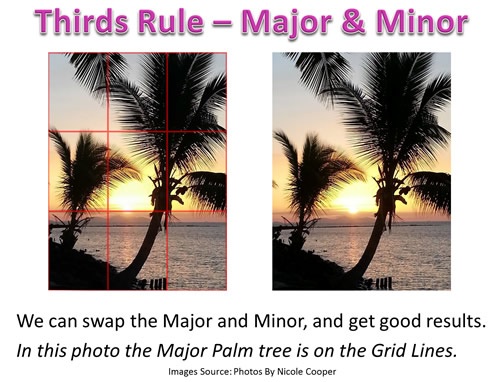
Photos by Passy Photo Composition 21


Leading Lines

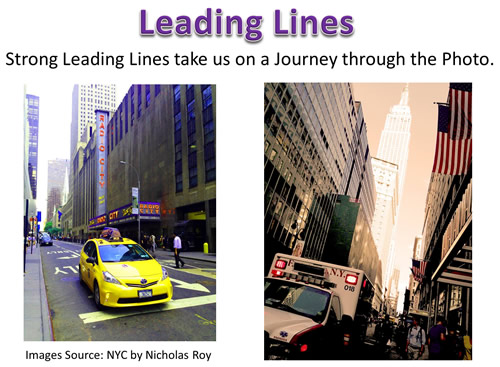
When we look at a photo our eye is naturally drawn along lines. These can be curved lines, zig zag lines, or diagonal lines which lead us into the picture.

This gives the picture a three dimensional story to it, and makes us go on a “Journey” through the scene.
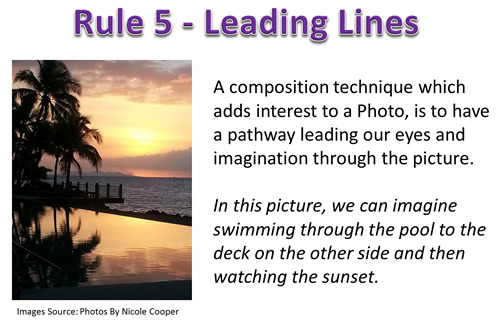
Photos by Passy Photo Composition 22

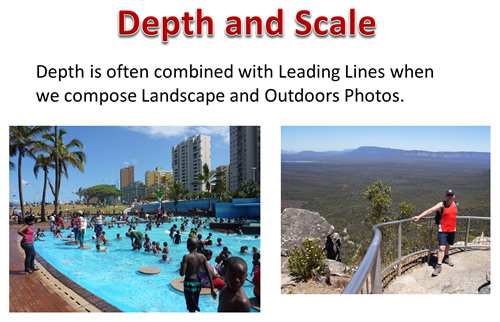
Leading lines are often used in Landscape and Nature photos to add interest to the pictures.
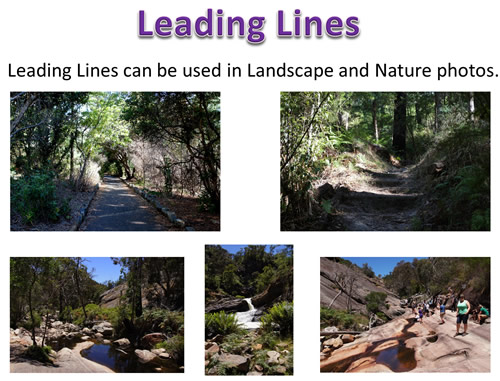
Photos by Passy Photo Composition 23

Here are some great examples of Leading Lines in photos taken by Musician/Photographer: Nicholas Roy in New York City.
Photos by Passy Photo Composition 24


Depth and Scale

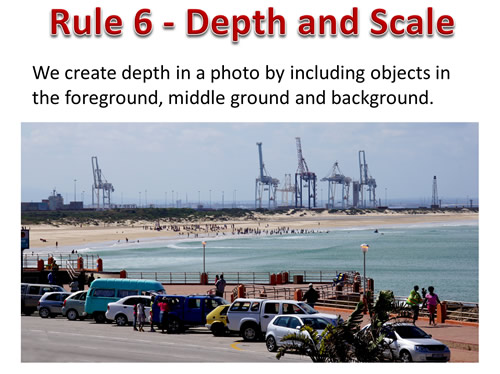
Photography is a two-dimensional medium, which can make it difficult for us to convey the sense of depth that was present in the original scene.

We can create depth in a photo by including objects in the foreground, middle ground and background.

It is also a good idea to include people in Landscape and Nature files to act as a scale reference for the Picture.
Photos by Passy Photo Composition 25

Depth is often combined with Leading Lines when we compose Landscape Photos.
Photos by Passy Photo Composition 26


Symmetry and Patterns

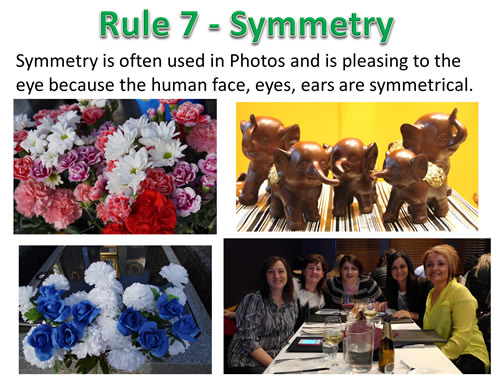
Our eyes are trained from when we are babies to look for the face of our mother, which has a nose and eyes either side.

We are highly trained to look for symmetry, and for this reason we find it to be an attractive trait in photographs.
Photos by Passy Photo Composition 27

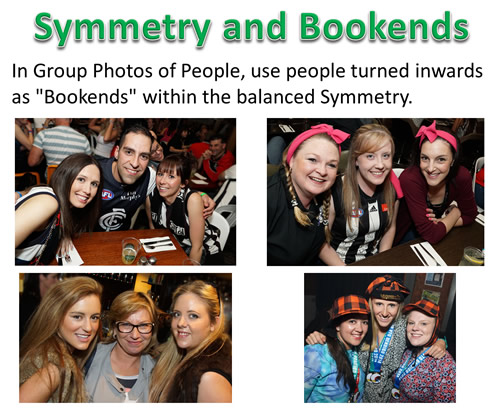
In Group Photos, especially Groups of Three, we can use people turned inwards as “Bookends” within the balanced Symmetry.

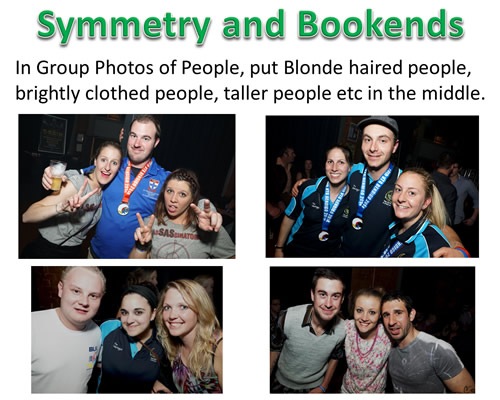
Also to preserve symmetry, put either the Tallest or Shortest person in the Middle, also place people with blonde or bright hair or bright clothes in the middle.
Photos by Passy Photo Composition 28

Use Symmetry and balance the left and right hand side of the Group, by placing brightly clothed, or blonde haired people in the middle of the photo.

We do this because blonde haired people reflect light more, and always come out much brighter in Flash Photos.
Photos by Passy Photo Composition 29

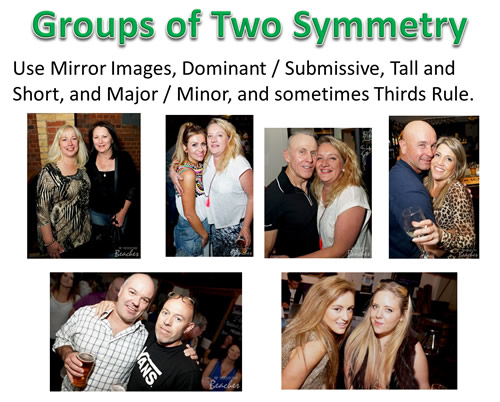
Finally for Groups of Two, we can make them mirror reflections, or make the man dominant and the woman submissive (even if this does sound sexist, it is classic portraiture composition – think of old style Hollywood Movie Posters like “Gone With The Wind”).

Also use Major / Minor with blonde brightly dressed person to the front and brunette or dark clothes slightly to the back.
Photos by Passy Photo Composition 30


Viewpoint and Shooting Angles

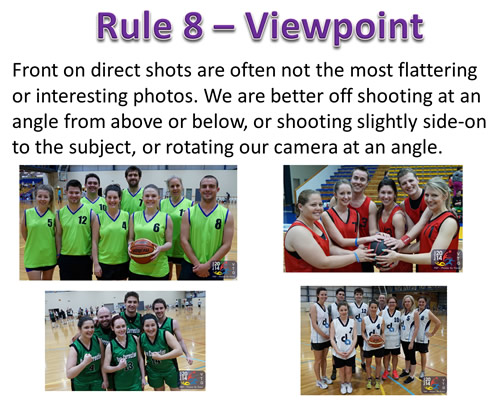
Different subjects look different if we shoot them from different angles rather than just straight on.

Shooting from above or below is one option, but we can also tilt the angle of the camera to create a different viewpoint.
Photos by Passy Photo Composition 31

When you shoot Groups of People, such as sports teams, it will be boring of all the photos are the same front-on straight line composition.

We need to mix it up a bit by using Angles, Interesting People Arrangements, and sometimes taking one or two steps sideways so that we are not directly front-on to the group.
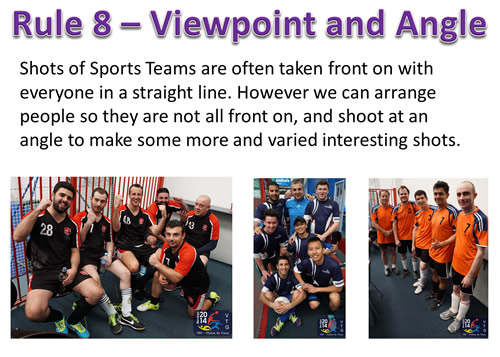
Photos by Passy Photo Composition 32

When shooting sports, often the best place to shoot from is where the umpire or referee stands most of the time. This gives us the best viewpoint.

Eg. For Basketball shoot from behind the rim to the right, and have the rim in the shot. For tennis shoot from the middle of the court at the net.
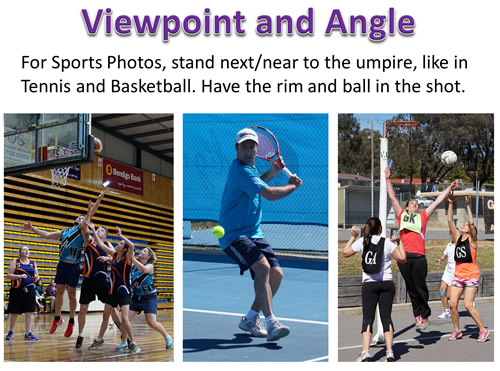
Photos by Passy Photo Composition 33

For certain sports it is good to shoot at a particular angle (up or down).

For Mountain bikes, it is generally a good idea to get down as low as you can on the ground and shoot upwards, especially on jumps.

However when riders are going up a long hill, it is better to get at a vantage point up high at the side of the track and shoot downwards.

Photos by Passy Photo Composition 34

For athletic events, get down as low as you can to shoot upwards for high jump and long jump so that the jump height is emphasized.

Getting down low kneeling on one knee, a few meters down from the start or finish line, is a good viewpoint for shooting running races.


For People shots at parties, start front-on, then move one or two steps to the left or right, and then lift up your camera up and shoot from above looking down.

Shooting from above and off to the side gives great jawline emphasis which is a very flattering look.

Shooting with Flash from above also creates a shadow under the jawline, further enhancing this feature.
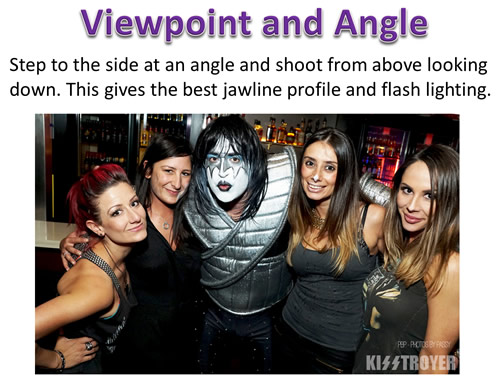
Photos by Passy Photo Composition 35

Here are some more photos where we have shot at a down angle, rather than front on.
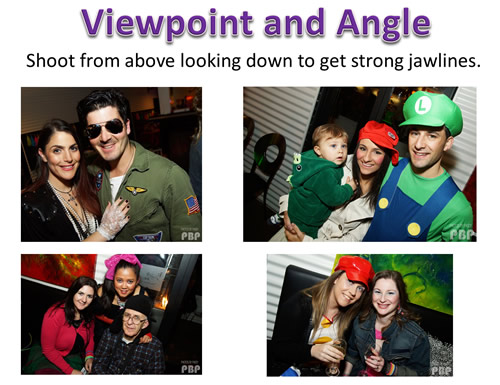
Photos by Passy Photo Composition 36

NEVER SHOOT PEOPLE FROM BELOW OR ALLOW THEM TO LEAN BACK.

Shooting too low emphasizes the neck in a bad way, and loses all that nice jawline profile.

Basically if you can see a person’s nostrils at all, then you are shooting from too low down.
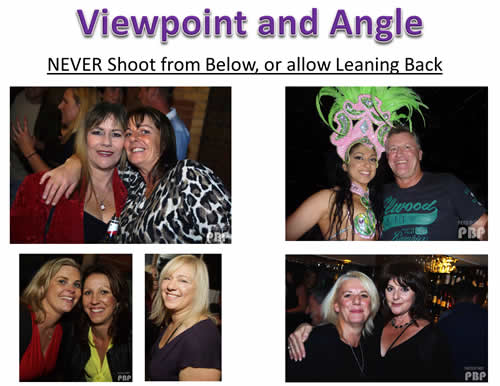
Photos by Passy Photo Composition 37

Straight up and down shots of people can become boring, and so tilt the camera while taking pictures to add angles and interest.
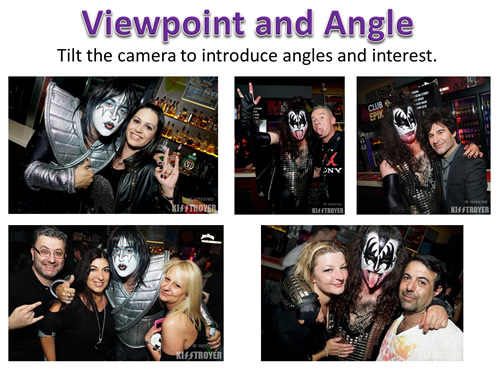
Photos by Passy Photo Composition 38

Camera Tilting is a good composition effect to use in music photos.
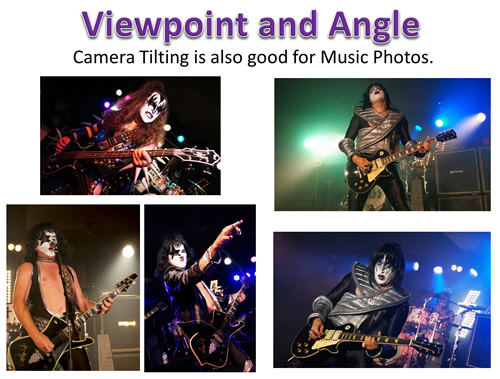
Photos by Passy Photo Composition 39

(The photos above are of “Kisstroyer” from Melbourne Australia. If you like Kiss music, then these guys will rock your socks off!)

Another use of Viewpoint is to get up high by lifting the camera, or using any available upstairs area when doing Dance Floor or very large Group Photos.
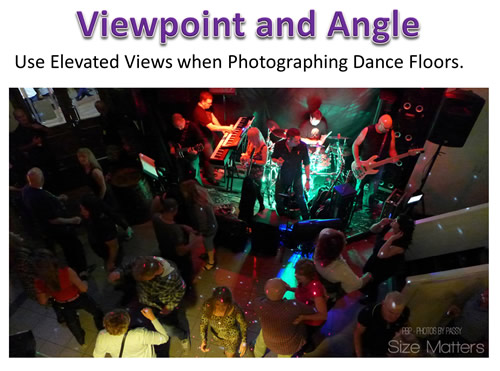
Photos by Passy Photo Composition 40


Space to Move

In certain types of Photos such as Music, Sports, Dance, and Theatre we do not “Fill the Frame”, and we do not follow “The Rule of Thirds”, because we need to leave space to move.

Having some space for the viewer to see where some action has come from, and where it is going to, is the main priority.
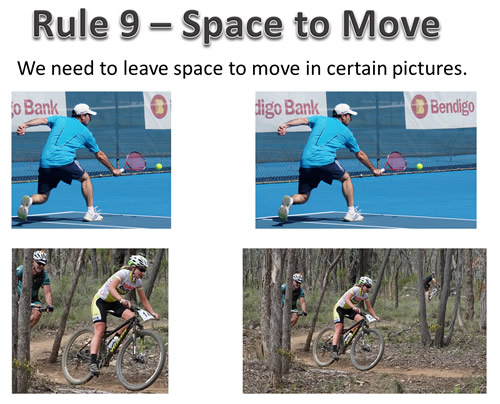
Photos by Passy Photo Composition 41

When we photograph performances it is a great idea to have some shots which include the audience, so we can see who the performance is going out to.
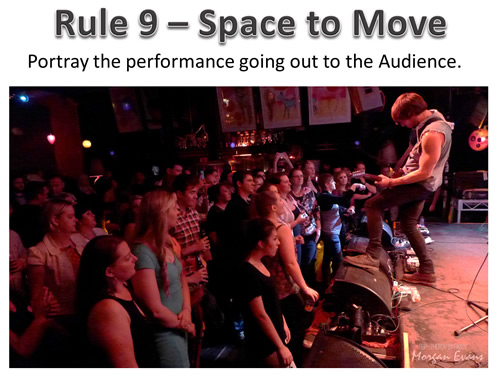
Photos by Passy Photo Composition 42

When photographing musicians we need to include all of their intruments, so we can imagine where their playing might be going to next on the instrument.
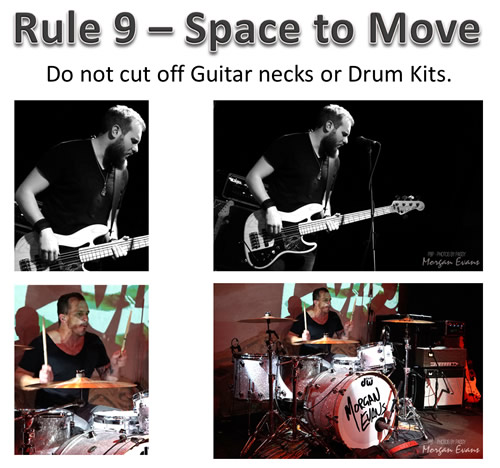
Photos by Passy Photo Composition 43


Cropping Body Parts

We often cannot include all of a person’s arms or legs, which is fine, as long as we do not cut off the arms or legs below the knees or elbows.

Eg. If we crop or frame a photo we must always “Cut Off” above the joints on the arms and legs.

It is best to take the shot wide and big enough to have the full body along with some space to move, and even have some extra background space we may not need.

There are plenty of Megapixels, and from a shot that is “too big”, we can easily crop out what we do not need from the background, and have all limbs fully intact.
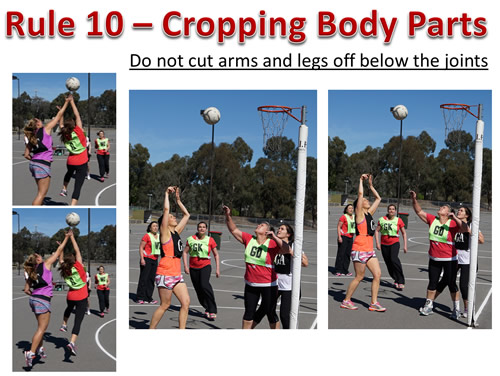
Photos by Passy Photo Composition 44

In the example below, the top left shpot has the guy’s arms cut off below gthe limbs. Aslo shown to the right and underneath ways we could shoot or crop this photo to solve this problem.
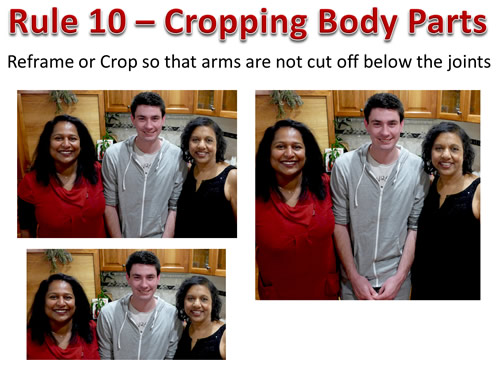
Photos by Passy Photo Composition 45


The Golden Ratio

We did say at the start of this article that we would only be covering ten rules; however there is one final rule which is above all others.

This final rule is the “Golden Ratio” or “Golden Spiral”.

This rule is believed to be the Penultimate Composition Rule for Art, Photography, Facial Corrective Plastic Surgery, and Architecture.

The following three minute video does a great job of explaining the Golden Ratio of 1.618 called “phi”.

The “Golden Ratio” is famous throughout history in Architecture, Art, and Photography as shown in the video.

Watch this video before reading the material below.


If key elements in a Photo fall onto the Golden Spiral containing rectangles and squares with side lengths in the “Golden Ratio”, then this should theoretically form the most pleasing picture possible.

The Golden Ratio Spiral is not easy to picture whenever I am busy taking a photo, so what I did was check some of my favorite photos in Photoshop by overlaying a Golden Spiral from Wikimedia.

I had originally composed each of these photos using only the general composition rules like symmetry, thirds rule, major/minor, and so on.

To my surprise I found that these photos did in fact contain elements of the Golden Ratio.
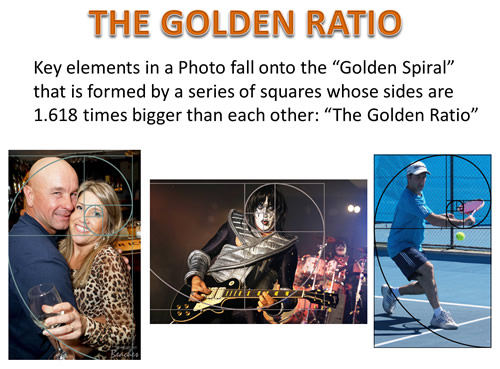
Photos by Passy Photo Composition 46

The Golden Ratio is used a lot in Portrait Photography, but can be applied to Landscape Photography, Sports Photography, and People Pictures.

The highly used “Rule of Thirds” is in fact an extremely simplified version of The Golden Spiral and Ratio.


The “Fibonacci Spiral” looks just like the Golden Spiral, and it is a very close approximation to the “Golden Spiral”.

The two spirals are very similar to each other, so either can be used for analysing the composition of a photograph.

In fact the two spirals are often confused with each other because they are so similar.

If you want to delve into the mathematical details of the two Spirals, then check out the following web page:

Wikipedia article about the Mathematics of Spirals

Here is three minute video about the Golden Ratio in Photographs:


Finally, here is a PinInterest Board where I have posted a number of interesting Golden Ratio Photos:

Photos by Passy Golden Ratio on PinInterest


Composition Quiz

What follows are a series of Photos, and it is up to you to think about whether or not they follow any composition rules and look good.

If the photo does not look quite right, think about how it might be fixed to be a better looking photo.

Answers are provided immediately after each set of Photos, so scroll down slowly without looking ahead at the answer.


Have a look at these first two photos, and see what composition rules are present, or perhaps should be present to improve the photos.
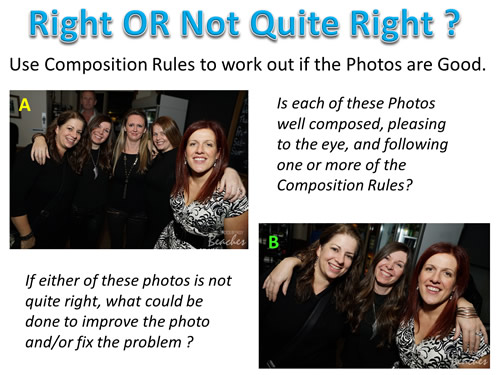
Photos by Passy Photo Composition 47


Here are the Answers to these first two photos.
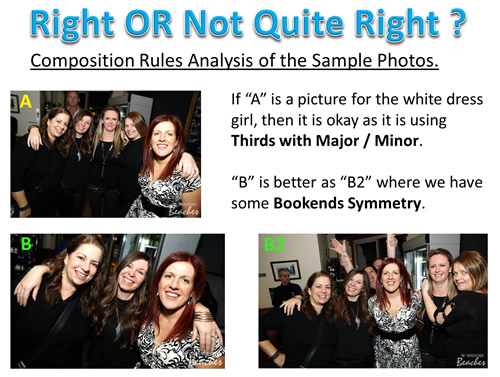
Photos by Passy Photo Composition 48

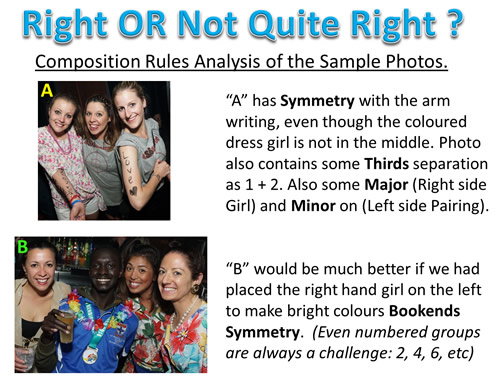
Picture A was actually a Birthday Party photo, and if the girl in the white dress was the “birthday girl” then it would be okay to have her as the dominant feature at the front.

However, it was not her birthday, and so she probably should have been arranged to be in the center of the group.


Here are the next photos in the Quiz which need to be considered, and their composition effectiveness assessed.
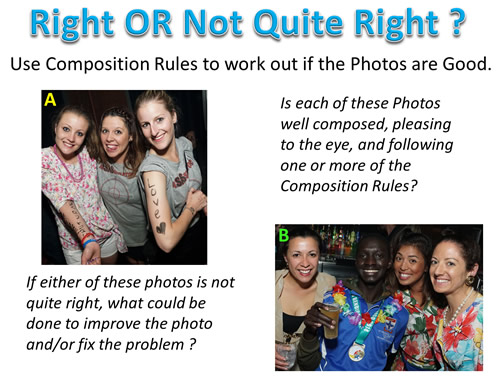
Photos by Passy Photo Composition 49


Here are the answers to the Photos.

Photos by Passy Photo Composition 50

Photo B is not actually all bad, it does have the right two thirds containing the brightly colored people with flowers, and the left one third having the plainly dressed person.

However, my personal take on the photo is that it would be better with “Bookending”.


The next two photos in the Quiz are these ones.
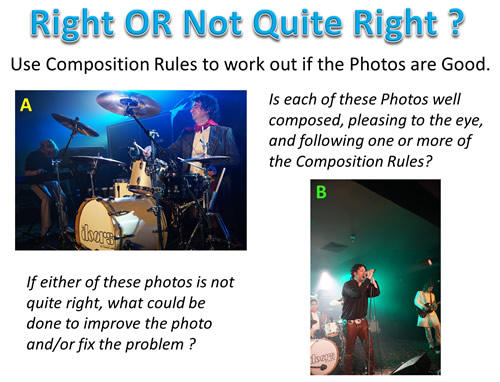
Photos by Passy Photo Composition 51


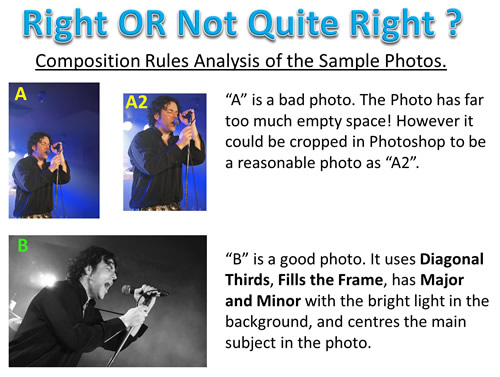
Here are the answers to the Photos: Photo A was quite okay, but Photo B stands out as having some serious issues.
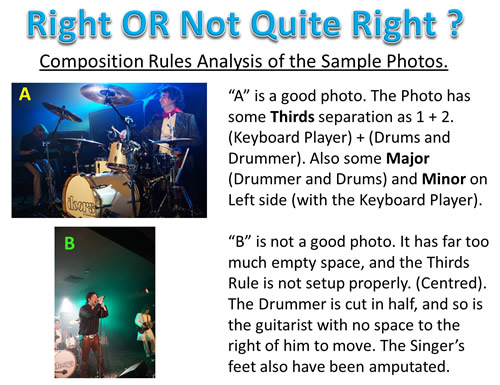
Photos by Passy Photo Composition 52


Two more photos for checking are from the same “Doors of Perception” band shoot album, and are shown below.
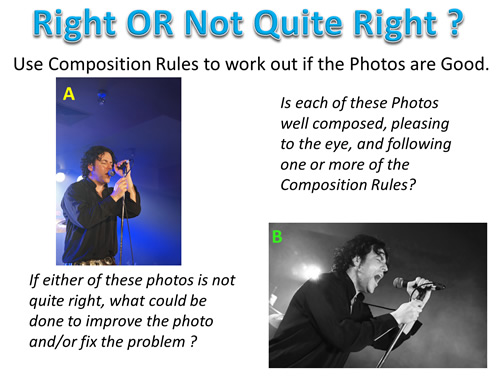
Photos by Passy Photo Composition 53


Here are the answers to the Photos.

Photos by Passy Photo Composition 54

“The Doors of Perception” Band from Melbourne Australia are highly recommended to see for anyone who loves all the The Doors classics played to perfection.


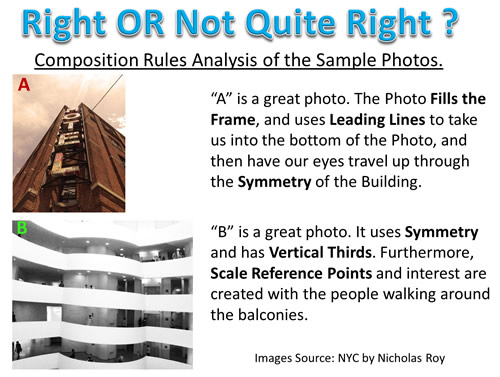
The next two photographs were taken by Photographer/Musician Nicholas Roy in New York City.

Nicholas has a great eye for photography, and his post processing of pictures using Photoshop is very artistic and creative.
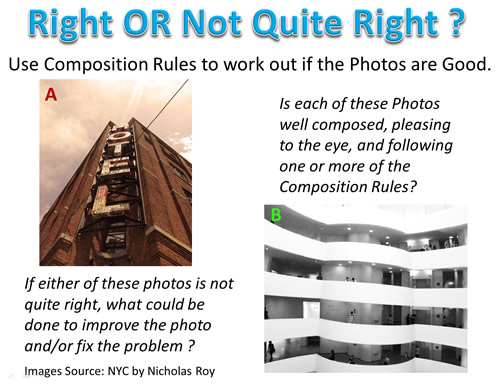
Photos by Passy Photo Composition 55


Here are the answers to the Photos.

Photos by Passy Photo Composition 56


These last two photos are also of New York City by Nicholas Roy.

There is a lot going on in these photos, and it might not be easy to see which Composition Rule(s) are making these pictures look so good.
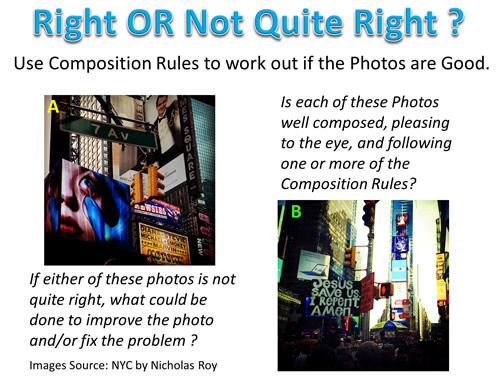
Photos by Passy Photo Composition 57


Here are the answers to the Photos. We saved the best till last; and these two photos are great examples of The Golden Ratio creating eye catching pictures.
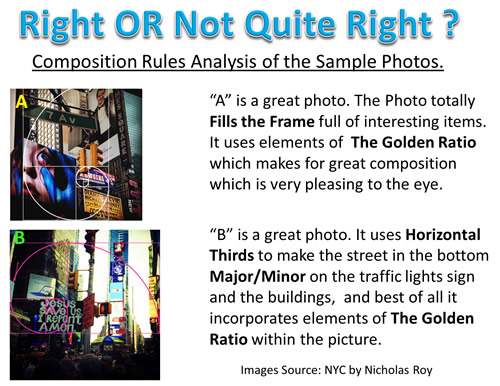
Photos by Passy Photo Composition 58


Videos About Photo Composition

The following ten minute video goes through a lot of the Photo Composition Rules we have covered in this article.

One of the key rules covered fdor example is that in portraits the eyes are the most important feature, and so should ensure they are on a thirds boundary.


This next twenty minute video has some interesting ideas about composition, especially for Group Shots and Family Photos.


Finally, here is a three minute music video which shows some really well composed photographs.

There are many other Composition videos available on YouTube, especially for the area of doing Portrait Photos.

We recommend regulary searching YouTube and watching these one or two of these types of videos as part of ongoing learning and study of Photography.


Videos About Portrait Photography

Here is a good five minute video about six basic composition rules for doing female portraits


Here is a one hour extensive lesson about Poses for Portraits, including the “Triangle Rule” and several others which we have not covered in this basic composition article.


Additional Reading

Here are some good articles on Composition which we found on the web while researching this article.

The first article is a basic summary of composition rules, including several that we have covered in this article.

10 Top Photography Composition Rules Article

Another excellent article on Composition is the following one.

Digital Camera World Composition Article

This next article covers 18 rules of Composition.

18 Composition Rules For Photos Article

The next article includes composition using the Golden Ratio.

Composition Article including The Golden Ratio

Here is an article that gives five quick easy composition rules.
Five Quick Easy Composition Rules
The next article shows some tips for Portrait Photography.

Composition Rules for Portrait Photography

Here is a link to Nicholas Roy’s Website (The guy who did the great New York City Photos contained in this article)

Nicholas Roy : Musician/Photographer Website

The following is a short article on the Golden Ratio and Golden Spiral by Photographer Jake Garn.

Jake Garn Golden Spiral and Rule of Thirds Article


Related Items

How To Do Camera Settings

How To Do ISO Settings

How To Do Aperture Settings

How To Do Shutter Speed


Subscribe

If you enjoy visiting Photos By Passy, why not get a free subscription to the website.

You can then receive notifications of new items and updates directly to your email address.

Go to the subscribe area on the left hand sidebar, (or down the bottom of the page if using a mobile phone), fill in your email address and then click the “Subscribe” button.

Enjoy,
Passy