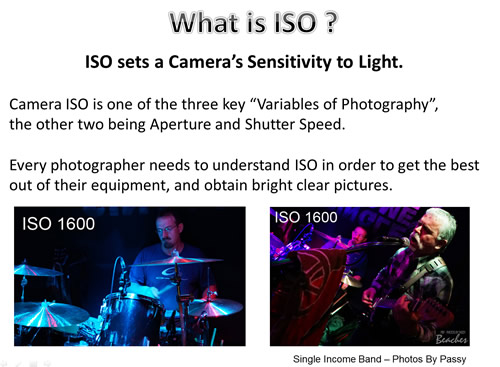
ISO sets a Camera’s sensitivity to light.
Effectively it works like a Brightness Control on your camera, and you can turn it up higher if you are in a dark room, or in a shady forest.
However, if you are outdoors in Bright Sunlight, then you need to turn the ISO down to a low value, or else your photo will come out all white and washed out with too much brightness.
Camera ISO is one of the three Variables of Photography, the other two being Aperture and Shutter Speed.
Every photographer needs to understand ISO in order to get bright and clear pictures from their equipment.
Definition of ISO

ISO stands for International Standards Organization, but in Photography it refers to the sensitivity of the camera’s digital sensor to light.
Typical settings are ISO 100, 200, 400, 800, 1600, 3200, etc.
A higher number means that the sensor is more sensitive to light, and each time the number doubles, it is twice as sensitive as the previous ISO sensitivity.
ISO Geometric Progression
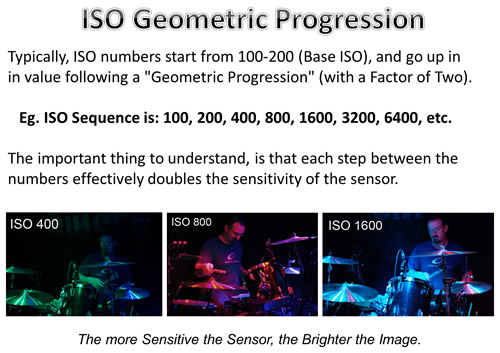
Typically, ISO numbers start from 50, 100 or 200, which is called the “Base ISO” of the Camera.
The values then go up in a “Geometric Progression” or a “Geometric Sequence” (Factor of Two, which results in Doubling).
This ISO sequence is: 100, 200, 400, 800, 1600, 3200, 6400 and etc.
The important thing to understand, is that each step between the numbers effectively doubles the sensitivity of the sensor.
ISO 800 is twice as more sensitive than ISO 400, while ISO 1600 is twice as more sensitive than ISO 800.
This makes ISO 1600 four times more sensitive to light than ISO 400,
and ISO 1600 sixteen times more sensitive to light than ISO 100, so on and so forth.
What does it mean when a sensor is sixteen times more sensitive to light?
It means that it needs sixteen times less time to capture an image, because there is 16 times more light.
Note that modern Digital Cameras also have in between ISO values which can be used.
EG. ISO values such as 1000 and 1250 which occur in between the standard ISO 800 and 1600 values.
The higher the number, the less light is needed to take a photo that is correctly exposed (not too dark or too light).
Typical ISO Values
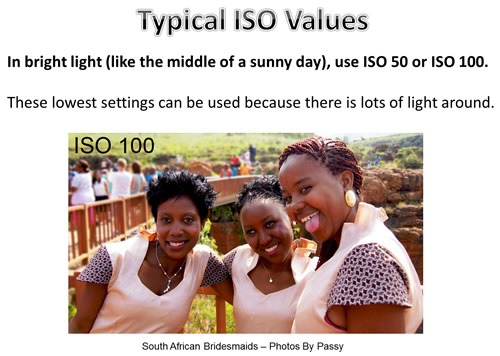
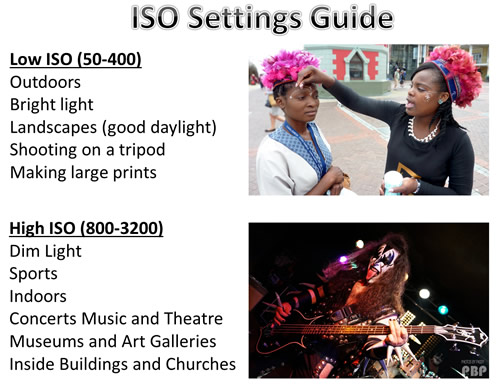
In bright light (like the middle of a sunny day), you’ll normally use ISO 50 or ISO 100.
These lowest settings can be used because there is lots of light around.
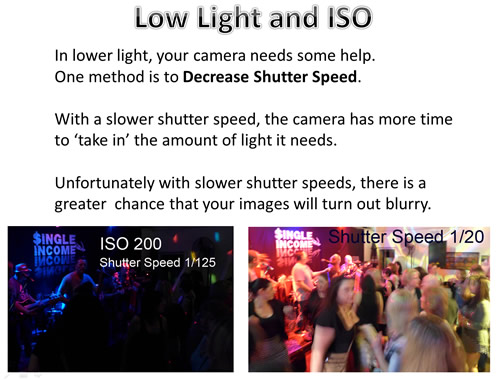
However, in lower light, your camera needs some help.
There are two ways of doing this: Decrease the Shutter Speed or Increase the ISO Value.
Decrease Shutter Speed
With a slower shutter speed, the camera has more time to ‘take in’ the amount of light it needs.
Unfortunately with slower shutter speed, Images can become motion blurred.
Increase ISO Setting
Rather than decrease the shutter speed, we can increase the ISO.
This will increase the sensitivity of the camera which means you can get the same shot with less light entering the camera.
As a result the shutter speed can be set at a value which will avoid blurry images.
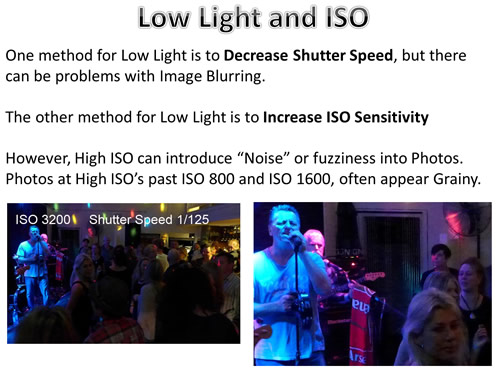
The side affect of increasing ISO to values past ISO 1600 on most Digital SLR Cameras, is fuzziness, with old style movie fuzzy dots, due to sensor signal “noise”.
What Causes Noise ?
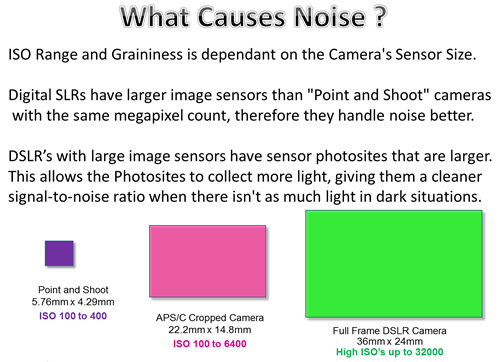
Available ISO Range and Graininess is dependant on the Camera’s Sensor Size.
Digital SLRs have larger image sensors than “Point and Shoot” cameras with the same megapixel count, therefore they handle noise better.
DSLR cameras have physically large image sensors and this means that the photosites are larger on a digital SLR’s sensor.
This allows the photosites to collect more light, giving them a cleaner signal-to-noise ratio when there isn’t as much light.
As a result, smaller cameras with small sensors tend to have a lower ISO range (typically 100-400) and there is more noise in their pictures throughout their ISO range.
Using Flash to Help
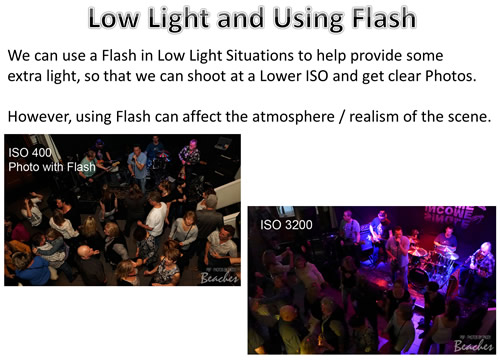
Using Flash will enable indoors shots to be taken at lower ISO’s and therefore be clear without fuzzy noise in the images.
However, this often detracts from the realism or ambience of the sitution being photographed.
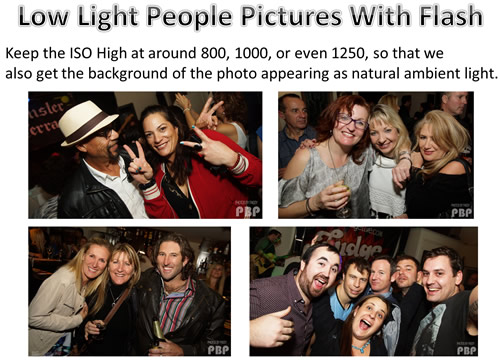
When we are using Flash for Indoor Photos of People, it is a good idea to actually keep the ISO High at around 800, 1000, or even 1250, so that we also have the background of the photo appearing as natural light, and not darkness.
Getting The Correct ISO
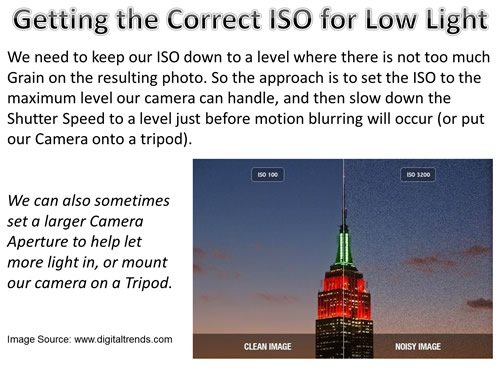
When we do not have bright natural daylight, we will probably have to increase the ISO so that we can get a sufficiently bright image.
However, higher ISO typically translates to a noisy or “grainy” image, and so as a general rule we should use the lowest ISO setting possible for our photos.
The general approach is to set up to the maximum ISO where our camera can take non-grainy pictures.
We then need to adjust the shutter speed to a slower setting, but not so slow that we get motion blurring.
We can also use a wide open aperture like F2.8 which will let more light into the lens.
Recommended ISO Values
Here are some ISO Tips from the Digital Trends Website:
– If your subject is moving and we are trying freeze the motion for a still, we may need a higher ISO setting to compensate for the high shutter speed, and to ensure that the image gets enough light.
– If we want to get a vintage aesthetic look, by adding a little bit of grain to our photos, then we should try bumping up the ISO.
– If we are using a tripod to stabilize our camera we can usually get away with a slower shutter speed, which in turn allows us to use a lower ISO.
– If we are shooting an image and don’t mind having a blurred background, we can increase the camera’s Aperture (thus allowing more light into the lens) and use a lower ISO.
– If we are shooting with artificial light by using a Flash we can use a lower ISO setting and get a very clear picture.
When To Increase ISO
We should always increase the ISO when there is not enough light for the camera to be able to quickly capture a clear image.
Eg. When shooting indoors without a flash, set the ISO to a higher number to be able to freeze motion and obtain a bright viewable image.
Other cases where you might want to increase ISO are when you need to get ultra-fast shots, like bird pictures or fast moving action sports.
However, when increasing the ISO, you need to watch out for the amount of fuzzy noise which is added to the image.
Situations where you might need to push ISO to higher settings include:
– Indoor Sports Events where players are moving fast and there is limited light available due to the fast shutter speed we are using to freeze the action.
– Musical Concerts and Theatre hows which are performed in low light and often have ‘no-flash’ rules.
– Art Galleries, Churches, and Museums, because they have rules against using a flash and of course being indoors it is not well lit.
– Birthday Parties where blowing out the candles in a dark room can produce a nice moody shot which would be ruined by a bright flash.
– You are taking Photos at a Party or Function and want to shoot unonbtrusively using a large zoom lens to capture natural candid pictures.
– You are taking a Photo in Low Light which is not going to be Enlarged or Printed, and so a small amount of graininess in the image will not matter.
Auto Settings
On many of the newer DSLRs, there is a setting for “Auto ISO”, which can help get better results in low-light environments.
The beauty of this setting, is that you can set the maximum ISO to a certain number, so when the ISO is automatically increased based on the amount of light, it does not cross the set barrier. So, if I want to limit the amount of grain in my pictures, I typically set the maximum ISO to 1600.
DSLR’s also have Auto “Scene Modes” which can be used, such as “Sports”, “Night Portrait”, “Landscape”, “Night Scene”, “Daylight Portrait”, “Food”, and so on.
These presets contain ISO values which are suitable for these situations.
Low Light Cameras
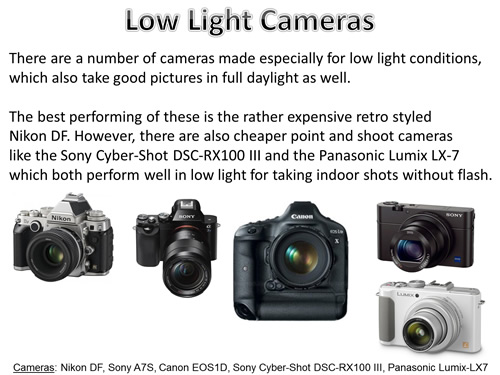
There are a number of cameras made especially for low light conditions, which also take good pictures in full daylight as well.
The best performing of these is the rather expensive retro styled Nikon DF, but there are also cheaper point and shoot cameras like the Sony Cyber-Shot DSC-RX100 III and the Panasonic Lumix LX-7 which perform well in low light.
The Sony A7s is a remarkable camera, capable of extremely High ISO’s with images obtianed which are of good quality.
The following one and a half minute video shows how the A7s is able to turn darkness into daylight.
However this amazing camera does not come cheap, and has a current Australian Retail Price of around $2500 just for the camera body with no lenses.
For further information on the best cameras to use in low light situations, see the following aticle:
17 Best Cameras For Digital Low-Light Photography
Videos About ISO
This first video is seven minutes long, and shows examples about ISO Settings and Noise. It also shows the relationship between ISO and Shutter Speed.
The following five minute video discusses ISO values and the importance of buying a good F2.8 wide aperture lens for low light.
This next vidoe discusses using ISO in Night Club Photography, and includes real life examples. The video is in two parts:
Part 1:
Part 2:
This next five and a half minute video includes examples and shows how to do an “ISO Lens Cap Test” on your camera.
Finally for those who love all things super technical, here is a nine and a half minute video which goes into the technical details of how ISO actually works in a Digital Camera, and how at High ISO’s we get noise introduced into the electrical signal which is what causes blurry noise dots on low light photos.
ISO Settings – Summary
Most of the time in good lighting conditions, your camera’s Auto or Scene settings will deal with ISO correctly and nice clear bright photos will result.
However in Low Light situations, there are a number of things to be aware of regarding ISO. We have tried our best to cover these in this “How To” article.
All of this might be a bit of information overload at the moment, but by gradually working through all of our “How To” articles, and trying out different settings on your own camera, we are sure that you will become a much better photographer who is able to problem solve situations quickly when your photos are not turning out exactly how you would like them to.
Good Luck, and keep taking pictures!
Passy
References and Further Reading
http://www.digital-photo-secrets.com/tip/136/iso-explained/
http://digital-photography-school.com/iso-settings/
http://photographylife.com/what-is-iso-in-photography
http://www.digitaltrends.com/photography/what-is-iso-camera-settings-explained/
http://www.facethelight.com/iso.php
http://www.steves-digicams.com/knowledge-center/iso-explained.html#b
http://digital-photography-school.com/iso-settings/
http://www.digital-photo-secrets.com/tip/136/iso-explained/#sthash.XYWWXhv6.dpuf
http://www.facethelight.com/iso.php
http://www.adorama.com/alc/0012810/article/15-Low-Light-High-ISO-All-Stars
Subscribe
If you enjoy visiting Photos By Passy, why not get a free subscription to the website.
You can then receive notifications of new items and updates directly to your email address.
Go to the subscribe area on the left hand sidebar, (or down the bottom of the page if using a mobile phone), fill in your email address and then click the “Subscribe” button.
Enjoy,
Passy