Tag Archives: camera mathematics

How To Do Shutter Speed

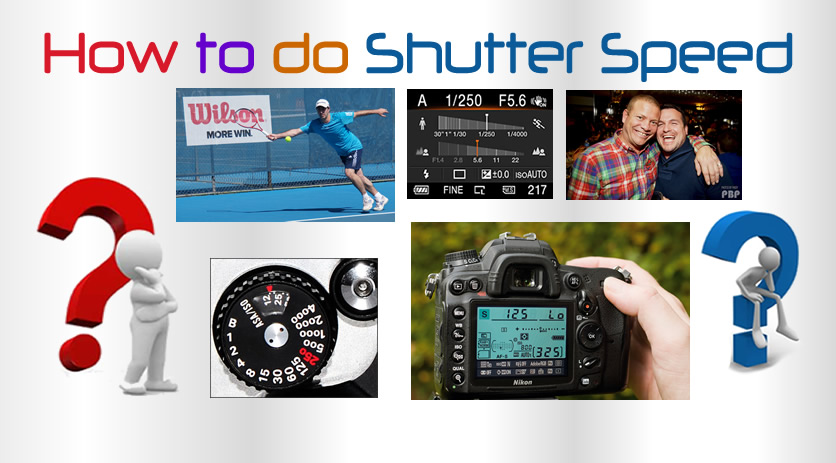
Shutter Speed is one of the three key variables in Digital Photography. The other two are ISO Light Sensitivity and Aperture Light Levels.

We suggest that before going through this article on Shutter Speed, you go through our previous articles on Camera Settings, ISO and Aperture.

These lessons can be found at the following links:

How To Do Camera Settings

How To Do ISO Settings

How To Do Aperture Settings


Shutter Speed is mainly used for creating dramatic effects by either freezing action or blurring motion.

It is a good idea to read our previous articles listed above about Camera Settings before working through this Shutter Speed Article.


Understanding Shutter Speed is critically important to isolate items and have them crisply in focus without any motion blur occurring.

In normal conditions, such as outdoors in bright daylight, shutter speed is usually not a problem. We can simply set our camera to Auto Mode and its processor will calculate and use a shutter speed which gives good results.

However, in various other situations, we need to be critically aware of what needs to happen with Shutter Speed and how it affects our photos.

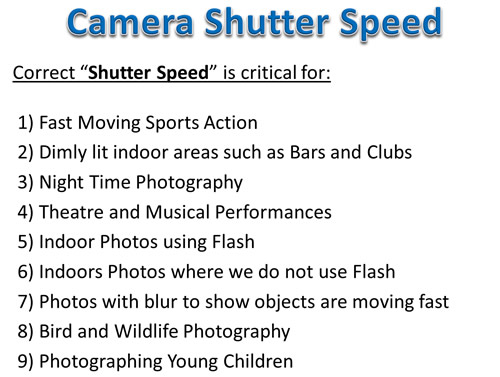
Shutter Speed, (also called “Exposure Time”), becomes critically important in situations outside of the norm, such as the following:

1) Fast Moving Sports Action

2) Dimly lit indoor areas such as Bars and Clubs

3) Night Time Photography

4) Theatre and Musical Performances

5) Indoor Photos using Flash

6) Indoors Photos where we do not use Flash

7) Photos where we want motion blur for fast moving objects

8) Bird and Wildlife Photography

9) Photographing Young Children

In this article we will show you what Shutter Speed is, what the speed numbers mean, and how to set shutter speeds to values which should produce great photos.

The article is a very long one, and so we recommend going through it several times, as well as watching the videos at the end of the article.


Definition of Shutter Speed

Every digital camera has a shutter which opens and closes quickly to let light through the lens to the image sensor. Think of the shutter as like being in a dark room during the daytime, and opening and closing a set of venetian blinds quickly to let a burst of light into the room.

Basically a camera shutter is like a curtain in front of the camera sensor that stays closed until the camera fires and goes “click click”.

When the camera fires, the shutter opens and fully exposes the camera sensor to the light that passes in through the lens.

After the sensor is done collecting the light, the shutter closes immediately, stopping any more light from hitting the sensor.

The button that fires the camera is called the “shutter” or “shutter button”, because it triggers the shutter to Open and Close.

Photos by Passy Shutter Speed 02

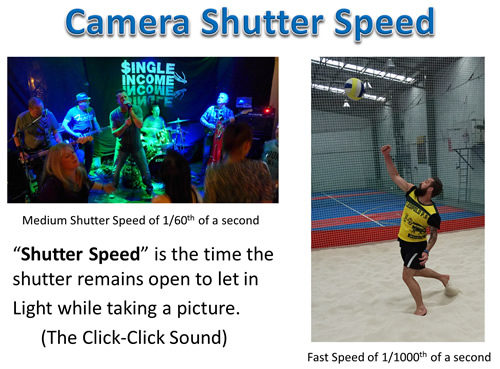
The speed at which the shutter opens and closes is usually a fraction of a second, such as 1/8, 1/15, 1/30, 1/60, 1/125, 1/250, 1/500, 1/1000, 1/2000.

The bigger the number in the bottom of the Fraction, the faster the shutter opens and closes.

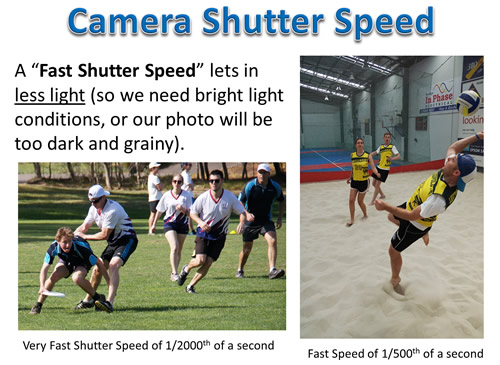
A “Fast Shutter Speed” is needed for Sports to freeze the action. But a fast speed lets in less light, and so we need good lighting conditions.

Photos by Passy Shutter Speed 03

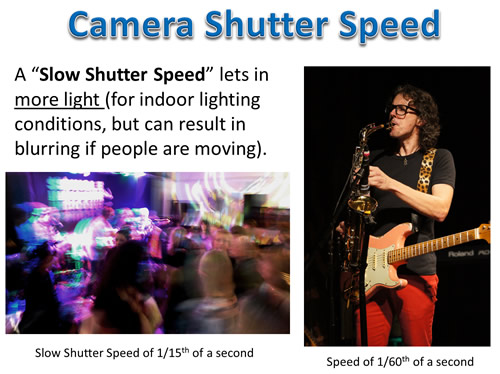
A “Slow Shutter Speed” lets in more light (for indoor lighting conditions).

However this can result in blurring if people are moving.

Usually we cannot shoot at speeds lower than 1/60, because we will get camera shake as well as blurring of our photos.

Photos by Passy Shutter Speed 04

Shutter Speed is not usually a problem if we are in bright sunlight, but for other situations speed is critically important.

Photos by Passy Shutter Speed 06


Standard Shutter Speeds

“Shutter Speed” is measured in seconds or fractions of seconds:

1, 1/2, 1/4, 1/8, 1/15, 1/30, 1/60, 1/125, 1/250, 1/500, 1/1000, 1/2000, 1/5000

Note that the bottoms of the fractions always double, except for the jumps between 1/8 and 1/15, and 1/60 and 1/125.

The jumping of 1/60 to 1/125, instead of 1/60 to 1/120, is deliberately designed that way so that the doubling pattern is simpler for the 1/125, 1/250, 1/500 end of the Range.

There is also the out of sequence jump between 1/8 and 1/15 for the same reason.

Photos by Passy Shutter Speed 05

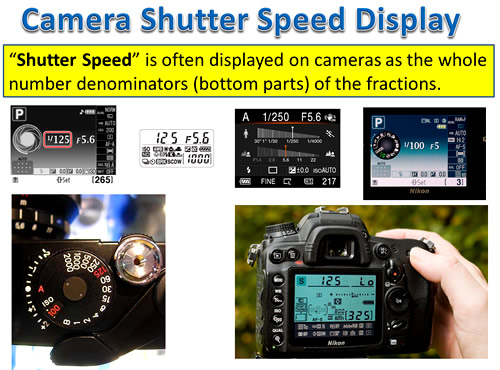
Note that the Speed is usually displayed as whole numbers on cameras, due to LCD and Viewfinder sizes.

Eg. 1, 2, 4, 8, 16, 30, 60, 125, 250, 500, 1000, 2000, 5000.

Photos by Passy Shutter Speed 07


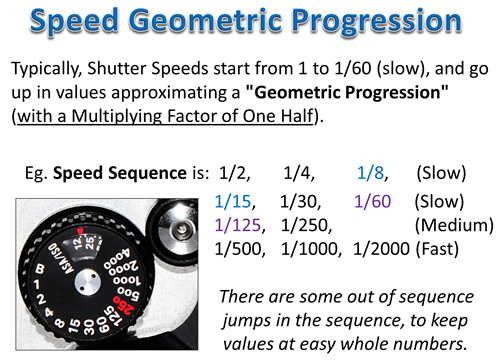
Shutter Speed Geometric Progression

Typically, Shutter Speeds start from 1 to 1/60 (slow), and go up in in value following a “Geometric Progression” (with a Multiplying Factor of One Half).

Eg. Speed Sequence is: 1, 1/2, 1/4, 1/8, then 1/15, 1/30, 1/60, then 1/125, 1/250, 1/500 etc.

As discussed previously, there are deliberate jumps in the sequence, (which do not follow a multiplying factor of 1/2).

These jumps are at 1/8 to 1/15, and 1/60 to 1/125, which keeps the shutter speed fractions at simple whole numbers.

So this means that the entire Sequence actually consists of three separate Geometric Progressions, with a Multiplying Factor of 1/2 in each of them.

Photos by Passy Shutter Speed 08

The important consequence that photographers need to understand, is that each step between the numbers effectively halves the amount of light reaching the sensor.

Eg. If we give the shutter an open/close time which is twice as fast, we only let half as much light in.

Photos by Passy Shutter Speed 09

Many modern Digital SLR cameras also have in between Shutter Speeds which can be dialled up and used.

For example in between 1/60 and 1/125, there might be speeds of 1/80, or 1/100, which are also available.

These in between values allow finer increments of speed increase and consequent light reduction.


Shutter Speed Guide

Photos by Passy Shutter Speed 10

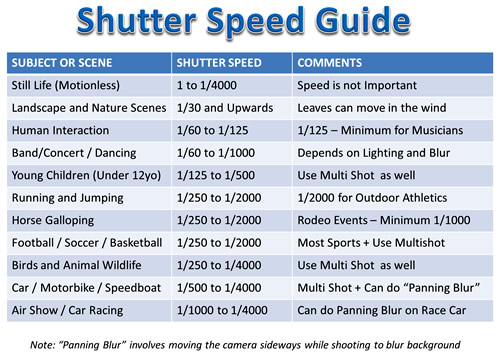
“Panning Blur” involves tracking the moving subject with the camera using multishot mode.

This creates motion blur in the background to give the viewer a sense of the speed.

Eg. For Panning Blur on a Runner in the Park, use speeds of 1/30, 1/60, or 1/100 so that the subject is captured, but the background is blurred.

The following video shows an example of how to do “Panning Blur”.


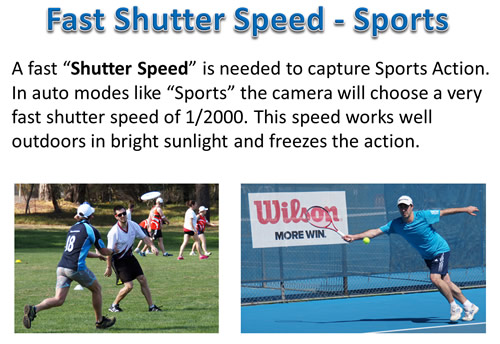
Fast Shutter Speeds for Sports

Capturing the action in Sports can be a trade off between freezing the action, and having enough light coming in through the shutter to get a good clear picture.

Outdoors in bright sunlight we are usually okay, and if we set our camera to “Sports” Mode, it will use a very fast speed like 1/2000 and get good clear shots.

Photos by Passy Shutter Speed 11

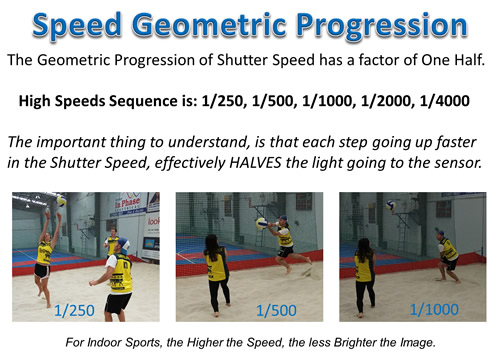
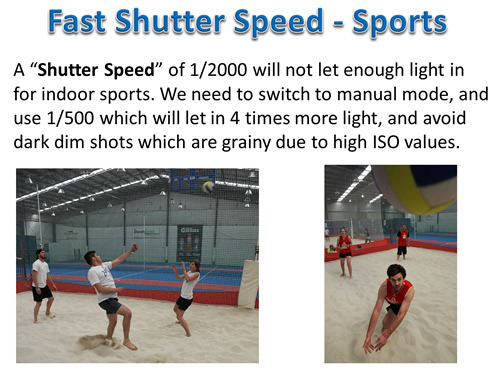
However for Indoor Sports, even if the stadium appears to have good lighting, a Shutter Speed of 1/2000 will make our shots come out too dark.

We need to remember that our human eyes adjust extremely well to reduced lighting conditions, but cameras do not!

If in “Sports” or “Auto” mode, we take an indoor shot, and it comes out too dark, then we will not be able to use our camera in automatic mode.

In these situations we can do some basic mathematics and figure out that 1/2000 + 1/2000 = 2/2000 = 1/1000.

This means that if we reduce shutter speed from 1/2000 down to 1/1000 we will get twice as much light onto the camera’s sensor.

If we change 1/2000 to 1/500 we will get four times more light, and reducing 1/2000 down to 1/250 will give us 8 times more light.

We will need to put our camera into either “Manual” mode “M”, or “Shutter Priority” mode “S” to be able to make these changes.

Photos by Passy Shutter Speed 12

The trade off will be that we might not freeze the action perfectly, but sometimes a slightly blurred ball can help show some fast movement in the photo, and so it is actually a good thing.


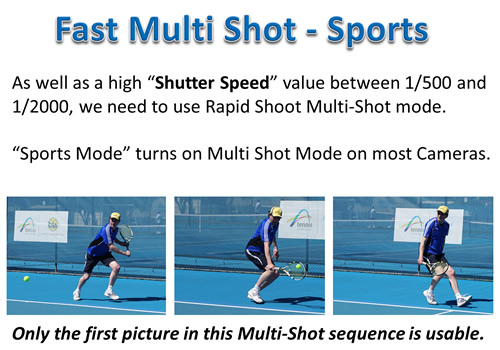
Using Multi Shot for Sports

For fast moving ball sports, especially tennis, a lot of shots will be unusable because the ball moves so fast it is often out of frame by the time the camera fires.

The solution to this issue is to make sure “Multi Shot” or “Rapid Fire” is turned on, so that several photos are quickly taken in a row, while the camera makes a machine gun type sound.

We can then pick the best photo from the multi shot sequence and use that one in our photo album.

Most cameras have a rapid shoot preset mode that can be dialled in, and/or they have “Sports” as one of their Scene Modes, and “Sports” mode will automatically turn multi shot on.

Photos by Passy Shutter Speed 13

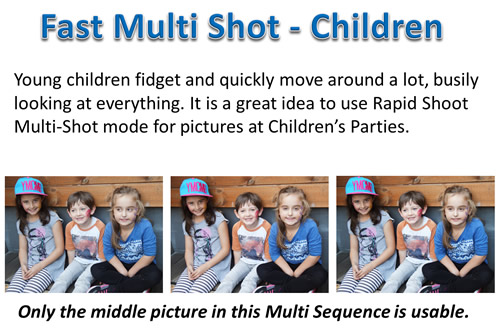
Multi Shot mode is also very useful to use at young Children’s Parties.

Kids move around a lot and are very easily distracted. It often takes several shots to get one where they are all sitting still and looking at the camera.

Photos by Passy Shutter Speed 14


Shutter Speeds for Flash Photography

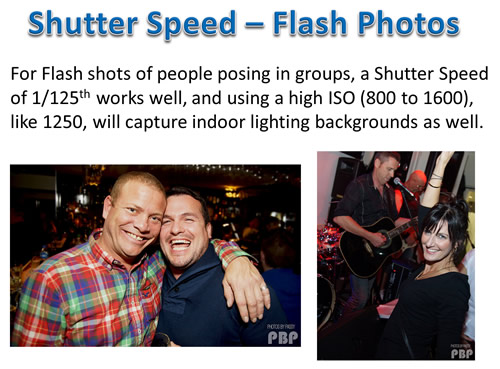
Photos of People need to be done at a shutter speed of 1/125 to 1/250 to ensure that all movement is frozen.

If we are indoors and we want to capture the indoor lighting background, (like at a Club or a Bar), then using 1/125 combined a High ISO of 800 to 1600 will usually do a good job of this.

Photos by Passy Shutter Speed 15

The reason that it works, and the photo does not come out too bright, is because when we use Flash the camera basically takes two pictures and merges them.

Eg. The Flash freezes subjects that were initially dark.

The following two part video explains this concept, as well as setting Shutter Speed for Night Club Photos.

Here is the second part of the above video:


Very Slow Shutter Speeds

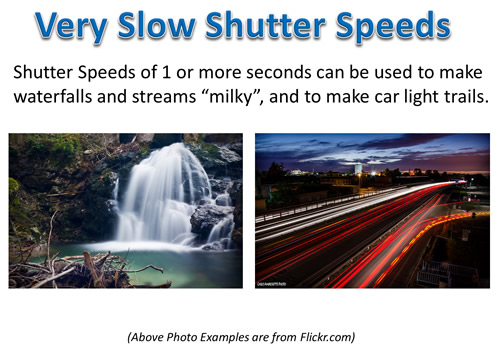
Some cameras also give you the option for very slow shutter speeds that are not fractions of seconds but are measured in full seconds.

Eg. 1 second, 10 seconds, 30 seconds etc.

These are usually used in very low light situations, and/or night time, to produce special effects, or for capturing a lot of movement in a shot.

In daylight, slow shutter speeds can be used to make seawater, rivers or waterfalls appear “milky” with blurred water, and many people find this effect visually pleasing.

However we also use to use an “ND Filter” over our lens to reduce the bright daylight coming in over such a long exposure time, so that the photos do not turn out way too bright.

Slow Shutter Speeds are also used to create an effect called “motion blur”, where moving objects appear blurred along the direction of the motion.

This effect is used quite a bit in advertisements for cars and motorcycles, where a sense of speed and motion is communicated to the viewer by intentionally blurring the moving wheels.

Slow Speeds also create interesting car light trails in night time city photos.

Photos by Passy Shutter Speed 16

Some cameras also give you the option to shoot in ‘B’ (or ‘Bulb’) mode. Bulb mode lets you keep the shutter open for as long as you hold it down.

Bulb Mode can be used for getting photos of the Stars Moving Across the Night Sky.

The following video shows how to shoot car light motion at night.


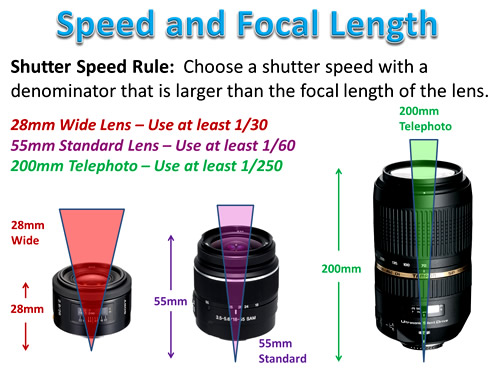
Shutter Speed and Lens Size

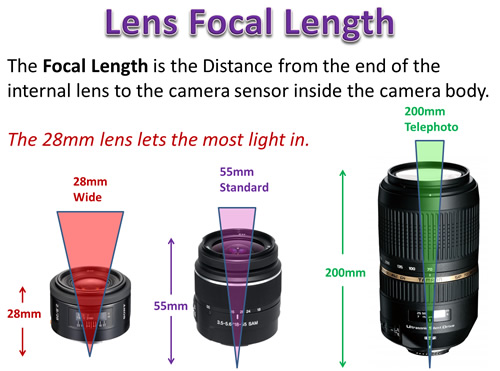
Different Lenses are different sizes, and have various “Focal Lengths”, where Focal Length is basically the distance from the end of the lens to the sensor inside the camera body.

Photos by Passy Shutter Speed 17

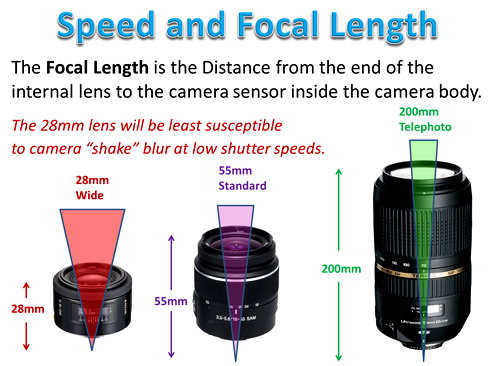
Longer focal lengths, (like when you zoom right to 200mm for a shot), have a reduced subject area, and are far more sensitive to camera shake.

If you have ever used Binoculars or a Telescope, you will know how hard it is to keep it steady when you have zoomed right in on a person or object.

To overcome the shake, we need to choose a faster shutter speed (unless we have very good image stabilization built into the lens, or our camera is mounted on a Tripod).

The ‘rule’ of thumb to use with focal length is to choose a shutter speed with a denominator that is larger than the focal length of the lens.

For example if we have a standard 50mmm or 55mm lens then 1/60th is probably ok. But if we have zoomed right in with a 200mm lens, we need to shoot at around 1/250 to be safe from shake blurring.

Photos by Passy Shutter Speed 18


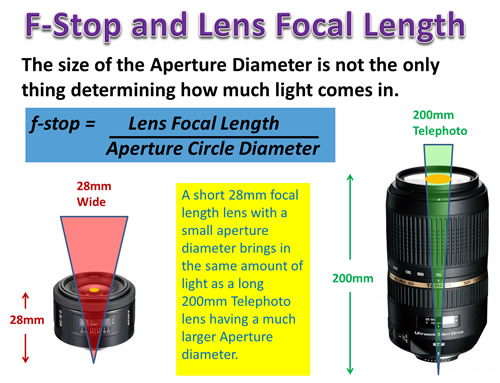
Shutter Speed and Lens Aperture

A Faster Shutter Speed will let us freeze the action, but will let less light into the camera.

In bright daylight sports this will probably not be a problem as there is plenty of bright light available.

For sunny outdoors, we can capture action sports using a cheap f3.5 to f5.6 Zoom Lens.

However for indoor sports, with less light, using a high / fast shutter speed to freeze the action can result in very dark pictures.

This is because we do not have enough light entering the camera when the shutter speed is higher than 1/250.

Increasing the ISO Light Sensitivity to lighten up the photo, will probably result in ugly dotty grainy effects on our photos.

The only solution is to get more light in using a wider aperture, and for this we need an expensive f2.8 lens.

Photos by Passy Shutter Speed 19

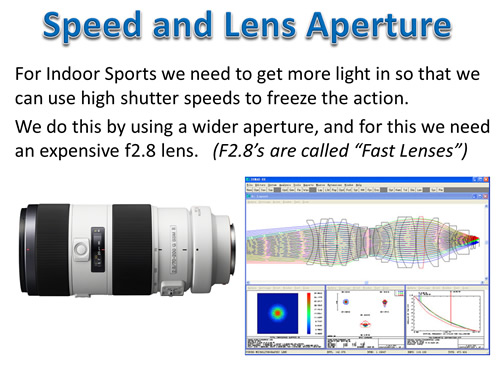
This is why f2.8 zoom lenses, and f1.4 portrait lenses are called “Fast” Lenses.

It is because these lenses can supply enough light using their wide open apertures to allow us to use a high shutter speed of 1/500 to 1/1000.

f2.8 Fast Zoom lenses are very expensive: eg. $2500 to $15 000 to even $45 000.

These lenses can be used for both Indoor Sports and Outdoor sports and are usually White in Color, and can look like “Bazooka Guns” mounted on cameras.

The other great thing about expensive f2.8 zoom lenses is that they are great for shooting high quality clear videos indoors.


Shutter Speed ISO and Aperture

To get a great Photo, we need to manipulate the three key camera variables of Shutter Speed, ISO, and Aperture to values which are optimal for the given set of lighting conditions, and the speed at which subjects are moving.

Photography in bright sunlight conditions is not a problem, because there is an abundance of natural light to make great photos.

But Photography indoors without flash is always a trade off between these three variables.

The simultaneous manipulation of Speed, ISO, and Aperture is quite involved and is the subject of an entirely separate photography article at the following link:

How to Combine Exposure Settings


Videos About Shutter Speed

Here are some videos that cover everything we have discussed in this article and are well worth watching.

The following three minute video gives a basic explanation about Shutter Speed


This next eleven minute video fully explains shutter speed, and is well worth watching


Sony Video About Shutter Speed

Here is an excellent video all about Setting Shutter Speed on Sony Alpha Cameras.


References

Digital Photograpy School Shutter Speed Article

Photography Life Shutter Speed Article


Related Items

How To Do Camera Settings

How To Do ISO Settings

How To Do Aperture Settings


Subscribe

If you enjoy visiting Photos By Passy, why not get a free subscription to the website.

You can then receive notifications of new items and updates directly to your email address.

Go to the subscribe area on the left hand sidebar, (or down the bottom of the page if using a mobile phone), fill in your email address and then click the “Subscribe” button.

Enjoy,
Passy

How To Do Aperture

Aperture is one of the key variables in Digital Photography. The other two are ISO Light Sensitivity and Shutter Speed.

It is a good idea to read our previous article on “How To Do Camera Settings” before working through this Aperture Article.

You can access this article at the following link:

How To Do Camera Settings


An understanding of Aperture is critically important to isolate subjects in portraits and get full detail in Landscape pictures.

The Aperture Scale consists of a seemingly odd set of decimal and whole numbers, and getting your head around these values is not at all easy for Beginner Photographers.

In this article we examine Aperture in detail, and mathematically explain where the Aperture “f-numbers” come from. The mathematics might be challenging for some people, but do not worry too much about the detail if it is challenging for you.

The main thing we need to understand as Photographers is how the “f-stop” number values relate to the amount of light made available for our image, and how the background can be deliberately blurred using Aperture settings.


Definition of Aperture

Camera Aperture basically imitates the function of the human eye.

In dark conditions we require more light entering our eyes and camera, but in bright light we need far less light.

Our eyes adjust to these conditions using our “pupils”, (the central dark circles inside our eyes).

Photos by Passy Aperture in Photography 02

A camera mimics the action of our pupils using a setup that creates various size circles; and we call this camera function “Aperture”.

Photos by Passy Aperture in Photography 03


Using Camera Aperture Values

We go to detail about this later in this article, but just as a starter, here are a couple of examples where we use different sized Apertures, which mimic the function of the human eye.

Photos by Passy Aperture in Photography 04


Lens Aperture Values

The Aperture function is performed in the Lens of the camera, and not in the Digital Camera Body. (The “Lens” is the cylindrical barrel on the front of the camera, and the “Body” is the back part of the camera with all the buttons and dials on it.

Each lens we mount onto a DSLR camera has its own Aperture System, and as we will see later on, different sized lenses need to have their own particular Aperture systems.

Lens Apertures are specified using f Numbers which are called “f-stops”.

These numbers make little sense at all when we first look at them, as they are what seems to be some weird random collection of decimal and whole number values.

Photos by Passy Aperture in Photography 05

A first look at these strange f-numbers reveals that there are doubling patterns in the list of numbers from f1.4 to f22.

Another very confusing aspect of these f-numbers is that as they go up in value, the size of the circular Aperture openings actually goes down in value, and the cicular “Aperture” openings become progressively smaller.

In fact each circle becomes exactly half the size of the one before it.

This is indeed very confusing, as the smallest number 1.4 represents a large fully open camera lens letting in lots of light, but the largest number at f22 represents a tiny cicular opening in the lens which is not letting much light in.


Mathematical Patterns

The standard f-numbers are: 1.4, 2, 2.8, 4, 5.6, 8, 11, 16, 22 .

We can always form the next number in the pattern by multiplying by 1.4, which is the square root of 2 as a rounded off decimal value.

1.4 x 1.4 = 1.96 = 2

2 x 1.4 = 2.8

2.8 x 1.4 = 3.92 = 4

4 x 1.4 = 5.6

5.6 x 1.4 = 7.84 = 8

and so on.

In the f-numbers we have a sequence of numbers, where we always multiply by a common value of 1.4 to generate the next number.

In mathematics this is called a “Geometric Sequence” or a “Geometric Progression”

The common multiplying value, in this case 1.4, is called the “Geometric Ratio”.

The 1.4 (Square Root of 2) value results because we are dealing with Circles when we are doing Apertures.

Photos by Passy Aperture in Photography 06


If we want to make a Circle twice as big, it turns out that we need to increase its Radius by a factor of Square Root of 2, which in decimal is 1.4.

Photos by Passy Aperture in Photography 07

So if you are wondering where the 1.4 multiplying factor comes from, it is all due to the way the area of circles is doubled.

The f-numbers sequence is set up so that in real terms the amount of light due to the circular opening halves as we move up through the f-numbers.

Photos by Passy Aperture in Photography 08


F-Stop Formula

We are nearly through the Mathematics of Aperture.

As a Photographer you do not need to memorise all this mathematics, you simply need to understand the consequences in relation to light entering your camera.

There is a Mathematical Formula for f-stop which relates the 1.4,2,2.8,4,5.6, etc values to the actual Aperture Circle Diameter, and the size of the Lens you are using.

Photos by Passy Aperture in Photography 09

Aperture is not just related to how wide we make our circular opening, (the “Diameter”), but it is also related to the size of the Lens we are using which is specified as the Lens “Focal Length”.

We will confine our discussion to fixed size lenses, called “Prime Lenses”, and talk about “Zoom” lenses later on.

A 28mm Lens is a short lens, which gives a very wide angle of viewing.

A 50mm or 55mm lens is a standard size which is supposed to be a lot like the angle of viewing, or field of vision that is in focus when we are looking at something with human eyes.

A 200mm lens is a “Telephoto” type lens which will make distant objects look a lot closer, just like a set of Binoculars would.

The 28mm lens with its wide view lets in the most light, and the 200mm long lens lets in the least light.

Photos by Passy Aperture in Photography 10

Thinks of it like being at the Beach.

If you were at the beach looking at the whole scene there would be lots of light from the sun, and its reflection on the water. This is what a 28mm lens gives you, a nice wide picture where you can see everything, and there is plenty of light.

If you were just looking at some children building a sand castle, then this is the type of view from a 50mm lens.

If you were using a 200mm lens to look at some guys fishing in a boat off the shore, then this is a zoomed in type situation, and you only get the light from the boat and people, and not lots of light like when you are looking at the whole beach scene.

This is the reason why we need to take “Focal Length” or lens size into account. To get the same f-stop amount of light, we actually need different sized circular openings on different sized lenses.

Photos by Passy Aperture in Photography 11

In the example shown below, the two lenses are set to the exact same f-stop, so that the exact same amount of light can reach the interanl camera sensor.

However, to get the exact same amount of light into the camera body, we need to use a much larger physical Aperture opening on the long 200mm lens.


Video About Aperture

By now you might be totally overwhelmed by all of this Mathematics, but do not worry about it, because the main thing you need to understand is that Aperture changes the circular lens opening to let in more light or less light.

If we adjust our current F-Number UP to the next F-Number we HALVE the light.

If we adjust our F-Number DOWN to the previous F-Number we DOUBLE the light.

We need to adjust the light to get a picture that is not overly bright and washed out, and not overly dim and too dark to see its contents.

The following 15 minute video explains what we have covered so far.


Some Final Mathematics

Here is one last set of Mathematical calculations to show how Aperture works for different sized lenses.

We will work backwards to find the actual mm diameters of the circlular openings we would need in two different lenses to get the same amount of light which would mean we had the same f-number or “f-stop” set on each of the lenses.

To find the Diameters required, we rearrange our previous f-stop formula as follows:

Photos by Passy Aperture in Photography 12


Once we have the diameter required, we can halve it to get the circle radius and then calculate the actual Area of the circular opening we would need in the lens to create given f-stop amounts of light.

These calculations are shown below:

Photos by Passy Aperture in Photography 13

The above calculations were obtained from an excellent article on Camera Mathematics from Mr Martin which can be viewed in full at the following link:

Mr Martin Mathematics of Photography Article


By examinng the results of the above calculations we can see the following patterns and results:

Photos by Passy Aperture in Photography 14


One Third F-Stops

Finally just to add another layer of complexity to everything, if you check the Aperture f-number values on your actual camera, it is likely that there will be more than just the standard values we have been discussing:

1.4, 2, 2.8, 4, 5.6, 8, 11, 16, 22

Your camera (thanks to the wonders of modern technology) will have the standard values, plus a whole lot of extra in between values.

These values allow you to change your Aperture light up or down by 1/3. This way you can open the Aperture up to 1 and 1/3, then to 1 and 2/3, and then up to Double the amount of light.

Your camera will possibly have this full set of one third f-stops, resulting in a sequence like this:

1.4, 1.6, 1.8, 2, 2.2, 2.5, 2.8, 3.2, 3.5, 4, 4.5, 5.0, 5.6, 6.3, 7.1, 8, 9, 10, 11, 13, 14, 16, 18, 20, 22

Photos by Passy Aperture in Photography 15


Photos by Passy Aperture in Photography 16


Aperture Blades

Anyone who has ever tried to draw a perfect circle freehand knows exactly how hard it is to do.

It is also very difficult to mechanically make circles of different sizes, and often the Aperture openings are not actually circular, but might be Pentagons, octagons, or other multisided geometries.

The lens uses a series of adjustable “Aperture Blades” to make the best circles it can.

Photos by Passy Aperture in Photography 17

Basicially the more you pay, the more blades in the system, and the better the circles will be.

Two lenses sitting side by side might have drastically different prices, because one of them has a many blades quality system inside it.

If you have a cheap lens with not many blades, blurred lights in the background will not be round, and you may also get some slightly dark tinges in the four corners of your photos.


Aperture and Zoom Lenses

Most people have an adjustable zoom lens on their camera, which can do wide angle shots, through to zoomed in telephoto pictures.

As we saw previously, the field of vision narrows as we increase lens focal length, and so it is tricky for the Aperture system to continually adjust to different focal lengths as you zoom in and out.

Photos by Passy Aperture in Photography 18

This is why there are cheap and very expensive zoom lenses.

A Cheap Zoom Lens for $300 might only allow Apertures from f4 to f8 and the picture will darken as you zoom in.

An expensive f2.8 Zoom for $1500 to $15000 will allow you to use all Apertures no matter how far you are zoomed in or out.

Those giant white “bazooka” looking lenses you see at sports events can cost anywhere from $5000 to $25000 !


Aperture and Blurring

Well that is all the Mathematics and Technical stuff done with, and now we can talk about actually taking some photos!

A really nice side effect of using wide open Apertures is that we end up with our subject at the front of the picture crisply in focus, and the background we are not interested in all blurred out for us.

Photos by Passy Aperture in Photography 19

However, if we want to see our whole photo in clear focus, like on a landscape shot, we need to do the opposite and set a very narrow (high f-number) Aperture.

Photos by Passy Aperture in Photography 20


Group Shots and Blurring

However, with taking “Group Shots” of people we run into a problem.

If we use f1.4, or f2, or f2.8 to get nice background blurring, we will find that people in the back row of the group will be blurred out of focus.

To get the whole group in focus we typically need to use an Aperture of f4 or f5.6, which will make sure everybody in the group is in focus.

However, the background we are not interested in will also be in focus and clearly visible.

The way aorund this problem is to use Blurring Tools in Photoshop, as has been done below.

Photos by Passy Aperture in Photography 21


Aperture and Sunsets

Sunset Photos can also be interesting for setting up the Aperture correctly.

We might use a really narrow Aperture like for a landscape, and our image will be too dark; or we might use a wide open Aperture and have our photos turn out too bright and look like daylight.

The best Aperture to use is between f8 and f11, as shown below in these great photos taken by our friend Nicole Cooper.

Photos by Passy Aperture in Photography 22

The following page has thirty great tips for taking good sunset photos:

30 Tips for Taking Sunset Photos


Video About Aperture and People Shots

Finally here is a two part video totalling around 25 minutes all about how to set your Aperture when doing Night Club Photography, or really any Photos at Events like Birthdays, Baptisms, Parties, and so on.

Here Part 2 of the above Video.


Sony Video About Aperture

Here is an excellent video all about Setting Aperture on Sony Alpha Cameras.


References

Click the following links for more articles on the web about Aperture.

Digital Camera Mathematics

Very Technical Maths Explanation of Aperture

Mathematics of Aperture

How Aperture Blades Work

Mathematical Explanation of F-Stops


Related Items

For more great articles about How to Do Digital Photography, see our “How To” page at the following link:

How To Articles by Photos By Passy


Subscribe

If you enjoy visiting Photos By Passy, why not get a free subscription to the website.

You can then receive notifications of new items and updates directly to your email address.

Go to the subscribe area on the left hand sidebar, (or down the bottom of the page if using a mobile phone), fill in your email address and then click the “Subscribe” button.

Enjoy,
Passy