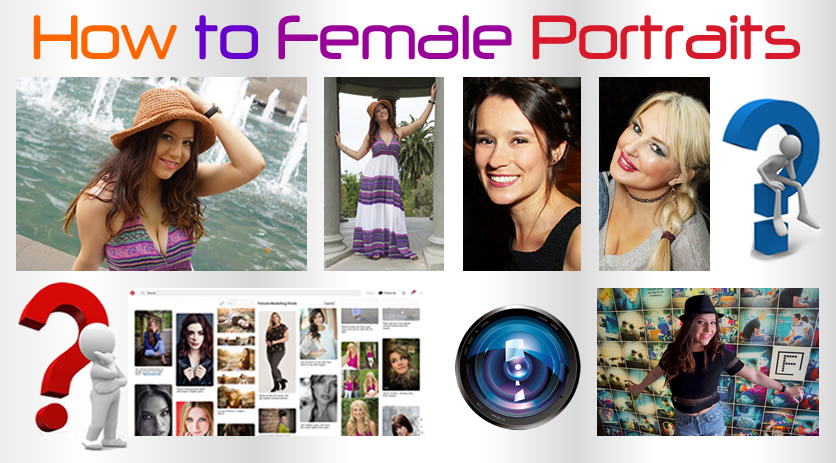
In this “How To” article we look at shooting individual portraits of females.
The lesson covers:
– Basic Rules For Female Portraits
– Example Female Modelling Poses
– Camera Equipment and Lighting
The article is mostly about poses and techniques for getting the best looking aesthetically pleasing images. It is more about the posing and modeling side of things rather than the technical equipment and lighting that can be used.
This article will focus on female portraits (as the web has boundless information on this). As such it should be useful to anyone taking photos of people.
It is a long and comprehensive “How To” article, so take your time going through all of the material.
At a future point in time we plan on writing separate How To articles about Male Portraits, Couples Portraits, Group Portraits, and Street Photography portraits.
Introduction
There are certain poses that work better than others, and it is important to fully understand this.
Often we are shooting people on the street, or at functions and events, and so we need to be able to “direct them” into certain poses that are going to make them look their best. We need to know how to make a person look like a photographic model.
The ideas we present here are what we have found makes for a good portrait shot from researching the web and doing our own photography. For example we are not a fan of sulky and angry looking poses and always think that a smile looks best for a portrait. Therefore our article and examples will be biased towards smiling shots.
Many people have taken lots of “selfies” on their phone and have an idea of what good poses look like. Our challenge as a portrait photographer is to get them to try something different that also makes for a great photo. We want them to be very pleasantly surprised by the portrait we have made of them.
It is the Photographer’s responsibility to direct the subjects into good poses, and the subjects are expecting the Photographer to do this. The Photographer’s role is to confidently take charge and “Direct the Shoot”.
There is nothing more awkward than a clueless model and a quiet photographer. Hence shooting a subject requires a lot of continual talking, getting the subject to make slight re-posing moves, all done whilst continually shooting.
We need to make the subject feel good about themselves and what they are doing. This can be done by showing them image results on the camera screen throughout the shoot. Get feedback from them about which ones they like and which ones they dislike. Have them continually change posing positions slightly and take lots of pictures.
As advised by portrait photographer Clay Cook: During a Portrait Shoot you need to be confident in what you tell your subject and if one pose or technique does not work then simply move onto something else. Keep experimenting and keep talking. Connect with your subject and be patient, if you stop talking and connecting, you will never get that perfect pose.

(Portrait Photographer Clay Cook directing a shoot)
We hope that this “How To” article will give you the tools and techniques you need to become a confident maker of Portrait Pictures.
Basic Rules for Posing
There are a series of basic rules that we think greatly assist female portrait shots.
The basic “rules” we follow here at Photos By Passy when shooting individual portraits are the following:
1) Shoot From Above
2) Chin Down
3) Tortoise Chin
4) Eyes in Focus
5) The Two Thirds Turn
6) Mouth Open / Lips Apart
7) Placing The Hands
8) Using Props
9) Sit and Lean In
10) Slimming Poses
11) Using Trees Walls and Doors
12) Sideways Looks
13) Position The Hair
14) Use The Favoured Side
15) Gaps Between the Arms
16) Cross the Legs
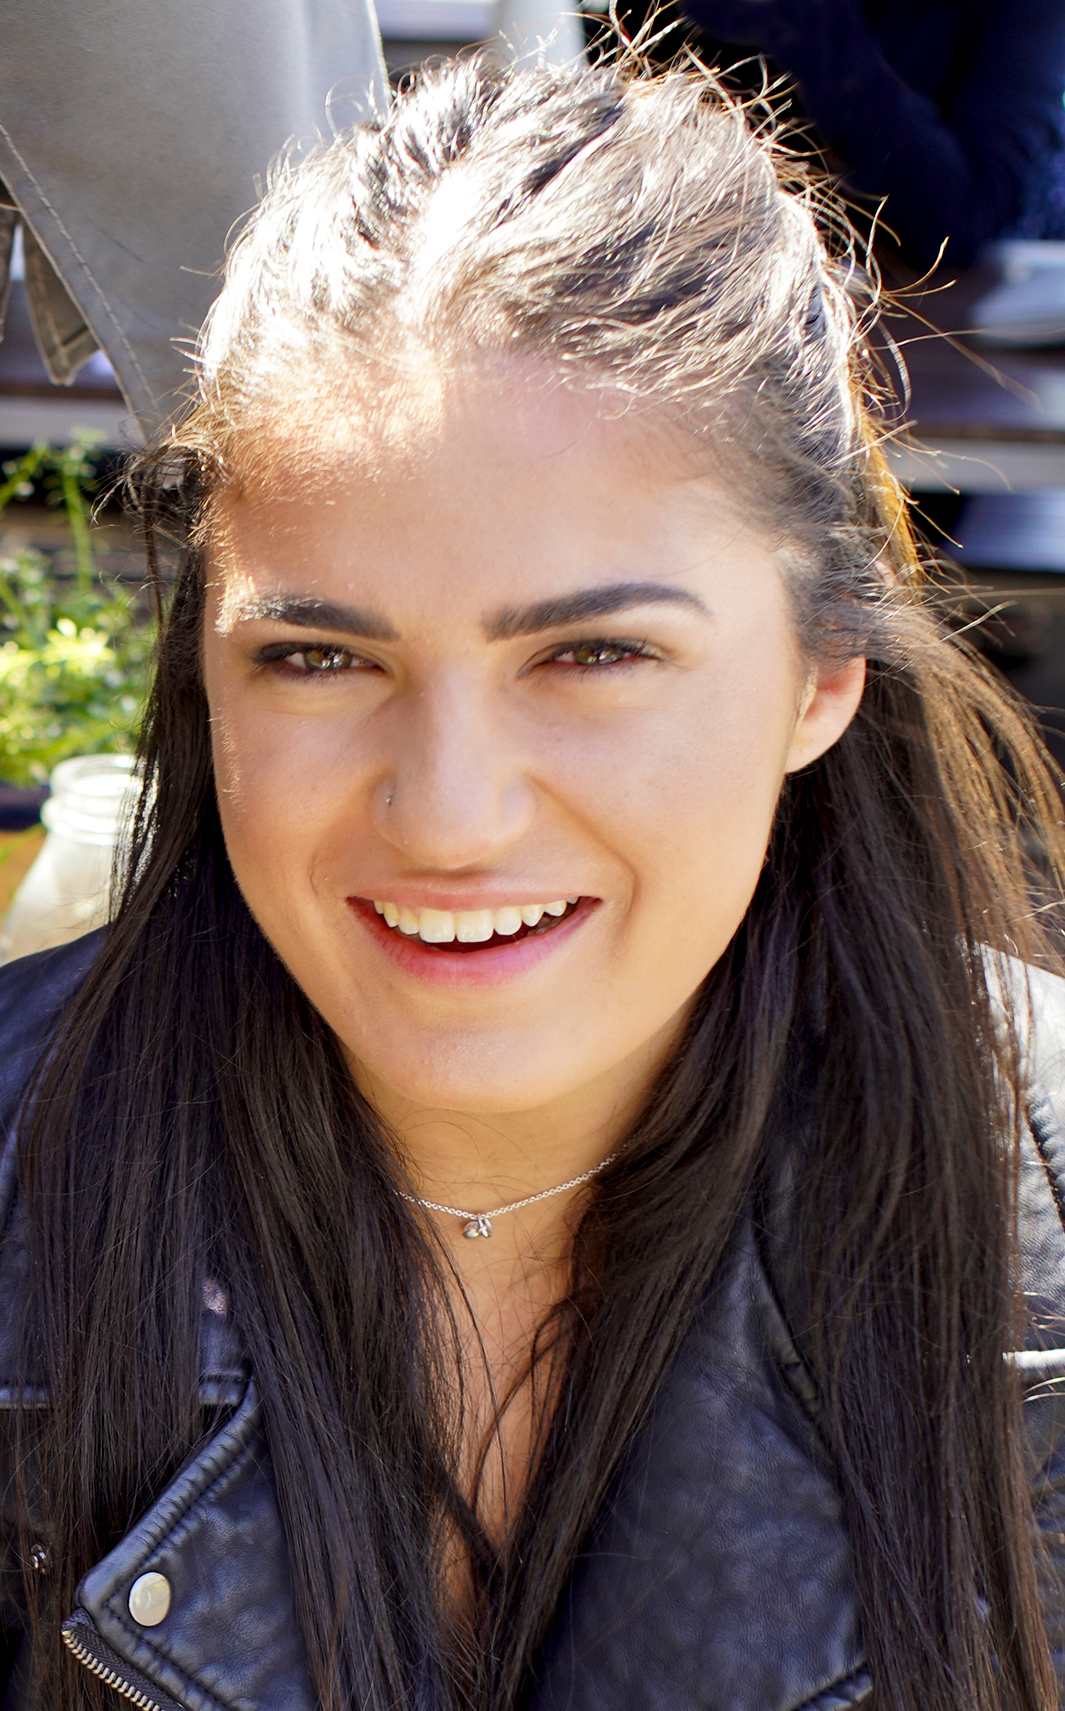
17) Getting a Natural Smile
18) Maintaining Good Posture
Many of these rules are equally applicable to group shots. The primary aim is to get people looking their best by having strong jaw lines, feminine curves, and looking healthy.
If you are more of a visual learner, then you may want to jump straight to our Pinterest Board of examples at the link below:
Female Portraits Pinterest Board
Let’s discuss each of our portrait making rules one by one with plenty of real life examples.
1) Shoot from Above
A strong jawline without multiple chins looks great, so always take the camera to a position higher than the person’s eyes. Never shoot at the subject with your lens below the level of their eyes. Basically we are using the same technique as used on phone selfies.
So the rule is to shoot above the subject’s eyes, looking down. This angle not only gives the jawline more definition, but also slims the body as it looks smaller when it is placed further from the camera. Curvier women look great in this pose.
2) Chin Down
This is a follow on from Rule 1 and is all about getting a strong jawline.
People often have a natural instinct to lean backwards in a photo. When they do this we can see up their nose, into their mouth, and their eyes are partially closed. It is not a good look.

We need to tell the subject to bring their chin down which will fix these problems and should also help open their eyes up. The eyes are the most important in a portrait.
Also try getting the subject to use their tongue.
It might feel strange, but pressing your tongue on the roof of your mouth while smiling is an effective way to help avoid the dreaded double chin, as it elongates your neck and your jawline.
However, it is important that if trying this method they do NOT press their tongue into the back of their front teeth. if this happens the tongue will show through the teeth and make their smile look awful.
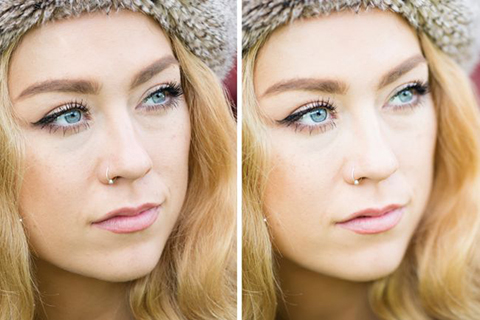
3) Tortoise Chin
This is another technique to get a strong jawline onto the subject, especially if we are facing them directly when shooting.
In their natural position everyone including skinny people will have some flab appear under their chin. Tortoise Chin Technique can remove this.
In this technique we tell the subject to bring their chin and ears forward and down, as if they were a tortoise poking its head out of its shell.
This should make their chin come out and down, resulting in a much more attractive jawline.
Here are some images from the “photography.tutsplus.com” portraits tutorial that shows how this works.

The above before and after effect was produced by telling the subject to bring their ears forward like a tortoise. Side on the Before and After looks like this:
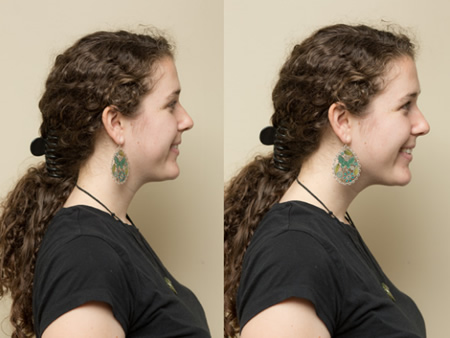
The Tortoise Technique works equally as well on males as on females.
When the subject pushes their chin forward and then down and is faced directly towards the camera, it will probably feel incredibly awkward and uncomfortable for the model.
However from the photographers perspective the jawline will become extended with stronger lines formed and be far more attractive.
Perhaps show the subject before and after shots of this technique so they can see for themselves what improvements this “torture / tortoise process” achieves.
A similar outcome to the Tortoise technique can also be obtained when the model leans forward towards the camera and we shoot from above.
(Click Image to View Full Size)
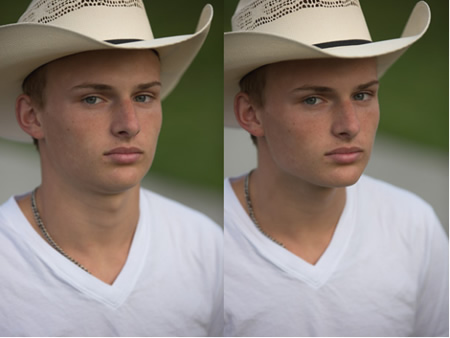
4) Eyes in Focus
It is critically important that both eyes are fully in focus.
If we shoot the model at an angle at a shallow with an open aperture of F1.4, 1.8, or 2.8, we can get the problem of one eye in focus and one eye out of focus. This can be seen in the following example taken from the web:
At PBP we find it is best to shoot our portraits at an aperture of F4.0 to F5.6 whenever we have the face turned at an angle.
This works well for eye focusing as shown in the following casual portrait taken at an Aperture of F4.0
(Click Image to View Full Size)
To get the eyes in focus, it is important to use a movable spot focus point if your camera has this, and place it over one eye of the subject. Or simply get one of the latest Sony Cameras with intelligent eye focus built into the camera.
5a) The Two Thirds Turn
Shooting straight on facing a person makes them look big, but having them turn away will give them a slimmer profile look in the camera.
Tell the subject to turn their right side away from the camera by about two thirds. Move their body but keep their face looking straight at the camera. They can do this by stepping their right foot back.
Another slight change of position which looks good for rotated looking over the shoulder shots, is to get the model to raise the shoulder closest to the camera slightly.
(Click Image to View Full Size)
Popping a shoulder up and forward can make a significant difference, because raising one shoulder higher than another adds dimension and strength to the image.
5b) Avoid Shooting Straight On
This is basically the same idea as the “Two Thirds Turn” Rule. Avoid shooting from directly in front of your subject facing straight on. A straight on orientation will make the subject look her widest.
Instead, ask the subject to turn her body 45 degrees (or about two thirds) and then raise the shoulder that is nearest to the camera.
When doing a full length portrait, try the following approach for the legs and hands.
Next have her bring one leg forward (leg closest to camera) and turn that foot slightly outwards, keeping the knee bent.
This closer to camera bent knee leg can alternatively be slightly crossed behind the back leg.
Ask her to roll her hip slightly up and to keep her weight on her straight leg.
All of these things help give the bulkier parts of the body a slimmer appearance.
Keeping the weight on the back leg furthest from the camera is a ground rule for full length portraits.
The hands can be placed to the side or to the front of the model as shown in the examples below.
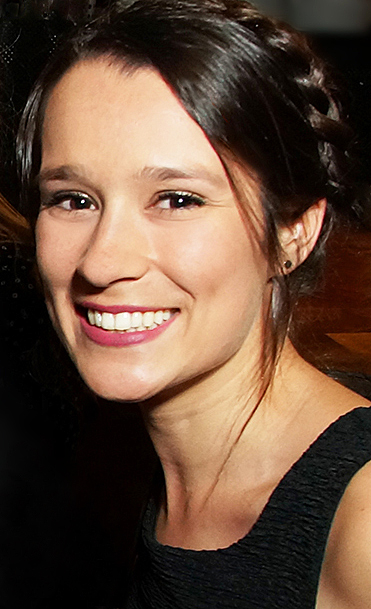
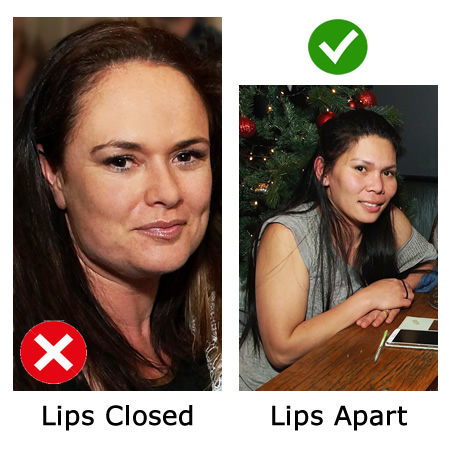
6) Mouth Open / Lips Apart
We are not quite sure exactly why this technique works, but basically a closed tight mouth is a body language sign of anger or disinterest, whereas a slightly open mouth often occurs when people show interest or agreement in something.
Having the mouth slightly open can set a completely different mood in the photograph. With the mouth closed, the jawline clenches and adds extra weight to the sides of their face. It can also give negative energy to an image, a bored neutral look.
With the mouth slightly open, the jawline is elongated and gives a subtle interesting and pleasant look to the portrait.
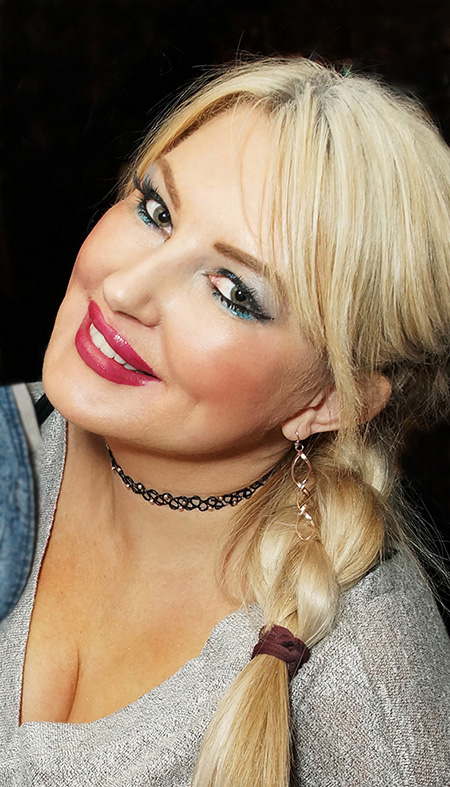
The lips just need to be slightly open, just enough to relieve the closed lips tense look.
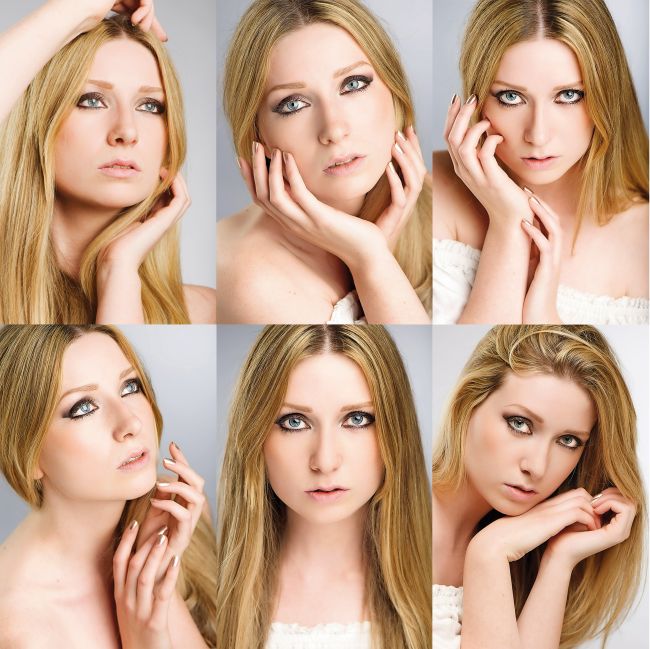
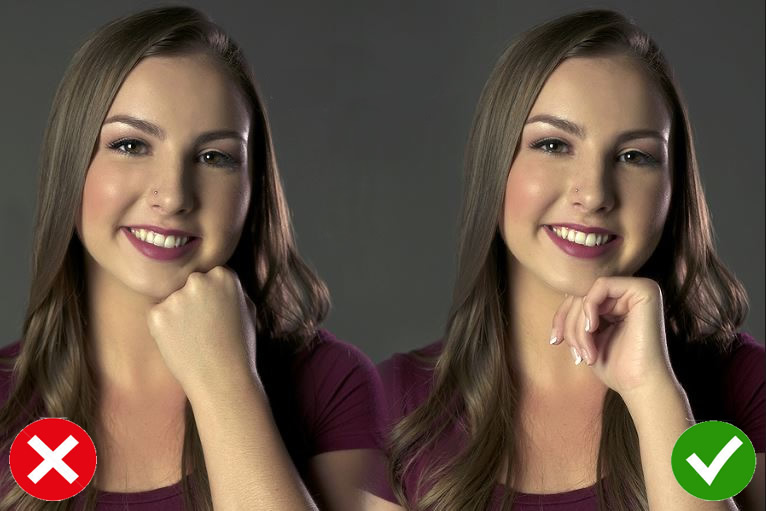
7) Placing The Hands
Photographer and Educator Sue Bryce uses the term “Ballet Hands”. Hands are one of the more challenging aspects of posing and can make or break an image if the hands are displayed incorrectly. Sue’s advice is that the subject should relax their hands as if they were in a ballet, spreading the fingers lightly, slightly broken at the joints. From there hands should be placed in a position that works with the image.
It is important to realise that a person’s hand is almost the same size as their face, and so we do not want open hands, palms, and backs of hands in full view close to the face.
(Click Image to View Full Size)
Under the chin, over the shoulder, to the side or through the hair are some common positions for hands.
(Click Image to View Full Size)
As shown below, the fingers need to be slightly curved, and slightly apart, only just touching the face or hair, and not pressing against anything.
(Click Image to View Full Size)
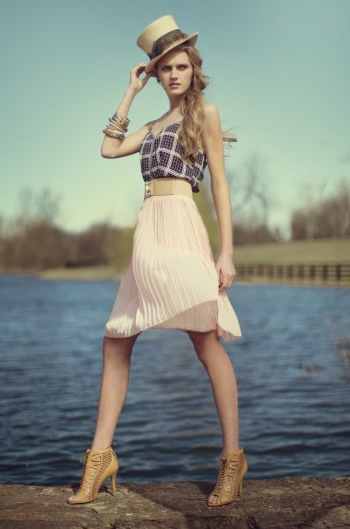
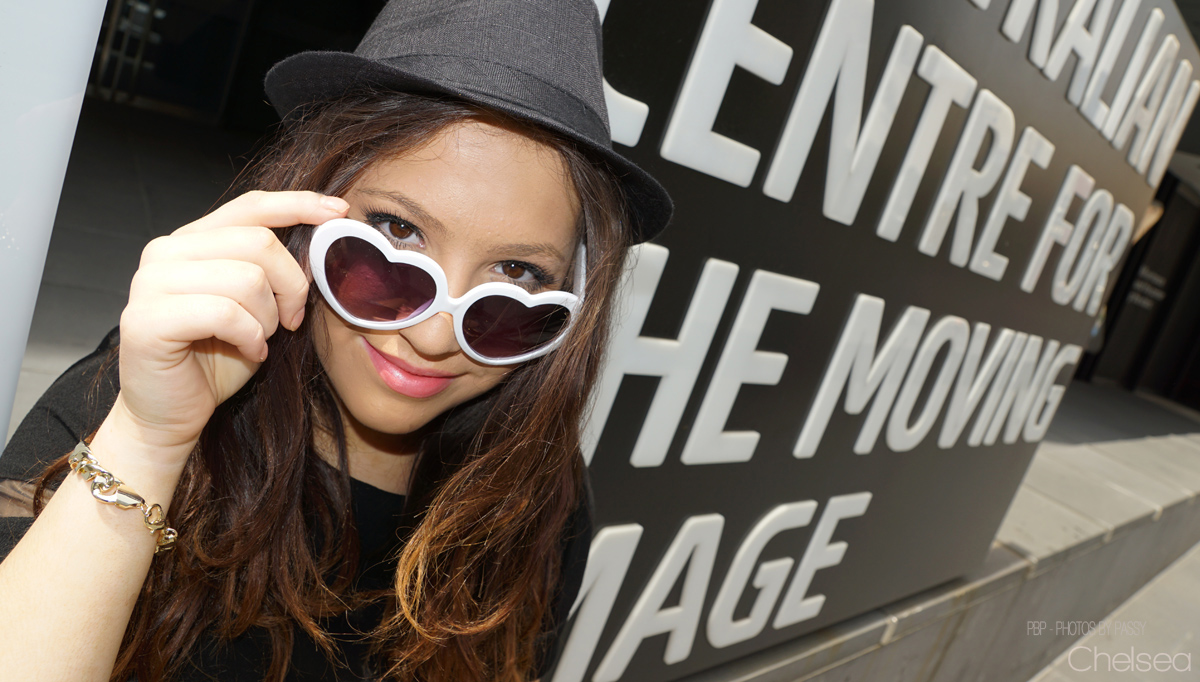
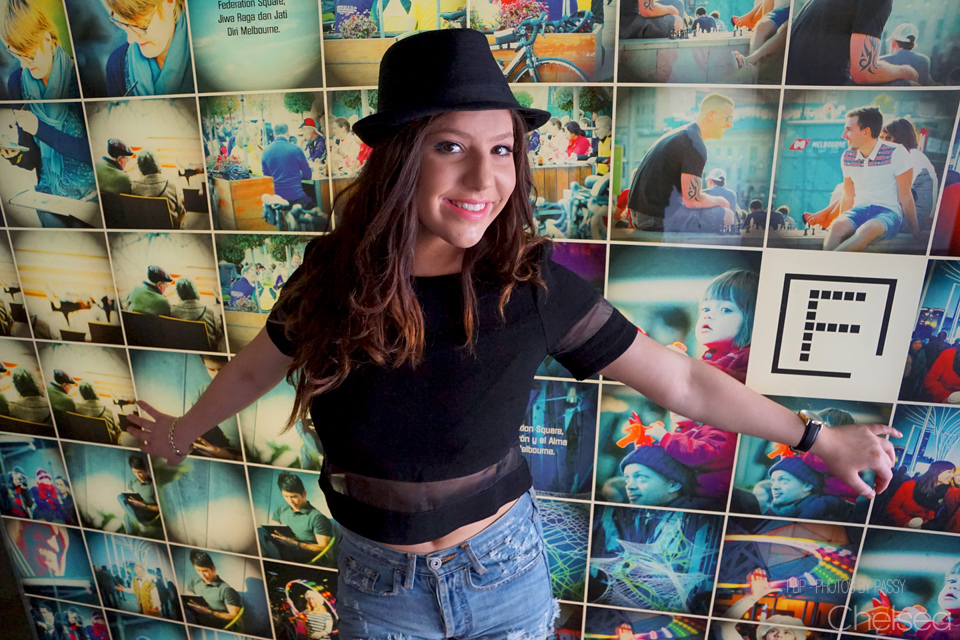
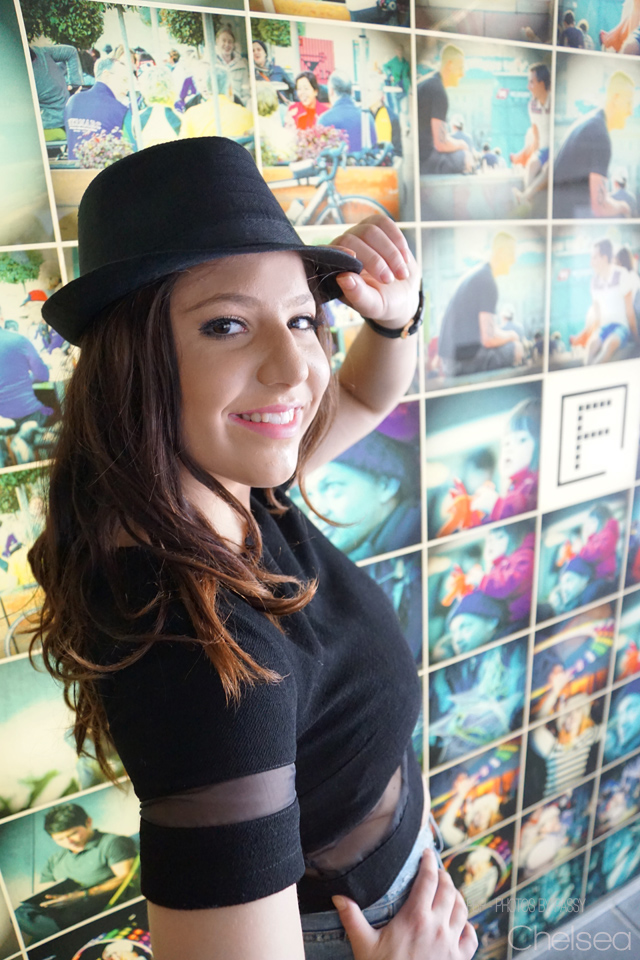
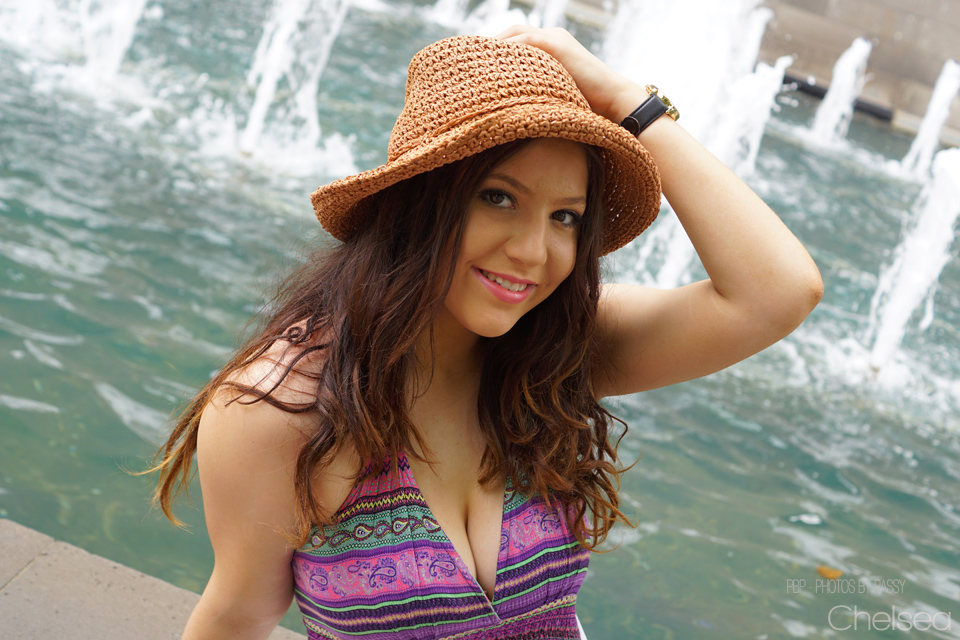
8) Using Props
Hats are awesome to use in Portrait photos. Build up a collection of them from second hand clothing shops.
(Portrait Photo by Clay Cook)
The following Portrait works well with the black 80’s Gloves and Black Trouser Braces against the white outfit on the model.
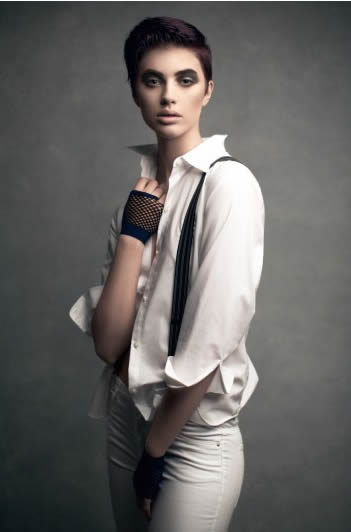
(Portrait Photo by Clay Cook)
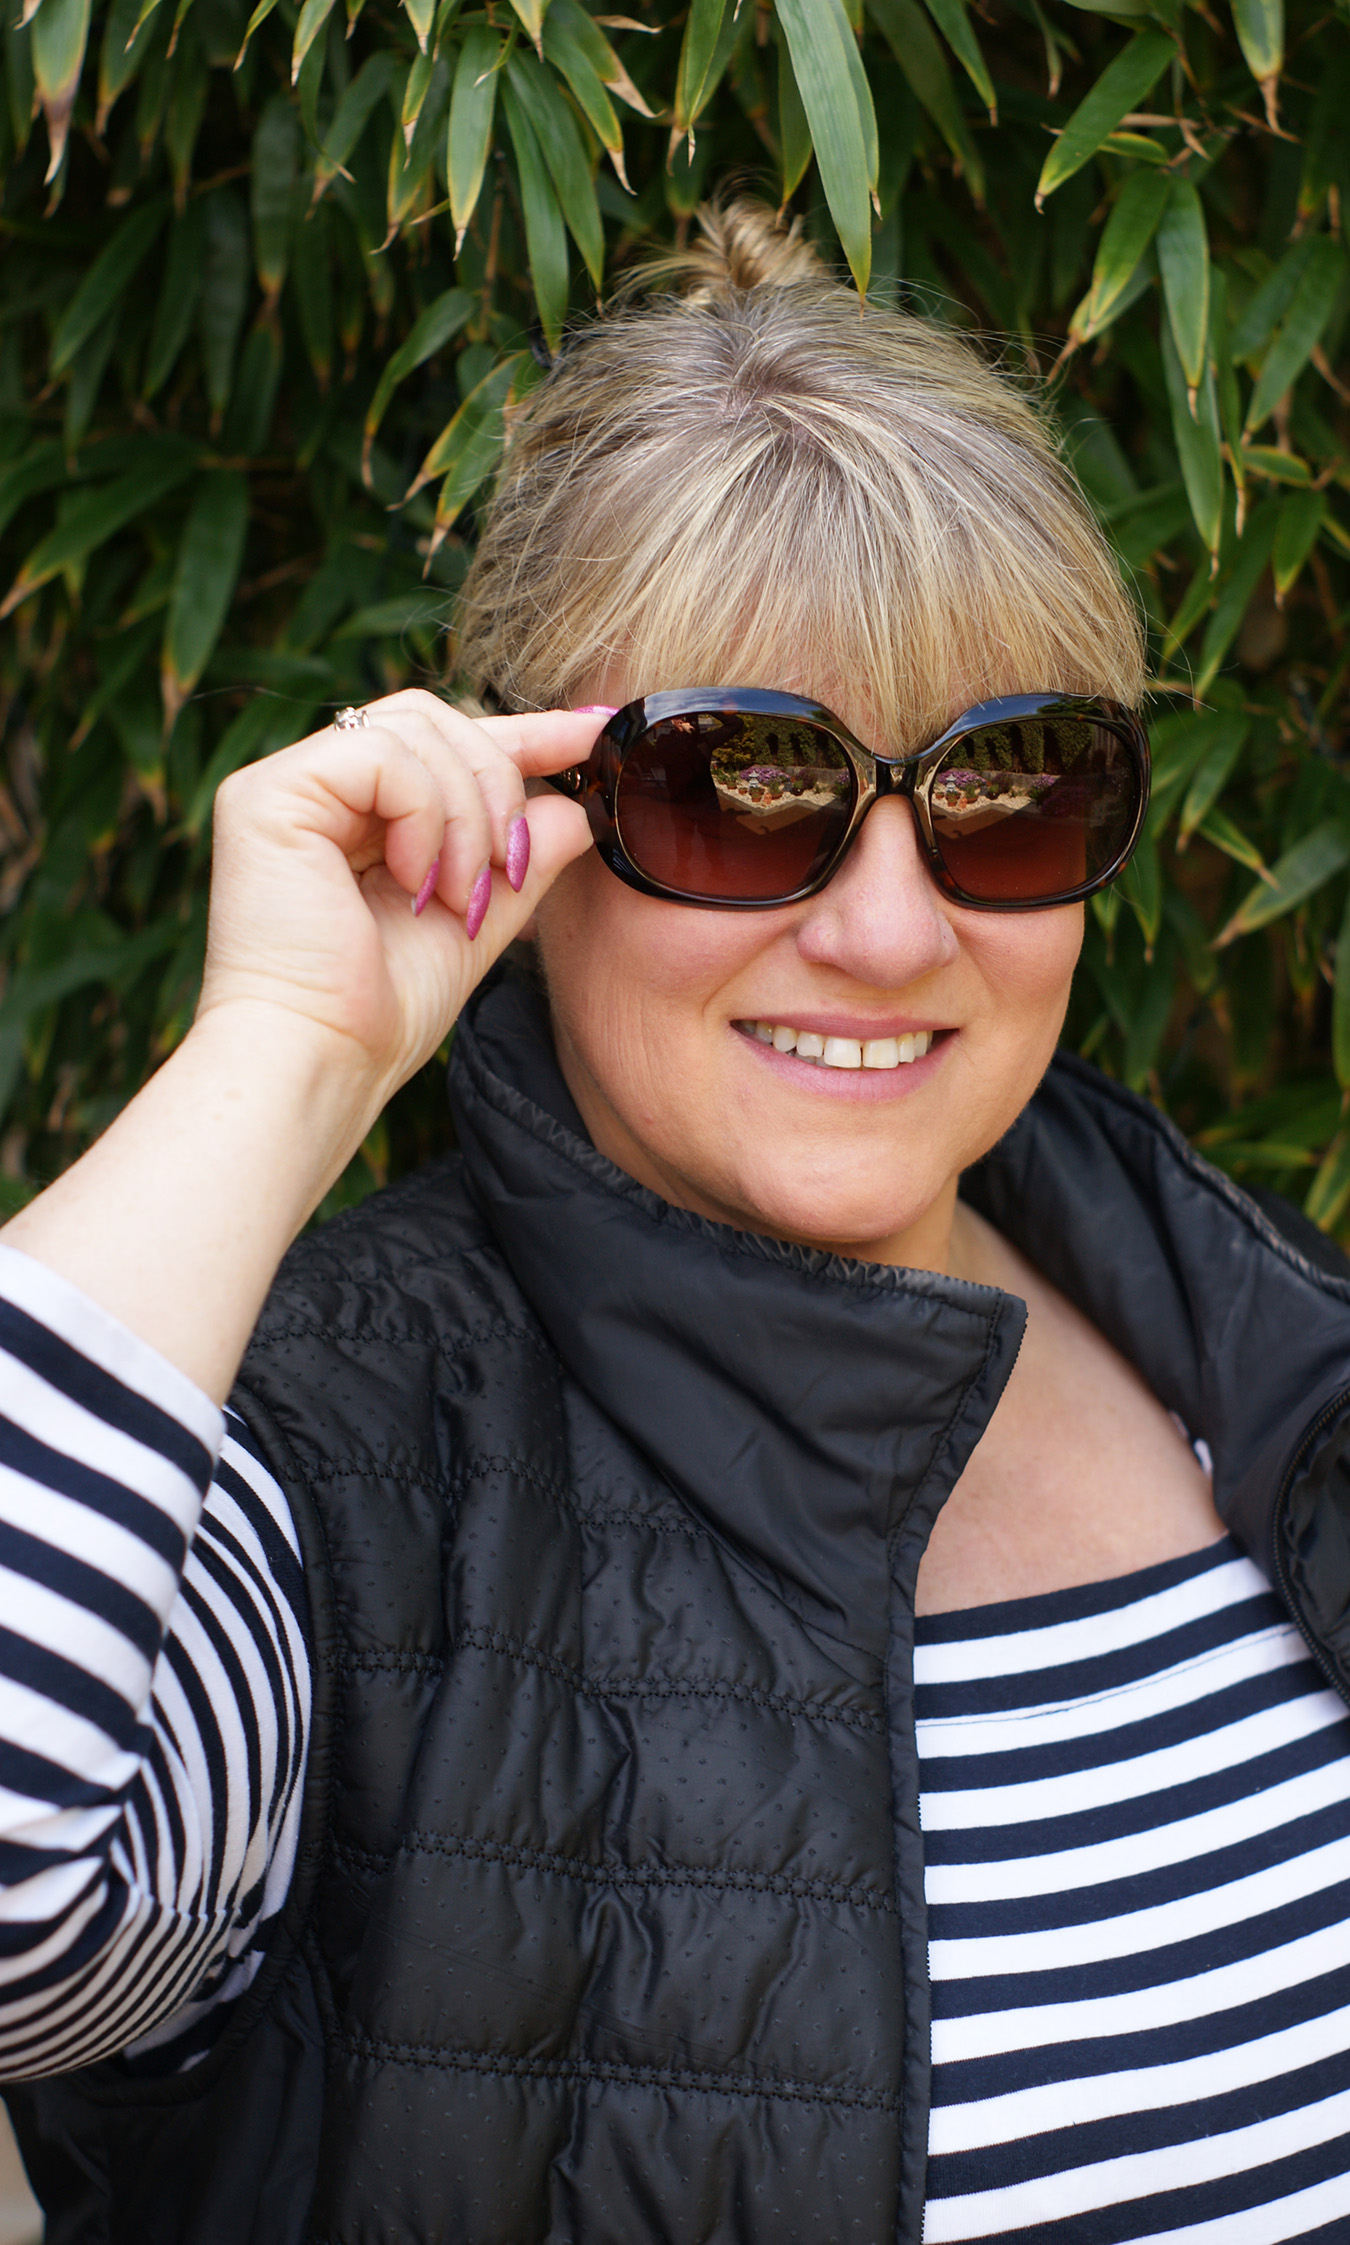
Sunglasses are also another great prop that can be used in Portrait photos.
(Click Image to View Full Size)
The sunglasses above were purchased at a second hand shop, it is a good idea to have some sunglasses as props to take along to outdoor shoots.
(Click Image to View Full Size)
Interesting jewellery (ear rings and necklaces) can add to a Portrait shot.

(Click Image to View Full Size)
Handbags and Purses are another great prop which can add interest and solve the problem of what to do with the hands.
(Click Image to View Full Size)
If a subject is wearing a jacket, then we can do a pose where they pull lightly on the lapels.
A cup of coffee or a drink in the hand is another good prop that can be used for casual portraits at social functions.
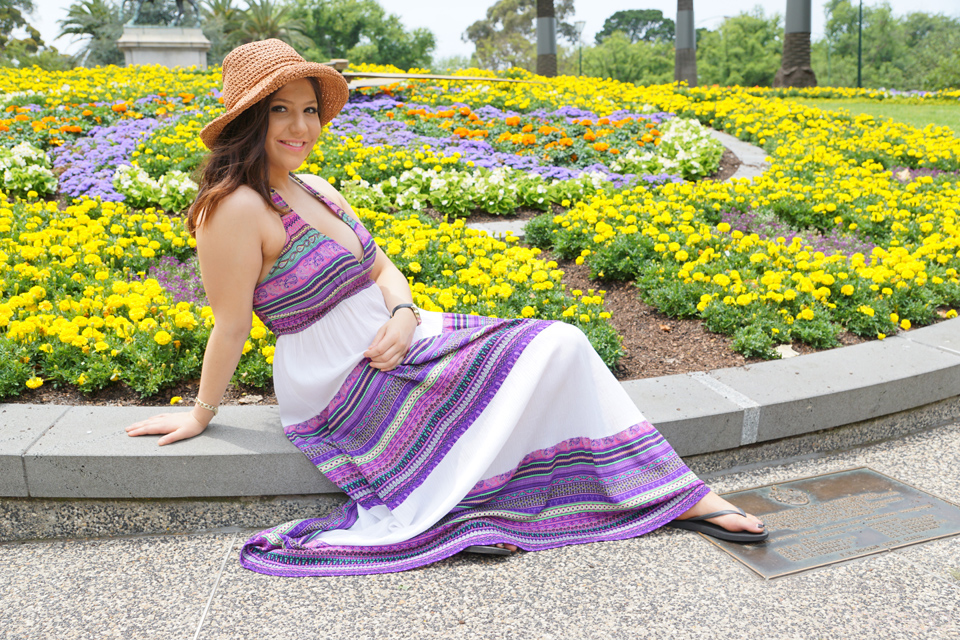
9) Sit and Lean In
The approach here is to have the subject lean her face in towards the camera. This works well if the model is seated and will emphasize the face and hair. The subject leans her face towards you, parallel to her bent knees if she is sitting. This elongates the neck, defines the chin, and let’s her hair fall down, away from her body making it look voluminous. Watch the curve in her shoulders and back, make sure she doesn’t slouch.
Shoot from above around to the side so that her shoulder is at 45 degrees (the two thirds angle) to camera.
(Click Image to View Full Size)
In this second example we have the model leaning in towards us, with right hand side hair forward, and left hand side hair back.
(Click Image to View Full Size)
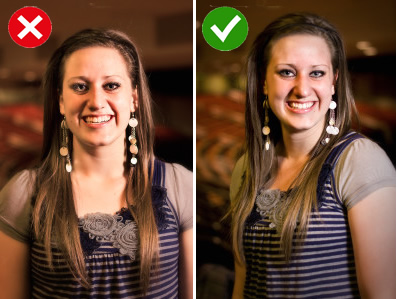
10) Use Slimming Poses
No matter what size a woman is, it is more likely than not, that she wants to appear thinner. Have her bring a shoulder to the front and turn her head toward you. Shoot slightly from above and this creates nice angles that focus on her face and make the body look slimmer.
Any body joint bent (arms and legs) automatically looks slimmer. Never have arms straight and pressed against the body, or crossing over the body close to the camera.
If a person’s arm looks fat, they will think they look fat. Even slender women can get “fat arms” if they are positioned poorly. If she is leaning her weight back on an arm, it needs to be bent and positioned slightly away from her body. Do not let it protrude out so it looks double jointed, this pushs the arm muscle to bulge in the back of the arm. A bent anything always looks slimmer.
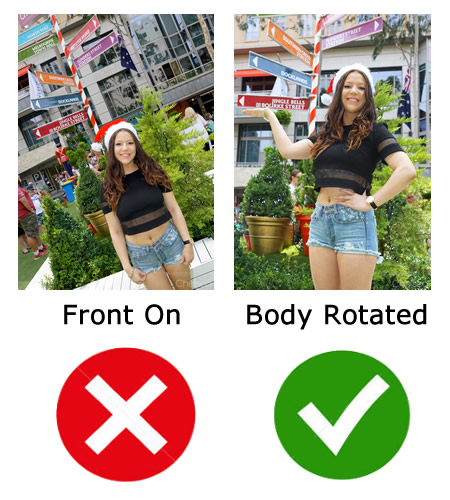
Never shoot front on.
Arms and hands look overly big if they are the closest items to the camera. In the image below the arms and hands are positioned very badly. They should have been kept down to the side and bent with an open gap in between them.
(Click Image to View Full Size)
Arms bent with hands down lower away from the face gives a much better look.

(Click Image to View Full Size)
Bending the legs and taking the arms away from the body and also bending them creates a significant slimming effect.
A hand on the waist will help make it look smaller, as will that space between your model’s arm and torso when the arm is bent by doing this.
Have her drop the other arm slightly behind her body while turning towards the camera at that 45 degree angle. Or have the other arm on the other hip so the hand is just visible.
Instructions to the model are to Position her body 45 degrees and put the arm closest to the camera on her hip.
Then plant one foot slightly in front of the other, point her front foot toe to the camera and place her weight onto her back leg.
This classic celebrity red carpet pose ensures that the subject’s upper arm isn’t smooshed against her body making the arm look flattened and thus larger.
If the hand-on-hip pose is a bit forced and unatural to the model, get her to hold her arms out from her sides ever so slightly.
Never let the arms just hang against the subject’s side, because this will make her look wider.
Never have a side on view of arms pressed straight down against body as then the arms can look very large.
The images below show how this weight on back foot, leg bent, hands on hips slimming pose works.
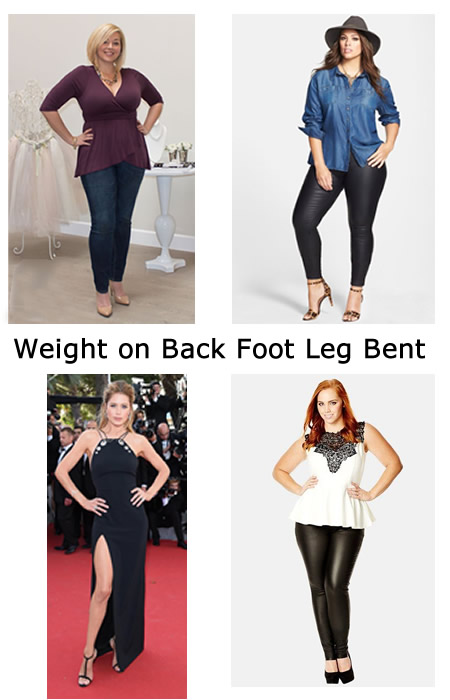
Note that the hand on hip corresponds to the weight bearing leg arm, if only doing one arm, and that he hands are still visible when on the hips.
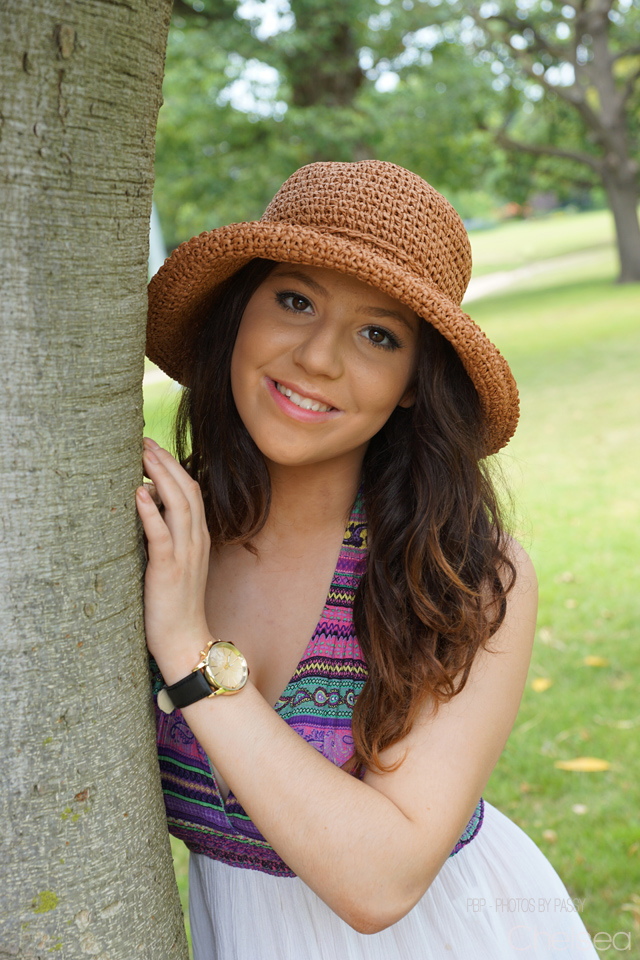
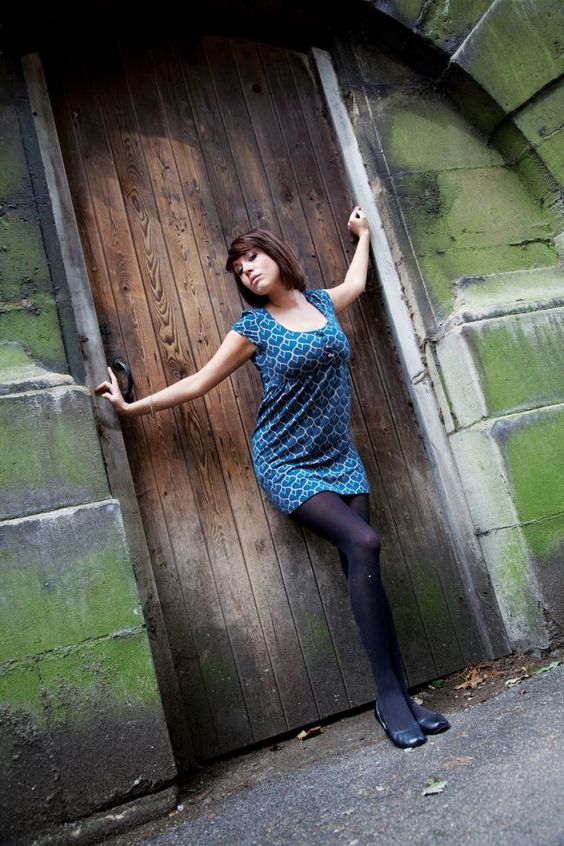
11) Using Trees Walls and Doors
Trees can be used as part of an outdoor portrait. Note in the example below we also have the fingers with a light touch and slightly curved, as per the “Hands Rule” described previously.
(Click Image to View Full Size)
Walls can also be used in Portraits.
(Click Image to View Full Size)
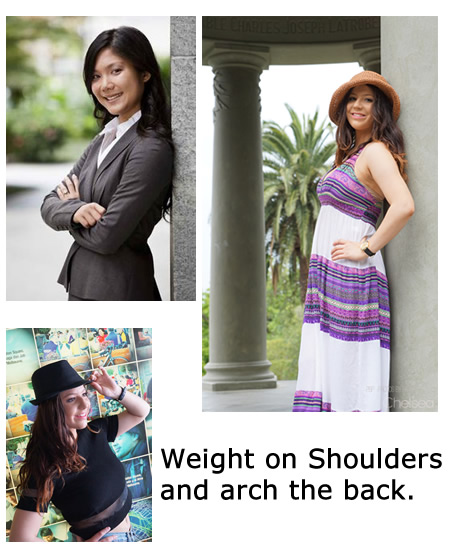
If we have a model sideways against a wall, then we can get her to arch her back while supporting her weight on her shoulders and this provides a flattering curvy result.
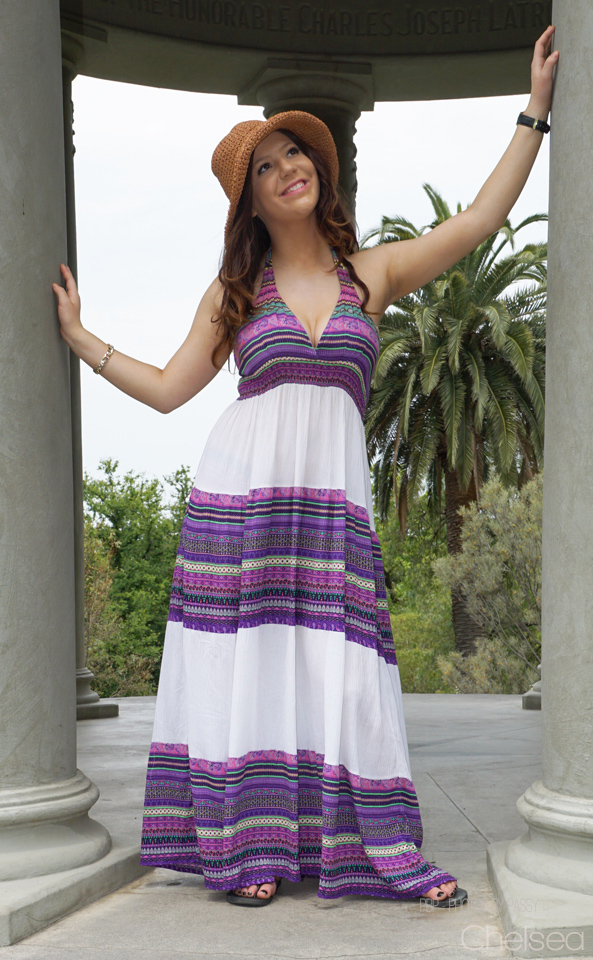
Doorways and Columns can also be used as posing aids for full length portraits.
(Click Image to View Full Size)
Note that in doorways we have one arm up and the other one down, with head tilted towards the lower arm, and the lower arm’s hip swung out. This makes a great curvy elegant look.
(Click Image to View Full Size)
12) Sideways Looks
When we have the subject move their eyes to give a sideways look, often the eyes are moved all the way across, which creates too much whites of the eyes visible.
For example, the portrait below could have been a good shot, but look at the far away eye and how much white there is visible. It is too much.
(Click Image to View Full Size)
The sideways glancing pose is a difficult one to get right. We really need to be concentrating when we get the pose happening and the shot lined up.
In the image below we have our subject looking sideways, but not all the way, and the eyes look so much better.
(Click Image to View Full Size)
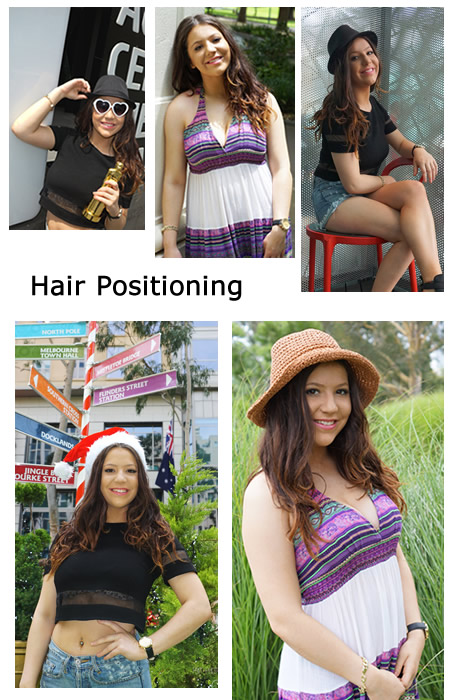
13) Position The Hair
Hair sitting on the shoulders does not look good. It is best to have the hair with one side forward and one side back. Often it is best to try both combinations of forward and back, as the natural part in the hair will favour one combination over the other.
Alternatively depending on the model and the shot the hair can be pushed back, or forward on both sides. This is explained at “photography.tutsplus.com” using the following diagram.
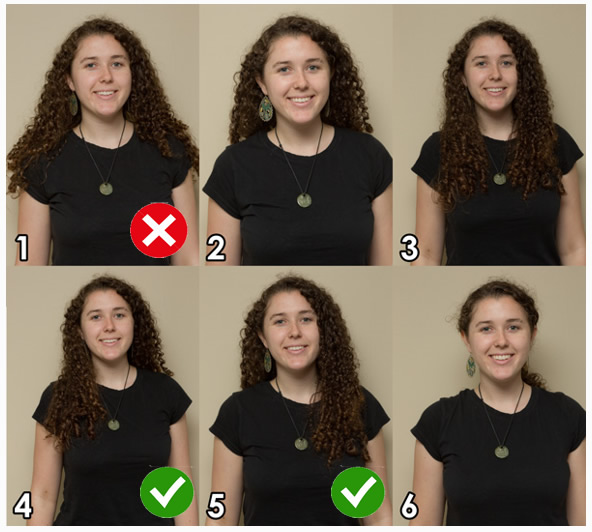
(Click Image to View Full Size)
Hair position Number 1 should not be used, 4 and 5 are good to use, 2, 3, and 6 are okay to use in the right situations.
There is a link to the “photography.tutsplus.com” article in the “Further Reading” section later on.
Here are some Photos By Passy images showing hair positioning.
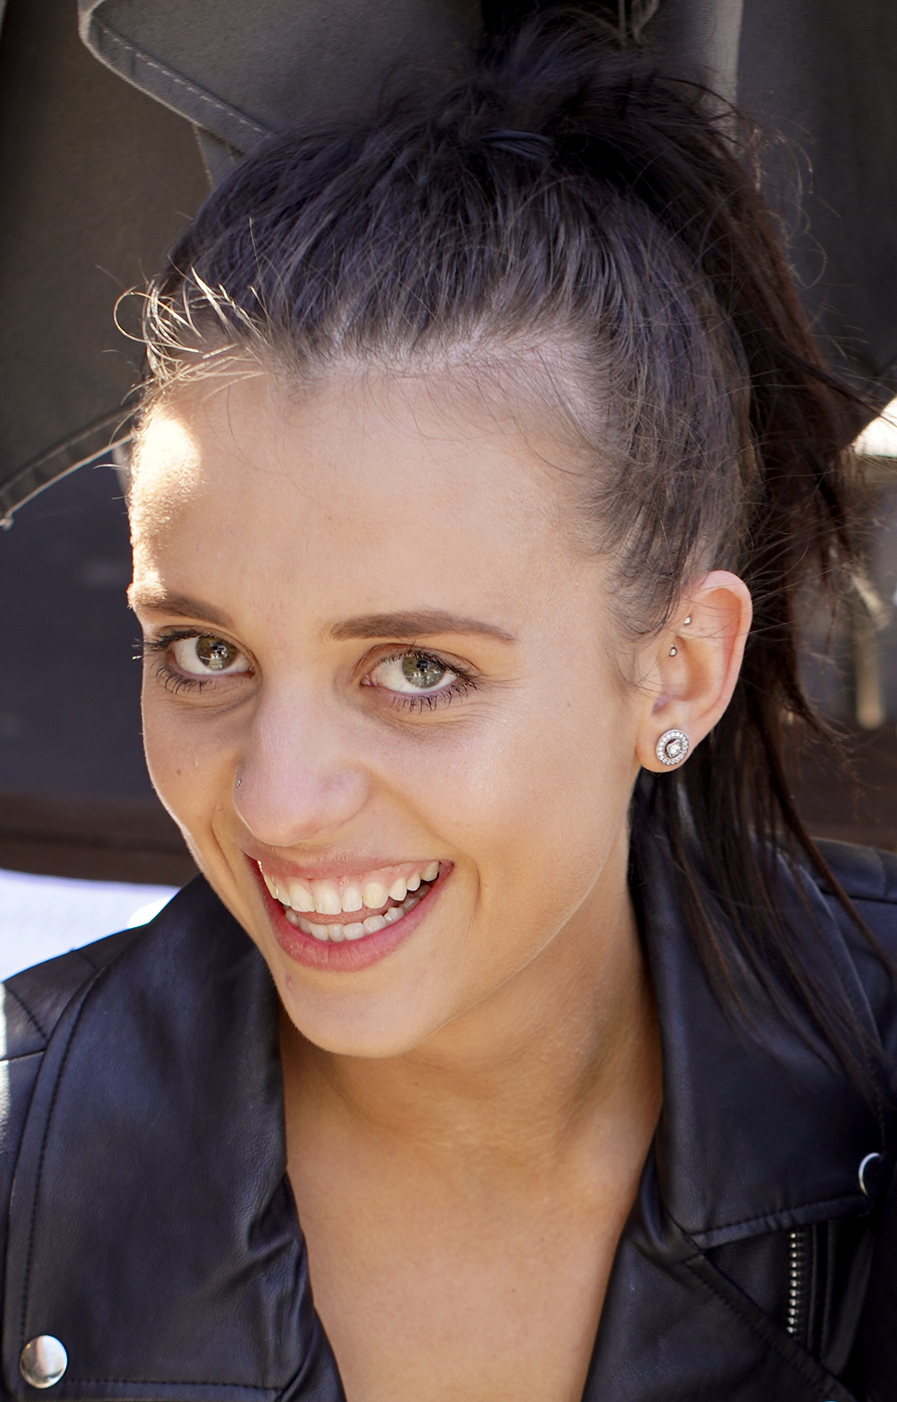
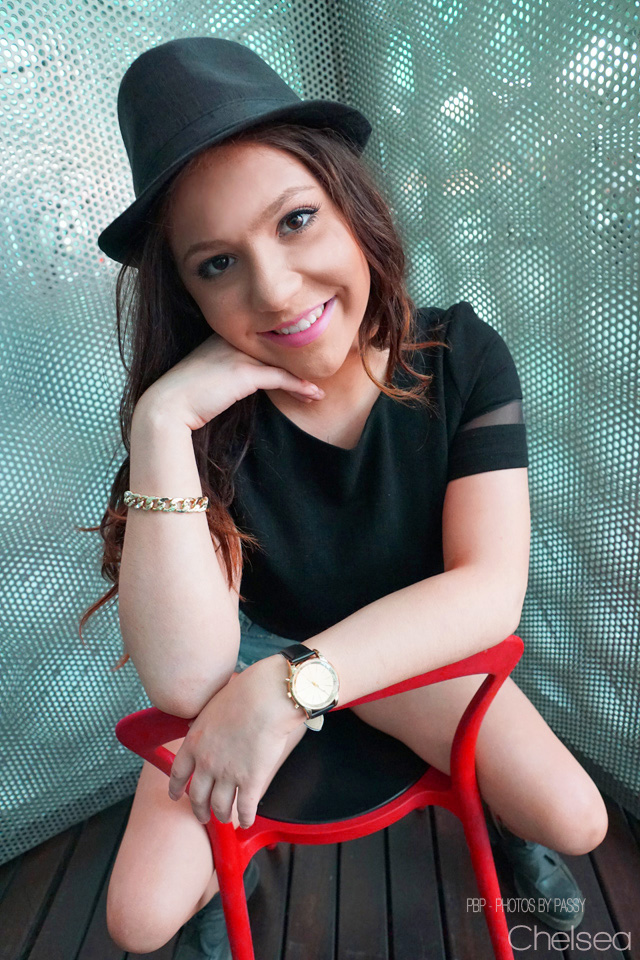
14) Use The Favoured Side
From taking selfies, a lot of women will know that they have a “favoured side” which looks best. This might be because the teeth look better on one side than the other, or just because the face looks better on that side.
Although people look identical on both sides of their faces, there is often one side which looks better than the other.
Make sure that you ask your subject which side is her favoured side and take all the shots from that side wherever possible.
In the images below, our model Chelsea has her right hand side as her favoured side.
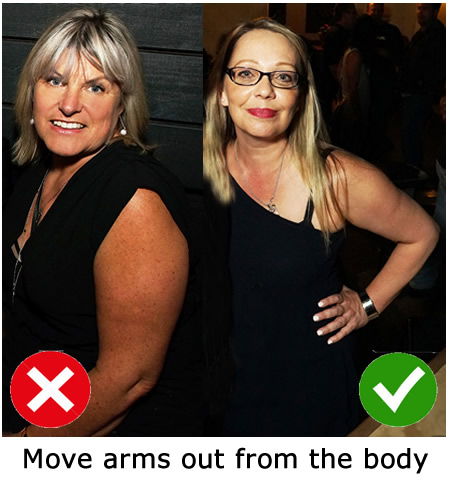
15) Gaps Between the Arms
Arms can look oversized in photos and these tips from “photography.tutsplus.com” are an excellent way to remedy this.
When people stand naturally they tend to stand with their arms flat at their sides. This causes several problems. First, it makes them look awkward and uncomfortable in the photo. Secondly, their arm presses against their body which squishes the arm out and makes it look larger than it actually is.
As shown in the example below with the red measuring line, it is amazing how much thickness is added to the arm when it hangs down against the subject’s body.
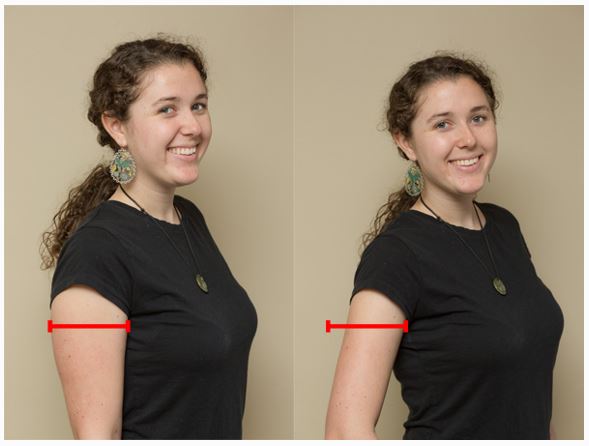
(Click Image to View Full Size)
As shown above the arm thickness problem is solved by having the subject lift their arm out from their body, or place their hand on their hip.
When we have people move their arms out away from their body, typically by placing their hands on their hips, it is important that we can see both gaps between their bent arms on each side.
This is shown clearly in the example images below from “photography.tutsplus.com”:
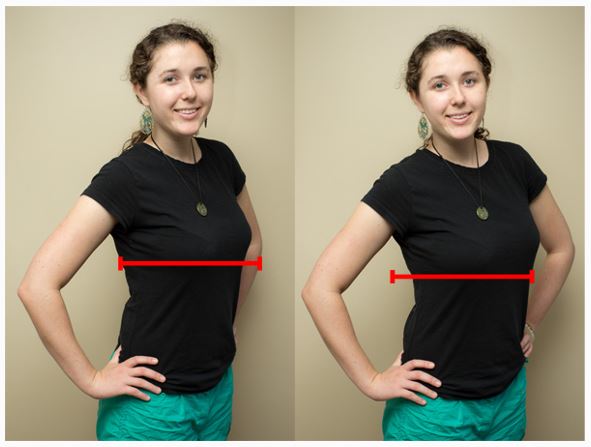
(Click Image to View Full Size)
As shown by the red line in the diagram, without a gap showing for the far away arm, the subject’s body appears to be a lot wider. By having both gaps between both arms and the waist clearly visible we create a definite curvy and slimming effect.
So remember to get arms moved out from the body, especially when they are the closest object to the lens.
One final problem with arms occurs when the model rests their weight on an arm.
The arm can appear to bend backwards and look double jointed, as in the image below.
(Click Image to View Full Size)
In cases like this we need to get the model to bend the arm slighty so that it looks perfectly straight.
16) Cross the Legs
Models on the catwalk are trained to do a walk where they continually cross their legs over each other in an X pattern. This makes them look taller and accentuates curves.
For full length portraits of larger ladies, have them cross their legs over which creates a nice slimming effect.
We can clearly see the effect of doing this in the Before and After images below.
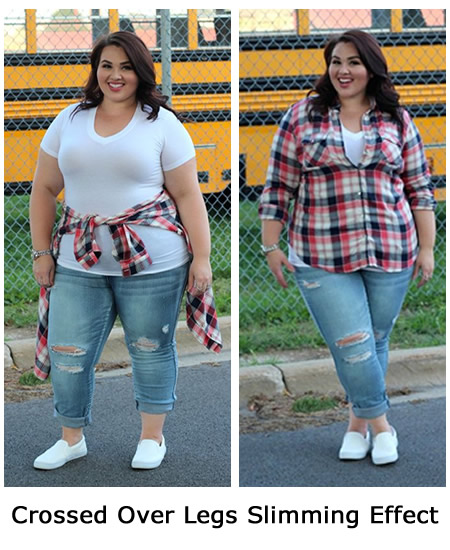
Here are some further examples of the effectiveness of the cat walk X shaped crossing over of legs.
The leg cross method works because the leg in front obscures part of the leg behind and thereby makes both legs look slimmer.
This rule is also called “Crossing the Ankles”.
As shown previously crossing the ankles is used for standing shots, even when the shot is going to be cropped later above the knees. This makes the bottom of the cropped shot look much better.
Eg. Ff the subject is being shot straight-on (for a street style looking picture) have the subject cross her legs, starting at the calf.
This ankles crossed stance will make the hips look narrower and the legs look longer, plus it looks a bit more casual.
The same pose also works when the subject is sitting.
An alternative for large sized legs is to use the knee bend, with weight resting on the non-bent leg as discussed in the slimming rules previously.

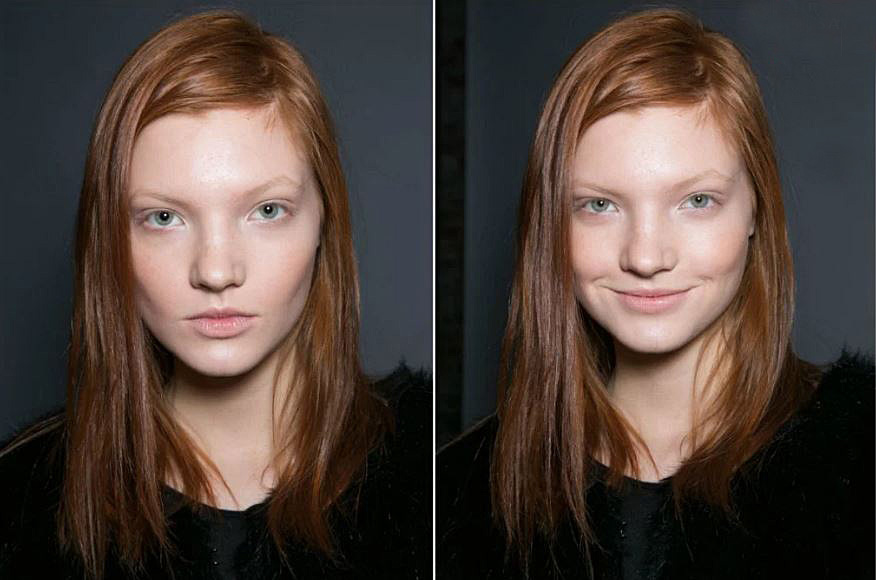
17) Getting a Natural Smile
Smiling too wide on purpose causes the face muscles to tense up, the eyes to squint, and the cheeks to puff out, which does not make for an attractive photo.
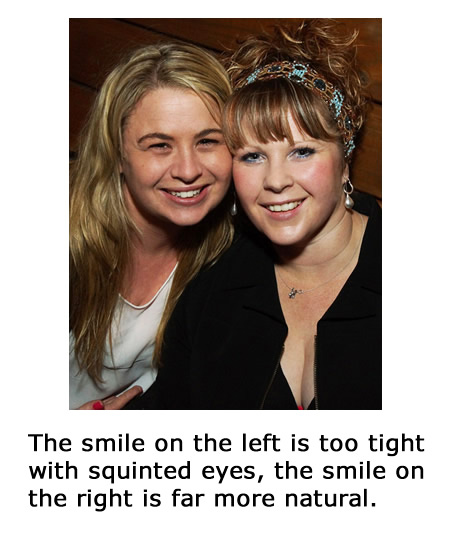
When people smile naturally, the area around the eyes tends to crease a bit, which looks much more sincere than a forced contrived smile with just the mouth.
Get the subject to relax their face and open their mouth slightly, so that a more natural smile results.
For people who do not have great teeth for smiling, smile with the lips and the eyes, as shown below.
(Click Image to View Full Size)
18) Maintaining Good Posture
Standing up straight makes a significant difference and gives an aura of confidence and good health.
It also helps elongate the subject in photos.
After a few shots people can tend to start slumping and slouching, so Posture needs to be constantly monitored throughout the shoot.
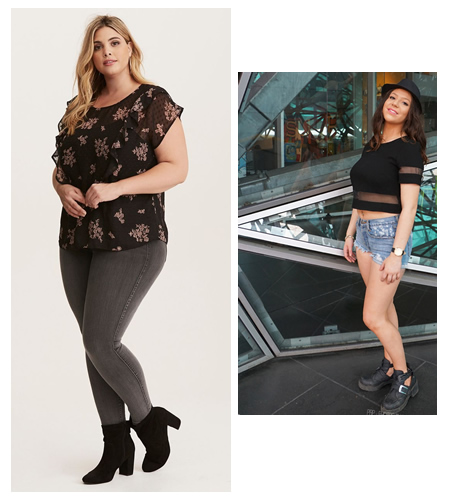
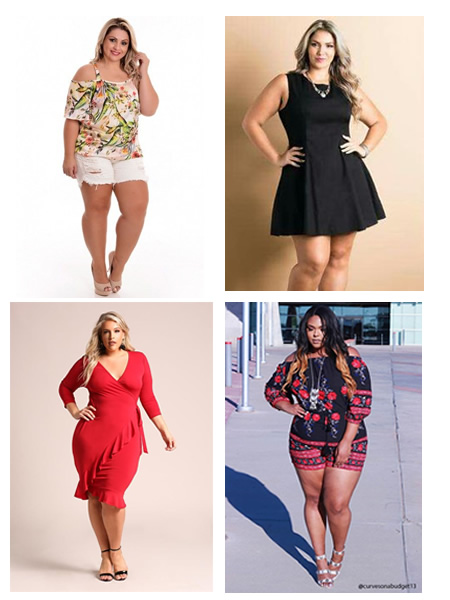
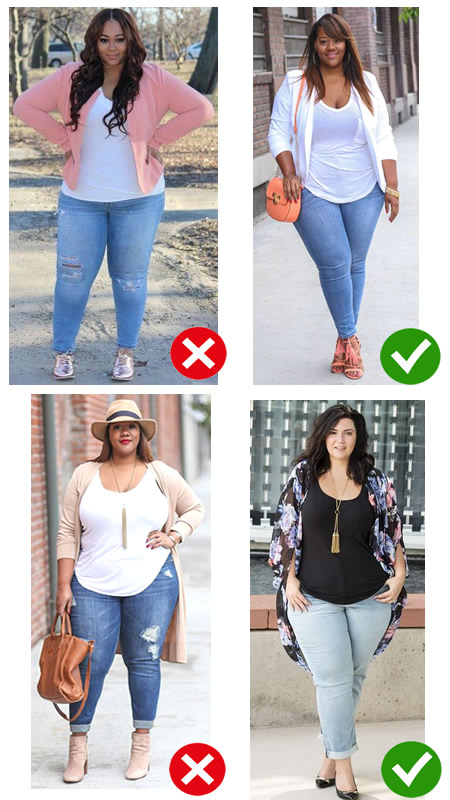
Photographing Curvy Women
Large curvy women can be made to look slimmer using a number of the rules discussed previously in this article.
The right kind of flattering outfit is a good start.
Obviously, horizontal stripes on a curvy model aren’t going to help her look slimmer.
Darker colors are more flattering and slimming, and long sleeves can help deaccentuate larger arms.
Curvy people sometimes dress a size or two too big to hide their curvy figures, but this often has the opposite effect: it can make them look larger than they actually are.
Clothes that fit are going to be much more slimming than clothes that don’t.
There are a number of great tips for photographing curvy women in the following article.
Tips for Photographing Curvy Women
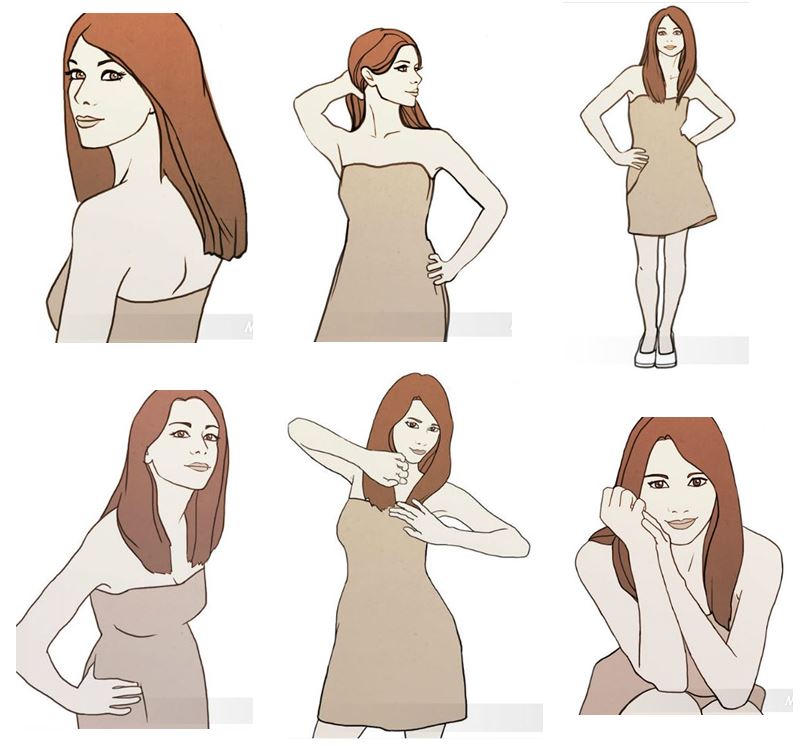
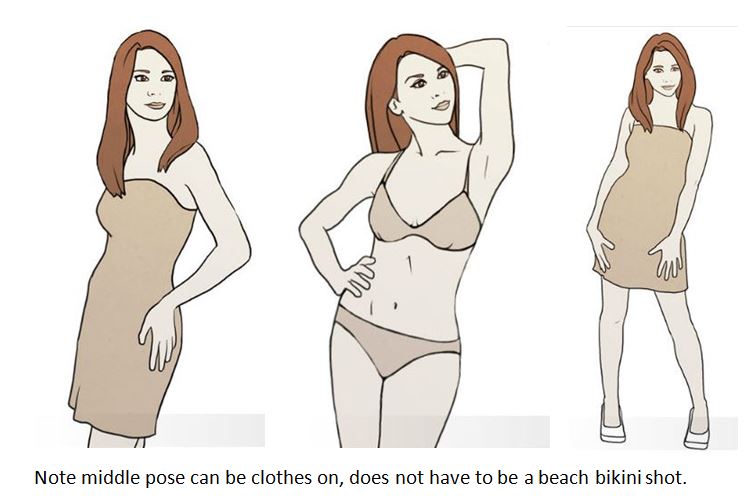
Classic Modelling Poses
Here are fifteen classic modelling poses that could be used if you are stuck for ideas during a shoot.
(Click Image to View Full Size)

(Click Image to View Full Size)
(Click Image to View Full Size)
Read the full article about these fifteen classic poses which also includes a real life model performing each of them at the link below.
Fifteen Classic Modelling Poses
There are many other great poses and ideas in the “Further Reading” section later on in our article.
Pinterest Board of Examples
Check out our Pinterest Board of over 100 female modelling shots and poses at the link below.
Female Portraits Pinterest Board
Camera Equipment for Portraits
A telephoto lens (85mm or 135mm F1.4) or a long range zoom (70-200 F2.8) is really essential for portrait photography, as the shorter the focal length of your lens the greater the potential for unwanted distortion.
An 85mm F1.4 lens is perfect on a full frame camera for portraiture as it enables half-length portraits to be taken from a comfortable distance away from the subject of around 2 to 3m, so you can direct your subject without crowding in and making them feel awkward.
On a cropped sensor camera, use a 50mm lens that will give you an equivalent of 75mm focal length.
Use open apertures of F1.4 through to F5.6 to get background blurring behind subjects. Be careful using F1.4 wide open as it can be easy not to have both eyes fully in focus.
The latest Sony Cameras like the A99II have a special eye autofocus feature which make them fabulous for doing Portrait Photography.
Read the following article all about the best type of lenses to use for Portrait Photography:
Best Lenses for Portrait Photography
Also go through the following multi page article which discusses Aperture, Shutter Speed, ISO, and Exposure Compensation:
Camera Settings for Portrait Photography
Here is a great article by Mark Galer about using Sony Cameras for Portrait Photography.
Sony Camera Settings for Portraits
Lighting for Portraits
In regards to lighting, it is vitally important to produce great quality indoor and outdoor portraits.
This four minute video shows how to effectively use fill flash from the camera combined with sunlight or shade in outdoor portraits.
This next video shows how to use Diffusers and Reflectors.
The following video shows how to use a budget umbrella off-camera flash for doing indoor portraits.
Videos About Portrait Photography
We have selected a series of videos that reinforce the posing rules we have listed previously, as well as give great tips on how to shoot female portraits.
This eight minute 10 Tips for Posing video is well presented with the Photographer working with a female model.
This next thirteen minute video from @caliallstaring from Instagram gives some good tips about how to run the Photo Shoot and communicate with the subject.
The next seven minute video from Tony and Chelsea Northrop shows some great lighting tips and techniques for shooting outdoor portraits.
This next five minute video has an older experienced guy talk through a shoot and discuss what is good and wat is bad, with the photo results showm each time.
In the following four minute video, the photographer shows how to start with the basic one hand on hip and ankles crossed over pose, and from there build up lots of other poses by continual repositioning. A great way to start off a shoot and get the subject comfortable and following directions.
Further Reading
The articles below are the hand picked best of what we found on the web about female portrait photography.
It was from these articles that many of our “Portrait Rules” have been either discovered or distilled.
We highly recommend that you read through all of these articles to reinforce and add to the information that we have already presented.
This first article is really good as it has seven fundamental tips for non-models to follow when doing portrait poses.
Seven Fundamental Posing Techniques for Non-Models
This next article shows sketches and real life examples of 15 great modelling poses to use for females.
Digital Photography School has hand drawn digrams with suggested poses and comments about them.
Twenty One Standard Modeling Poses for Females
There is then a Part 2 with 21 more additional hand sketched poses:
Twenty One Additional Modeling Poses for Females
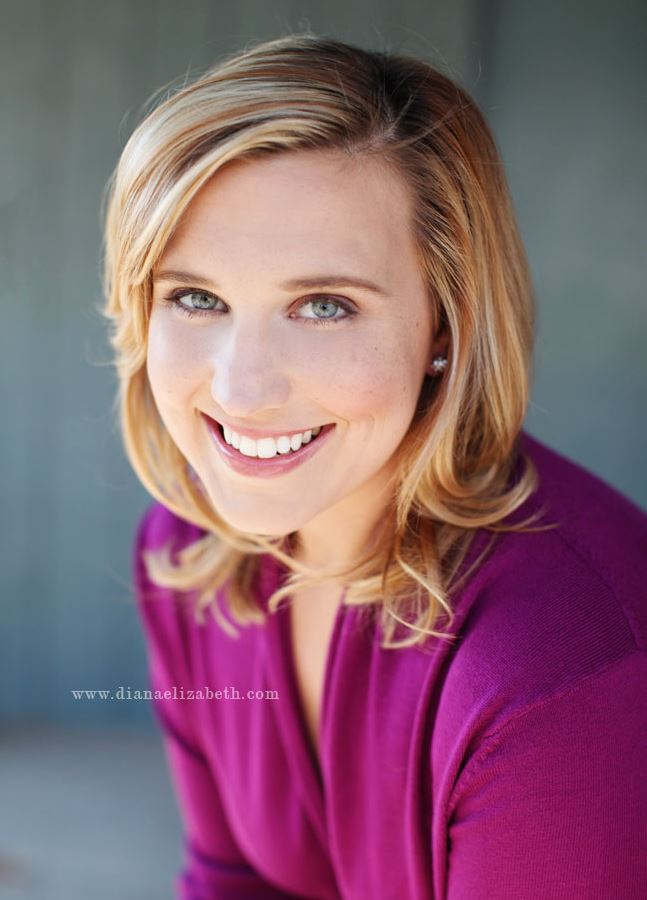
There are some interesting Posing tips in this article whcih is written by female photogapher Dianne Elizabeth.
Dianne Elizabeth Female Portrait Posing Tips
Check out Clay Cook’s Top 10 Female Posing Tips Article.
Clay Cook’s Top 10 Posing Tips
The following web page has an amazing photo gallery of before and after modelling photos.
(Scroll down the page to the gallery of thumbnails and then click on any photo to start the slideshow).
Gallery of Before and After Portrait Images
This next article has seven solid portrait taking tips.
Portrait Posing Tips By Dustin Olsen
Read the following article which has 101 pointers and tips about Portrait Photography.
The following web page has 25 example female portraits covering a range of different looks and styles.
Twenty Five Example Female Portraits
This next article has 10 tricks women should know about posing for photos.
10 Tricks Women Should Know About Portrait Photos
Even if you are not a portrait photographer, many of the concepts presented in this article can be used for any photos involving people.
At Photos By Passy we are by no means fully experienced with portrait photography yet, but plan to steadily implement all of the rules in this article and see how this improves our results.
Like and Follow Photos By Passy on Facebook and Instagram.
We are always trying to do things that many photographers are not doing, and constantly trying to make incremental improvements to our photography and share our knowledge with others.
Check out our website “How To” page for many other articles about Photography as well as Photoshop, Camera Raw, Video Making, Adobe Premiere, Sony Cameras, and Lightroom.
Enjoy,
Passy